
How to Make a Stunning Yule Log Cake (It’s Easier Than You Think!)
Let’s talk about the final boss of holiday desserts. The one that sits on the table, looking all majestic and complicated, making every other cookie and pie feel a little insecure. I’m talking, of course, about the legendary Yule log cake, or Bûche de Noël if you’re feeling fancy. It’s a chocolate sponge cake, rolled up with a creamy filling, and slathered in chocolate frosting to look like a rustic log. It looks like something that requires a pastry degree and a small miracle to create, right? Wrong. What if I told you that you, yes YOU, could make this stunning centerpiece? We’re going to break it down, step-by-step, and demystify this beautiful beast of a cake. Prepare to unlock a new level of baking badassery.
Why This Yule Log Cake Recipe Is Your Holiday Power Move
This isn’t just a cake; it’s a statement. It’s the dessert you make when you want to win Christmas. Here’s why you should absolutely tackle it this year.
It’s the Ultimate Showstopper

Seriously, nothing else on the dessert table stands a chance. A Yule log is pure edible art. When you carry this out to your guests, you’ll be met with gasps of awe and admiration. They’ll think you’re a baking wizard, and who are we to correct them?
A Triple Chocolate Threat
This cake is a chocolate lover’s absolute dream. It features a light, airy chocolate sponge cake, a sweet and simple whipped cream filling, and a rich, decadent chocolate ganache frosting. It’s chocolate on chocolate on chocolate, and it is glorious.
It’s More Forgiving Than It Looks

Here’s a little secret: a Yule log is supposed to look like a rustic log from the woods. So if your cake cracks a little when you roll it? Who cares! Slap some more chocolate frosting on it and call it “texture.” Any imperfections just add to its charm. It’s the wabi-sabi of the cake world.
The Ingredients for Your Masterpiece

This recipe has three main parts, but the ingredients are all straightforward.
For the Chocolate Sponge Cake
- All-Purpose Flour: ½ cup, plus more for dusting.
- Unsweetened Cocoa Powder: ¼ cup.
- Large Eggs: 4, separated into whites and yolks.
- Granulated Sugar: ¾ cup, divided.
- Vegetable Oil: 3 tablespoons.
- Water: ¼ cup.
- Vanilla Extract: 1 teaspoon.
- Baking Powder: 1 teaspoon.
- Salt: ¼ teaspoon.
- Powdered Sugar: For dusting and rolling.
For the Simple Whipped Cream Filling
- Heavy Whipping Cream: 1 ½ cups, cold.
- Powdered Sugar: ½ cup.
- Vanilla Extract: 1 teaspoon.
For the Rich Chocolate Ganache Frosting
- Semi-Sweet Chocolate Chips or Chopped Chocolate: 8 ounces.
- Heavy Whipping Cream: 1 cup.
The Necessary Tools & Kitchen Gadgets
This recipe does require a few specific items, but they’re all great to have in your baking arsenal.
- 10×15-inch Jelly Roll Pan: This is just a rimmed baking sheet of a specific size. It’s key for getting the right cake thickness.
- Parchment Paper: Absolutely essential. The cake gets baked on it.
- Electric Mixer: A stand mixer or a powerful hand mixer is a must for whipping the egg whites and cream.
- A Clean, Lint-Free Kitchen Towel: This is your secret weapon for rolling the cake.
- Offset Spatula: For spreading the filling and frosting like a pro.
- Various Mixing Bowls, Whisks, and Spatulas: The usual baking crew.
Step-by-Step Instructions: Conquering the Log
Take a deep breath. We’re going to break this down into manageable stages. You’ve got this.
Stage 1: Bake the Spongy Cake
Preheat your oven to 375°F (190°C). Grease your 10×15-inch jelly roll pan, line it with parchment paper, then grease and flour the parchment paper. Yes, all of that. It’s insurance. In a large bowl, beat the 4 egg whites with your electric mixer on high speed until soft peaks form. Gradually add ½ cup of the granulated sugar and continue beating until you have stiff, glossy peaks. In a separate bowl, whisk together the 4 egg yolks with the remaining ¼ cup of sugar. Whisk in the oil, water, and vanilla. In a third bowl (I know, sorry about the dishes), whisk together the flour, cocoa powder, baking powder, and salt. Add the dry ingredients to the yolk mixture and mix until just combined. Now, gently fold about one-third of the whipped egg whites into the chocolate batter to lighten it up. Then, fold in the remaining egg whites until just combined. Do not overmix! You want to keep all that lovely air you whipped in. Pour the batter into your prepared pan and spread it evenly. Bake for 12 to 15 minutes, or until the top springs back when you gently touch it.
Stage 2: The Hot Roll (THE MOST IMPORTANT STEP!)
While the cake is baking, lay a clean kitchen towel on your counter and generously dust it with powdered sugar. As soon as the cake comes out of the oven, confidently flip the hot cake out onto the prepared towel. Peel off the parchment paper. Starting from one of the short ends, immediately roll the hot cake up with the towel inside. Yes, with the towel. This “trains” the cake into a rolled shape while it’s still hot and flexible. Let it cool completely on a wire rack, still rolled up in its towel cocoon. This will take about an hour.
Stage 3: Make Your Fillings and Frostings
While the cake cools, make your goodies. For the filling, beat the cold heavy cream, powdered sugar, and vanilla on high speed until stiff peaks form. For the frosting, place the chocolate chips in a heatproof bowl. Heat the heavy cream in a small saucepan until it just begins to simmer, then pour it over the chocolate. Let it sit for 5 minutes, then whisk until you have a smooth, glossy ganache. Let the ganache cool and thicken at room temperature.
Stage 4: Fill and Re-Roll the Log
Once the cake is completely cool, gently and carefully unroll it. It might have a few small cracks—that’s okay! Spread the whipped cream filling evenly over the cake, leaving a small border around the edges. Now, using the towel to help you, carefully re-roll the cake (without the towel inside this time!). Place the rolled cake, seam-side down, on a serving platter.
Stage 5: Decorate Your Masterpiece
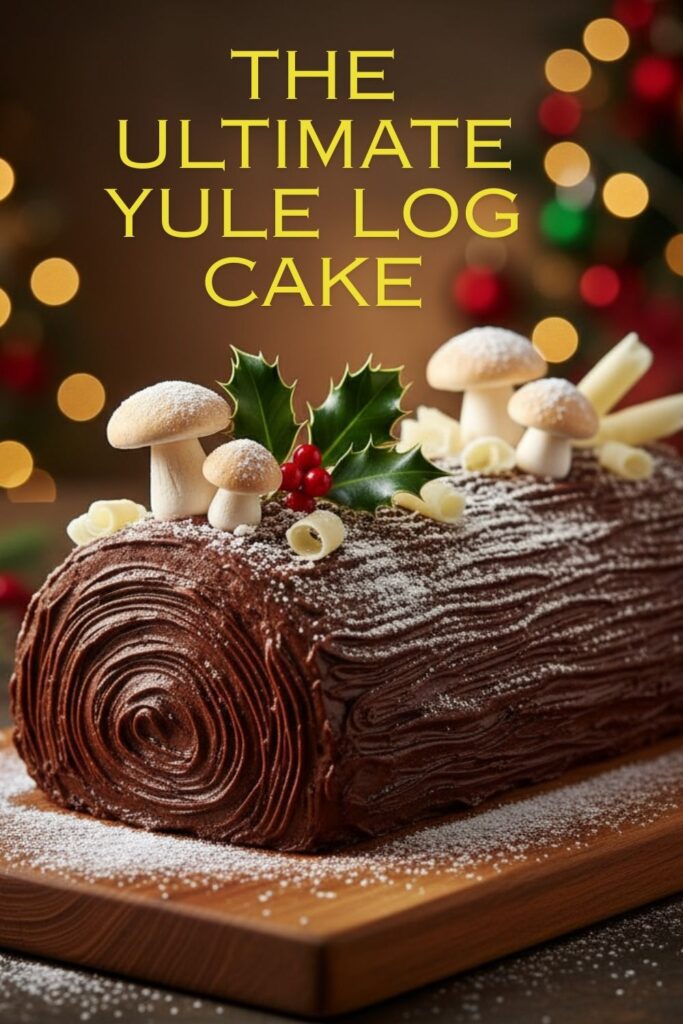
Your ganache should be thick but spreadable. If you want, you can cut a small piece off one end of the log at an angle and “glue” it to the side with frosting to look like a branch. Cover the entire log with the chocolate ganache using an offset spatula. Now for the fun part: run the tines of a fork down the length of the cake to create a bark-like texture. Dust with powdered sugar to look like snow, and decorate with sugared cranberries, meringue mushrooms, or a sprig of rosemary.
Calories & Nutritional Info

This is a celebration cake. Calories don’t count during celebrations. It’s a rule.
- Serving Size: 1 slice
- Calories: Approximately 400-450 kcal
- Fat: ~25g
- Carbohydrates: ~40g
- Sugar: ~30g
- Protein: ~6g (Disclaimer: This is an estimate. The actual number is probably best left a mystery. Just enjoy the cake.)
Common Mistakes to Avoid (Read This Before You Start!)
Here’s how to avoid the most common Yule log tragedies.
- THE CRACK ATTACK: The number one fear. The absolute best way to prevent a cake from cracking is to roll it up in the towel while it is still hot from the oven. A warm, pliable sponge is a happy sponge. A cold sponge is a brittle, tragic sponge.
- Overbaking the Cake: A dry cake is a guaranteed cracker. Watch it closely and take it out as soon as it springs back to the touch. It bakes fast!
- A Soupy Filling: Make sure your heavy cream is very cold before you whip it. Warm cream will never whip up properly.
- Breaking Ganache: If your cream is too hot when you pour it over the chocolate, the ganache can separate and look oily. Let it simmer, don’t boil it to death.
Variations & Customizations (Level Up Your Log)
Once you’ve mastered the classic, why not get a little adventurous?
1. Mocha Yule Log
Add 2 teaspoons of instant espresso powder to the cake batter with the dry ingredients. You can also dissolve 1 teaspoon of espresso powder in the hot cream before pouring it over the chocolate for the ganache.
2. Black Forest Yule Log
Fold 1 cup of chopped, drained maraschino or amarena cherries into the whipped cream filling. A splash of Kirsch (cherry liqueur) in the cream wouldn’t hurt either. 😉
3. White Chocolate Peppermint Log
Omit the cocoa powder from the cake and add an extra ¼ cup of flour for a vanilla sponge. Make a white chocolate ganache for the filling (and add ½ tsp of peppermint extract), and use a classic chocolate ganache for the outside. Garnish with crushed candy canes.
FAQ Section: Your Yule Log Questions, Answered
What is the origin of the Yule log cake?
It’s a French tradition, called a Bûche de Noël, dating back to the 19th century. It was designed to look like the actual Yule log that families would burn on the hearth for good luck during the winter solstice.
Can I make a Yule log cake in advance?
Yes! You can assemble the whole cake, fill it, and keep it tightly wrapped in the fridge for up to 2 days before frosting. Or, you can fully frost it and store it in the fridge for a day.
My cake cracked anyway! What do I do?
Do not panic! The frosting is your best friend. Think of it as delicious, chocolatey wood putty. Just use the ganache to glue any pieces back together and cover up the cracks. No one will ever know.
What’s the difference between a Yule log and a Swiss roll?
They are very similar, as both are rolled sponge cakes with a filling. The main difference is the decoration. A Yule log is specifically decorated to resemble a log, usually with chocolate “bark” frosting and festive, woodsy garnishes.
How do I store leftovers?
Store any leftover cake in an airtight container in the refrigerator for up to 4 days.
Can I freeze a Yule log cake?
Yes. You can freeze the unfrosted cake roll (tightly wrapped) for up to a month. Thaw it in the fridge before filling and frosting. You can also freeze the fully decorated cake, though some decorations may not fare as well.
My ganache is too thin/thick! How do I fix it?
If it’s too thin, let it cool longer at room temperature or pop it in the fridge for 10-15 minute increments, stirring until it thickens. If it gets too thick, gently warm it over a double boiler or in the microwave in very short bursts (5-10 seconds) until it’s spreadable again.
Final Thoughts
You did it. You stared into the face of the most intimidating holiday dessert and you didn’t back down. You have created a work of art, a conversation piece, and a ridiculously delicious cake all in one. Now, go present your masterpiece to your adoring fans. Take a bow. And when someone inevitably says, “You made that?! I could never,” just smile knowingly. It’ll be our little secret.

