
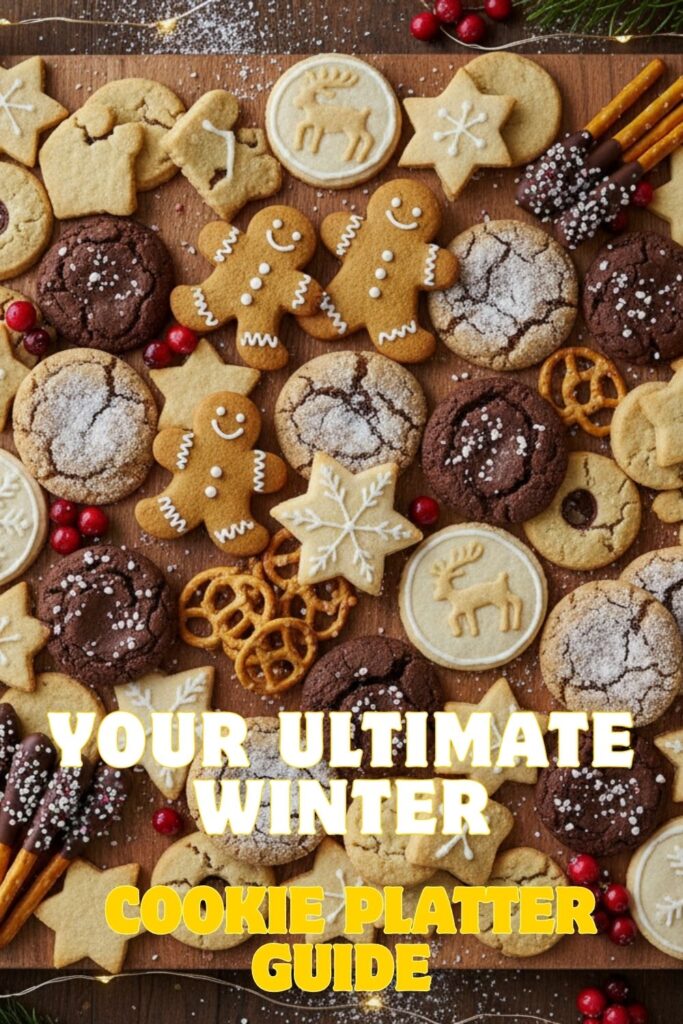
Okay, let’s talk holiday stress. We all feel it, right? The endless to-do list, the gift wrapping that looks like a badger attacked it, the sudden urge to hibernate until March. But there’s one thing that consistently cuts through the chaos and spreads pure, unadulterated joy: a killer Winter cookie platter. This isn’t just a collection of baked goods; it’s an edible hug, a festive centerpiece, and frankly, a subtle brag about your baking prowess. Forget buying those sad, store-bought assortments. Today, we’re crafting a cookie platter that’s so gorgeous and delicious, it should probably be in a museum. This guide will help you create a show-stopping assortment that looks incredibly complex but secretly uses some smart shortcuts to keep your sanity (mostly) intact. Get ready to impress everyone, including yourself!
Why This Winter Cookie Platter Is Your Holiday Essential

Why go to all this “trouble”? Because, my friend, the payoff is immense.
It’s a Feast for the Eyes (and the Stomach!)
A beautifully arranged cookie platter is more than just dessert; it’s a piece of edible art. The variety of colors, shapes, and textures is visually stunning, making it an instant centerpiece. And then you eat them. And it’s even better.
Something for Everyone

Got a chocolate lover? A spice fiend? Someone who just wants a classic shortbread? A well-rounded platter has options for every palate. No more awkward moments trying to convince Uncle Barry that the fruitcake is “actually quite good this year.”
The Ultimate Gift or Party Contribution
Need a host gift? Bringing dessert to a holiday party? This platter is your answer. It’s thoughtful, homemade (even with a few smart shortcuts!), and infinitely more exciting than another bottle of wine (though, IMO, a combo of both is peak generosity).
The Cookie Cast (A Stellar Lineup)
We’re going for variety and visual appeal. This platter combines homemade heroes with smart semi-homemade options to save you time.
The Homemade MVPs
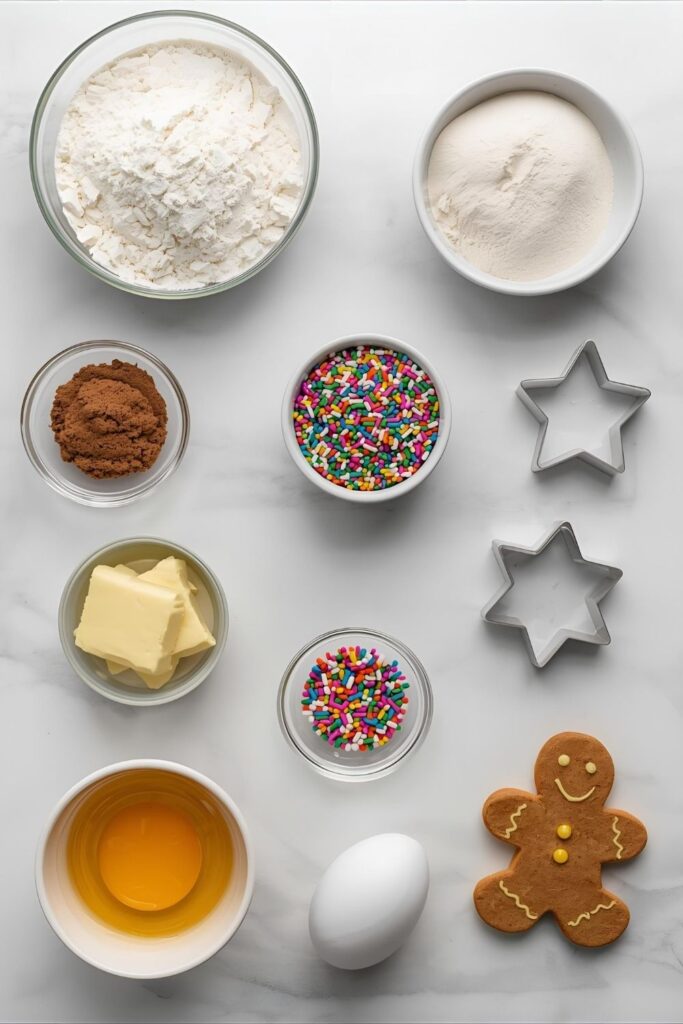
- Classic Shortbread Cookies: (Recipe follows below) Simple, buttery, and melt-in-your-mouth delicious. They are the perfect base for sprinkles or a simple glaze.
- Unsalted Butter: 1 cup (2 sticks), softened.
- Powdered Sugar: ½ cup.
- All-Purpose Flour: 2 cups.
- Vanilla Extract: 1 teaspoon.
- Pinch of Salt.
- Chocolate Crinkle Cookies: (Recipe follows below) A fudgy brownie-like interior with a crinkled, powdered sugar exterior. Total showstoppers.
- All-Purpose Flour: 1 ¼ cups.
- Unsweetened Cocoa Powder: ½ cup.
- Baking Powder: 1 teaspoon.
- Salt: ¼ teaspoon.
- Granulated Sugar: 1 cup.
- Vegetable Oil: ¼ cup.
- Large Eggs: 2.
- Vanilla Extract: 1 teaspoon.
- Powdered Sugar: ½ cup, for rolling.
The Smart Semi-Homemade Saviors
- Festive Sugar Cookies: Grab a good quality refrigerated sugar cookie dough. Cut out festive shapes (stars, snowflakes, trees) and decorate with store-bought icing and sprinkles. Easy peasy.
- Chocolate-Dipped Pretzel Rods: Melt some good quality chocolate chips (white, dark, or milk). Dip pretzel rods, then immediately sprinkle with festive sprinkles, crushed candy canes, or a drizzle of contrasting melted chocolate. Let them set on parchment paper.
- Store-Bought Biscotti or Amaretti: Sometimes, the best shortcut is no baking at all. Pick up a box of elegant store-bought cookies to add height and different textures.
Essential Tools & Kitchen Gadgets
You probably have most of these. If not, consider it an investment in your holiday happiness.
- Large Baking Sheets: Several are ideal to bake in batches.
- Parchment Paper: A non-stick lifesaver for all cookies.
- Electric Mixer: For the shortbread and crinkle cookies.
- Rolling Pin: For the shortbread and sugar cookies.
- Cookie Cutters: Festive shapes for your sugar cookies and shortbread.
- Mixing Bowls (various sizes), Whisks, and Spatulas.
- Cooling Racks: Essential for perfect cookies.
- A Large Serving Platter: Your canvas for cookie artistry!
- Piping Bags and Tips (Optional): For detailed decorating.
Step-by-Step Instructions: Assembling Your Cookie Kingdom
We’ll cover the two homemade recipes first, then the assembly.
Part 1: Homemade Shortbread Cookies (The Buttery Dream)
- Cream Butter & Sugar: In a large bowl, cream together the softened butter and powdered sugar with an electric mixer until light and fluffy. Beat in the vanilla extract and salt.
- Add Flour: Gradually add the flour, mixing on low speed until the dough just comes together. Do not overmix!
- Shape & Chill: Press the dough into a disk, wrap tightly in plastic wrap, and refrigerate for at least 30 minutes. You can also roll it out to ½-inch thickness and cut shapes with a cookie cutter for more variety.
- Bake: Preheat oven to 325°F (160°C). On a lightly floured surface, roll out the chilled dough to ¼-inch thickness. Cut into desired shapes. Place on parchment-lined baking sheets. Bake for 15-20 minutes, or until the edges are lightly golden.
- Cool & Decorate: Let cool on sheets for 5 minutes, then transfer to a wire rack to cool completely. Dust with extra powdered sugar or dip in melted chocolate.
Part 2: Homemade Chocolate Crinkle Cookies (The Fudgy Delight)
- Whisk Dry Ingredients: In a medium bowl, whisk together the flour, cocoa powder, baking powder, and salt.
- Mix Wet Ingredients: In a large bowl, whisk together the granulated sugar, vegetable oil, eggs, and vanilla extract until smooth.
- Combine & Chill: Gradually add the dry ingredients to the wet ingredients, mixing until just combined. The dough will be soft. Cover and chill for at least 2 hours, or overnight. This is crucial!
- Roll in Sugar: Preheat oven to 350°F (175°C). Place the ½ cup powdered sugar in a shallow bowl. Scoop rounded tablespoons of chilled dough and roll each thoroughly in the powdered sugar until completely coated.
- Bake: Place cookies 2 inches apart on parchment-lined baking sheets. Bake for 10-12 minutes. The edges will be set, but the centers will still look soft.
- Cool: Let cool on the baking sheet for a few minutes before transferring to a wire rack to cool completely.
Part 3: Assembling Your Epic Platter
- Gather Your Cookies: Make sure all your cookies (homemade and semi-homemade) are completely cooled and decorated.
- Choose Your Platter: A large, flat platter, cutting board, or even a tiered serving stand works best.
- Start with Larger Items: Place your bigger cookies or items like biscotti first to create a base.
- Build in Sections: Arrange cookies by type or color, creating little clusters. Think about contrasting shapes and colors.
- Add Fillers: Use smaller cookies, candies, or even some festive sprigs of rosemary or cranberries to fill in any gaps and add extra visual interest.
- Step Back & Admire: Adjust as needed until your platter looks abundant, beautiful, and utterly irresistible.
Calories & Nutritional Info
It’s a platter. It’s a variety. We don’t ask questions. We just eat.
- Serving Size: 1 cookie (average, depending on type)
- Calories: Approximately 100-200 kcal per cookie
- Fat: ~5-12g
- Carbohydrates: ~12-25g
- Sugar: ~8-15g
- Protein: ~1-3g (Disclaimer: This is just a ballpark. Also, the calories don’t count if you’re standing up. FYI.)
Common Mistakes to Avoid (Platter Pitfalls)
Don’t let your cookie dreams crumble.
- Baking Cookies to the Same Doneness: Not all cookies bake at the same temperature or for the same amount of time! Bake each type separately according to its specific instructions.
- Overcrowding Your Platter: You want abundant, not overflowing. Leave a little breathing room, or your beautiful decorations will get smudged.
- Decorating Warm Cookies: I’m going to say it again: cool cookies completely before icing or dipping in chocolate. Otherwise, it’s a runny mess.
- Not Chilling Doughs: Especially for cutout cookies and crinkles, chilling the dough is non-negotiable for preventing spread and getting the right texture.
- Ignoring Texture Variation: A good platter has a mix of textures—chewy, crispy, fudgy, crumbly. Don’t just make all chocolate chip cookies. (Unless that’s your jam. No judgment.)
Variations & Customizations (Your Platter, Your Rules)
Make this platter uniquely yours!
1. The “All-Chocolate Everything” Platter
Focus on different types of chocolate cookies! Think brownies cut into festive shapes, chocolate shortbread, double chocolate chip cookies, and chocolate-dipped anything.
2. Vegan or Gluten-Free Platter
Focus on recipes that can be easily adapted. Many shortbread recipes can be made gluten-free with a good GF flour blend. Look for vegan sugar cookies or brownie recipes. There are tons of great options out there!
3. Savory & Sweet Mix
Feeling adventurous? Add some savory elements for contrast! Think Parmesan shortbread crackers, spiced nuts, or even some artisanal cheese alongside your cookies. It’s unexpected and delicious.
FAQ Section: Your Cookie Questions, Answered
How many different types of cookies should I include?
Aim for 3-5 different types for good variety without overwhelming yourself. This recipe suggests 2 homemade and 3 semi-homemade for a perfect balance.
How far in advance can I make these cookies?
Most cookies can be baked and stored in airtight containers at room temperature for 3-5 days. Some, like shortbread, can last longer. You can often bake and freeze undecorated cookies for up to 3 months, then thaw and decorate closer to serving time.
What’s the best way to transport a cookie platter?
Arrange the cookies on a sturdy platter or cutting board, then carefully wrap the entire thing tightly with plastic wrap. For added security, place the platter inside a large, shallow box.
How do I prevent my cookies from getting stale?
Store different types of cookies in separate airtight containers. The moisture content varies, and soft cookies can make crisp cookies soft.
What are some good non-cookie additions to a platter?
Consider candied nuts, chocolate truffles, mini meringues, or even some fresh fruit like cranberries or grapes for a pop of color and freshness.
My cookies always spread! What am I doing wrong?
Usually, it’s about chilling the dough sufficiently (especially for cutout cookies), using cold butter for recipes that call for it, and not overcrowding your baking sheets. Also, ensure your oven temperature is accurate with an oven thermometer.
Can I mix homemade and store-bought cookies?
Absolutely! That’s actually a super smart strategy, especially during busy holidays. Focus your energy on a couple of showstopping homemade cookies, then supplement with quality store-bought options. No one will judge.
Final Thoughts
So there you have it. You’ve mastered the art of the Winter cookie platter. You’ve baked, you’ve decorated, and you’ve created something truly beautiful and delicious. Now, go forth and share your edible masterpiece. Watch the smiles. Hear the oohs and aahs. You are a holiday hero, a cookie connoisseur, and the purveyor of pure joy. And probably a little tired. But totally worth it, right? IMO. Enjoy every crumb!

