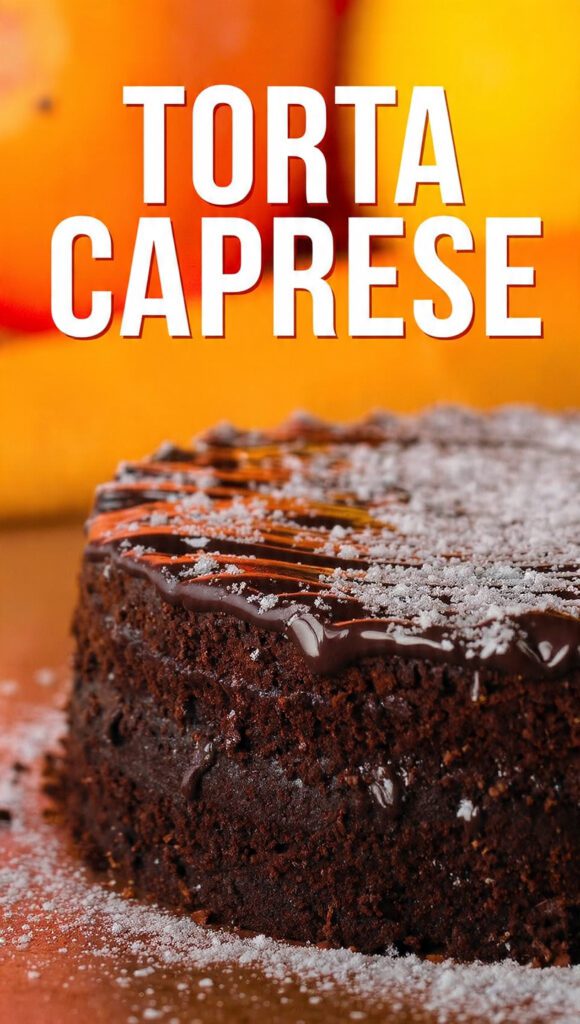
Authentic Torta Caprese Recipe: The Flourless Chocolate Cake of Your Dreams
Legend has it that back in the 1920s, an Italian chef on the island of Capri forgot to add flour to his almond cake while serving some notorious mobsters. Instead of ending up at the bottom of the ocean, he accidentally created torta caprese, a dessert so decadent and moist that it became a global sensation. Isn’t it nice when our massive failures turn into culinary gold? If only my burnt toast had the same PR team.

I first tried a slice of this at a tiny bakery overlooking the Mediterranean, and I’m pretty sure I saw the face of God in the dark chocolate crumbs. It’s dense, it’s rich, and it’s naturally gluten-free, which means you can serve it to your “health-conscious” friends without anyone feeling left out. Are you ready to make a cake that looks like a million bucks but secretly hides your biggest kitchen blunders?
Why This Recipe Is Basically Magic
Why should you bother with a cake that has no flour? Because flour is just filler, baby. By ditching the grain, we create a fudge-like texture that makes regular sponge cake taste like cardboard by comparison. It hits that perfect sweet spot between a brownie and a truffle.
Beyond the taste, this recipe impresses guests every single time. It’s sophisticated, elegant, and carries an air of “I just summered in Italy.” Plus, the prep work is surprisingly straightforward. You don’t need fancy pastry skills—just a good whisk and a dream. Ready to ruin store-bought desserts for your entire social circle?
The Ingredients: No Filler, Just Flavor
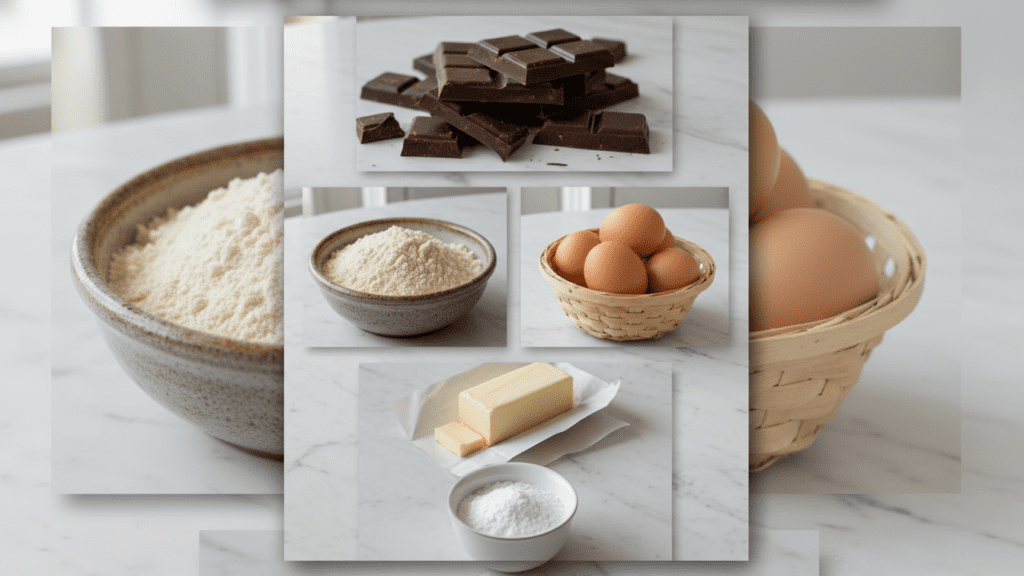
Keep it simple, but keep it high-quality. Since there are so few ingredients, the cheap stuff has nowhere to hide.
- 200g Dark Chocolate (70% cocoa): Use the good stuff, not the dusty chips from the back of your pantry.
- 200g Almond Flour: Or whole blanched almonds that you pulse into a fine meal yourself.
- 200g Unsalted Butter: Bring it to room temperature so it behaves.
- 150g Granulated Sugar: Just enough to balance the bitterness of the cocoa.
- 4 Large Eggs: Separate the yolks from the whites; we need them for different missions.
- 1 tsp Vanilla Extract: Because we aren’t savages.
- Pinch of Salt: To make the chocolate flavors actually pop.
- Powdered Sugar: For that final, elegant “snow-covered Capri” dusting.
The Arsenal: Tools & Kitchen Gadgets
You don’t need a professional bakery, but a few specific tools make the difference between a masterpiece and a mess.
- 8-inch Springform Pan: Essential for getting the cake out without a structural collapse.
- Food Processor: If you are grinding your own almonds, this is your best friend.
- Stand Mixer or Electric Hand Whisk: Your arms will fall off if you try to whip these egg whites by hand.
- Silicone Spatula: For that gentle folding motion that keeps the cake airy.
- Double Boiler or Microwave-Safe Bowl: To melt the chocolate and butter into a silky river of joy.
Step-by-Step Instructions: The Path to Glory
Step 1: Melt and Mingle
Preheat your oven to 340°F (170°C). Melt the dark chocolate and butter together using a double boiler or short bursts in the microwave. Stir until it looks like a glossy, dark mirror. Let it cool slightly while you handle the rest—we don’t want to scramble the eggs later.
Step 2: The Nutty Base
In a large bowl, whisk the egg yolks with the sugar until the mixture looks pale and creamy. Stir in the almond flour, vanilla, salt, and that cooled, glorious melted chocolate. It’s going to look thick and rich, and yes, you can lick the spatula (I won’t tell).
Step 3: Rise of the Whites
In a separate, perfectly clean bowl, whip the egg whites until they form stiff peaks. This is the secret to the cake’s lift. If you can hold the bowl over your head and nothing falls out, you’ve succeeded. If it falls on your hair, well, start over and maybe buy a hat.
Step 4: The Gentle Fold
Slowly fold the egg whites into the chocolate mixture. Do not stir like you’re mixing cement! Use a gentle “under and over” motion with your spatula. We want to keep all that beautiful air inside so the cake stays light despite its richness.
Step 5: Into the Heat
Pour the batter into your greased springform pan. Bake for 35-40 minutes. The edges should be set, but the center should still have a slight jiggle. This is the “fudge zone.” If it’s bone dry, you’ve gone too far!
Step 6: The Final Touch
Let the cake cool completely in the pan before releasing it—patience is a virtue, IMO. Once cool, dust it heavily with powdered sugar. You can even use a stencil to make a fancy pattern if you want to show off for the ‘gram.
Calories & Nutritional Info

It’s a chocolate and almond cake. Let’s manage expectations, shall we?
- Calories: ~380 kcal per slice (assuming 10 slices).
- Protein: 8g (Almonds are basically health food, right?).
- Total Fat: 28g (The delicious kind).
- Carbohydrates: 24g.
- Gluten Status: Zero. Zilch. Nada.
Common Mistakes to Avoid (The Cheeky Guide)
- Overbaking: This is the cardinal sin. If you bake it until a toothpick comes out clean, you’ve made a dry brownie. Keep it moist!
- Oily Egg Whites: Even a drop of yolk or a smudge of grease in the bowl will prevent your whites from peaking. Keep it pristine.
- Cheap Chocolate: If you use low-quality chocolate, the cake will taste like chemicals and regret. Spring for the 70% dark.
- Rushing the Cool: If you open the springform while it’s hot, the cake might crack or slump. Give it an hour to pull itself together.
Variations & Customizations
Feeling a little adventurous? Try these tweaks:
- The Boozy Boost: Add 2 tablespoons of Amaretto or dark rum to the batter for a deeper, more adult flavor profile.
- The Zesty Twist: Fold in the zest of one large orange. Chocolate and orange are a match made in heaven, TBH.
- The Crunchy Topper: Scatter some flaked sea salt and sliced toasted almonds on top before serving for a salty-sweet crunch.
FAQ: Everything You’re Dying to Know
Why is it called Torta Caprese?
It originated on the island of Capri! It’s the signature dessert of the region and basically tastes like an Italian summer.
Is it supposed to be sunken in the middle?
A little bit, yes! Because there is no flour or chemical leavener, it’s natural for the center to be a bit more dense and slightly lower than the edges.
Can I use regular flour instead of almond flour?
You could, but then it’s just a regular chocolate cake. The almond flour is what gives torta caprese its iconic texture and nutty soul.
How do I store it?
It actually tastes better the next day! Keep it in an airtight container at room temperature for up to 3 days, or refrigerate it for a fudgier texture.
Can I make this dairy-free?
You can swap the butter for a high-quality vegan butter or even coconut oil, though the flavor will shift slightly toward the tropical.
What should I serve it with?
A dollop of unsweetened whipped cream or a scoop of vanilla gelato is the classic move. A shot of espresso on the side is non-negotiable.
Why did my cake crack?
Don’t panic! Cracks are a sign of an authentic, rustic torta. Just cover them with a little extra powdered sugar and pretend it was intentional.
Final Thoughts
There you have it—a torta caprese that will make everyone forget you ever struggled with a microwave meal. It’s rich, it’s elegant, and it’s the perfect way to end a dinner party on a high note.
Go ahead, give it a whirl and let the chocolate-induced endorphins do their thing. Just make sure you get a slice for yourself before the guests realize how good it is. Happy whisking! 🙂