
Stop Making Sad Spuds: The Ultimate Guide to Perfect Stuffed Potatoes
Raise your hand if you’ve ever looked at a sad, lonely baked potato and thought, “This needs a life upgrade.” I see you. We’ve all been there. The simple baked potato is the perfect canvas, yet we routinely treat it like a beige side dish afterthought. That changes today.

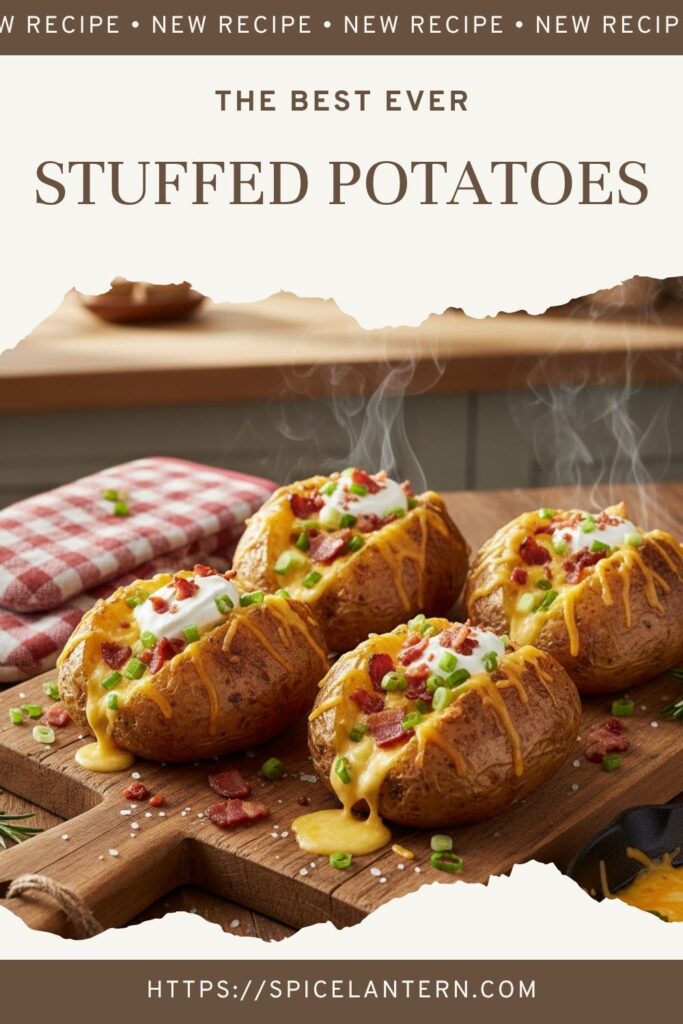
We’re not just adding a dollop of sour cream and calling it a day. We are taking that magnificent spud, scooping out its soul, mixing it with heavenly things, and stuffing it all back in until it’s an overflowing volcano of flavor. We are making the ultimate, creamy, cheesy, crispy-skinned stuffed potatoes.
This isn’t just dinner; it’s a culinary flex. It’s comfort food perfected. And let’s be honest, who doesn’t want to make their potato feel special?
Why This Recipe Deserves a Standing Ovation

Forget everything you think you know about baked potatoes. This recipe is awesome for three main reasons.
First, it tastes better than a regular baked potato because you literally remix all the best parts. We mix that fluffy interior with butter, cream, and cheese before we put it back in the oven. This creates a filling that is impossibly smooth and decadent.
Second, it’s a two-in-one meal. This isn’t just a side dish—it’s a meal! Add some crumbled bacon or chili, and you’ve got a budget-friendly, high-impact dinner that requires almost zero side planning.
Third, you get a perfect texture trifecta. You’ve got the crispy, salty skin (the best part, IMO), the impossibly creamy filling, and the golden, bubbly cheese topping. Seriously, can your current potato recipe do that? I doubt it.
The Secret Ingredient List (It’s Not That Secret, But It’s Amazing)

Keep it simple. We’re using ingredients that probably already live in your fridge.
- 4 Large Russet Potatoes: The standard baker. They have that rough, thick skin and fluffy interior we need. Wash these well!
- 2 tablespoons Olive Oil or Avocado Oil
- 1 tablespoon Coarse Salt (Kosher or Sea Salt): Crucial for that crispy skin.
- 4 tablespoons Unsalted Butter, softened: Because why not?
- 1/4 cup Heavy Cream or Milk: Heavy cream makes it ultra-rich; milk keeps it slightly lighter. Your call, boss.
- 1 cup Shredded Sharp Cheddar Cheese: Or a blend of your favorite cheeses.
- 1/4 cup Full-Fat Sour Cream: For that perfect tangy counterpoint.
- 2 Green Onions, thinly sliced
- 1/2 teaspoon Garlic Powder
- Salt and Black Pepper to taste
Key Substitutions and Upgrades:
- Not a Cheddar Fan? Swap it out! Monterine Jack, smoked Gouda, or Pepper Jack are amazing alternatives.
- No Heavy Cream? You can use whole milk, but you might need a tiny bit less. Do NOT use skim milk.
- Want a Garlic Kick? Replace the garlic powder with 1 minced clove of fresh roasted garlic (from the first bake) for a deeper, softer flavor.
Your Kitchen Arsenal: Tools for Stuffed Potato Success
You really don’t need much. This is a low-tech, high-reward situation.
- Baking Sheet: Large enough to hold all four spuds.
- Fork or Skewer: For poking holes—don’t skip this!
- Pastry Brush: For painting that gorgeous skin with oil and salt.
- A Good Mixing Bowl: You’re going to be mashing, so make sure it’s sturdy.
- A Potato Masher: Or a hand mixer with beaters. Your choice, though I like the slightly rustic texture a masher provides.
- Spoon or Ice Cream Scoop: For carefully scooping out the hot potato flesh.
- Oven Mitts/Kitchen Towels: Crucial. You handle the hot potatoes twice. Don’t burn yourself.
- Measuring Cups and Spoons
The Step-by-Step Road to Potato Nirvana
We break this down into two easy bakes. The first bake gets the potato tender, and the second bake gets the stuffing golden and bubbly.
Step 1: Prep the Spuds (And the Oven)
Preheat your oven to 400°F (200°C). Now, take your Russets. Wash them thoroughly—you are eating the skin, after all.
Take your fork or skewer and aggressively pierce each potato 6-8 times. This lets steam escape and prevents a potato-explosion situation (yes, it happens).
Step 2: The Crispy Skin Secret
Drizzle the potatoes with the 2 tablespoons of olive oil (or avocado oil). Use your hands or a pastry brush to rub the oil all over the skin.
Now, generously sprinkle them with the coarse salt. The salt sticks to the oil and helps the skin get impossibly crisp.
Place them directly on the baking sheet.
Step 3: Bake #1 (The Softening)
Bake the potatoes for 50 to 70 minutes. The time varies based on the size of your spud.
How do you know they’re ready? Squeeze them gently. They should feel tender all the way through and give easily. If they feel firm in the center, they need more time. Remove them from the oven, but leave the oven on.
Step 4: The Delicate Scoop
Let the potatoes cool for about 10 minutes. They need to be cool enough to handle, but still warm enough to mix easily. Use a clean kitchen towel to hold a potato.
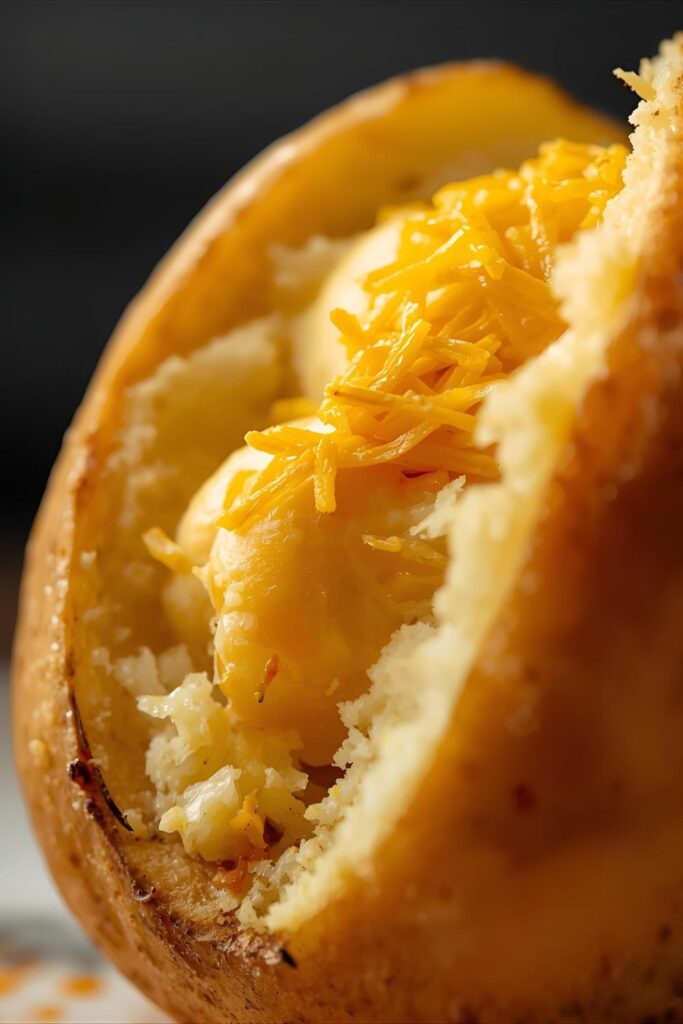
Using a sharp knife, slice each potato lengthwise (hot dog style). Now, using a spoon or scoop, carefully scoop out the potato flesh into your mixing bowl, making sure to leave about 1/4 inch of potato around the shell so the skin stays sturdy. Don’t rip the skin! You need a nice little boat for the filling.
Step 5: The Stuffing Remix
Add the softened butter, heavy cream (or milk), sour cream, and garlic powder to the bowl of potato flesh.
Using your potato masher or hand mixer (on low), mash and mix the ingredients until the filling is creamy and fluffy. Do not overmix, or you’ll get gluey potatoes.
Now, stir in most of the shredded cheddar (reserve about 1/4 cup for the topping) and most of the sliced green onions. Stir until just combined. Taste it! Add salt and pepper as needed. This is the moment to get the seasoning perfect.
Step 6: Stuff and Garnish
Scoop the magnificent filling back into your four potato “boats.” Don’t be shy. Overfill them! Make them look impressive. Use the back of a spoon to create some nice peaks.
Sprinkle the tops with the reserved cheddar cheese and a tiny bit of paprika, if you’re feeling fancy.
Step 7: Bake #2 (The Grand Finale)
Return the stuffed potatoes to the oven for 15 to 20 minutes.
The potatoes are ready when the tops are golden brown, bubbly, and the cheese is melted and slightly crispy.
Serve immediately, topped with the remaining green onions and whatever other toppings your heart desires!
The Nutritional Breakdown (It’s a Treat, Not a Trial)
FYI: This is an estimated value for one large stuffed potato with basic cheddar and cream filling.
- Calories: Approximately 450-500 kcal
- Carbohydrates: 45g (Hello, potato!)
- Protein: 15g
- Fat: 28g (Worth it!)
- Good Stuff: Potatoes contain good amounts of Vitamin C, B6, and potassium. You get healthy fats from the olive oil, too. See? Health food!
Rookie Mistakes to Avoid (Unless You Like Sad, Gummy Spuds)
- Skipping the Poking. You must poke the potatoes before the first bake. Otherwise, steam builds up, and your beautiful spud turns into a mushy, exploded mess in your oven.
- Using Cold Dairy. This is baking 101, people. If you use cold butter and cold cream, your filling will be chunky, not smooth. Soften the butter and let your cream/milk sit out for a bit.
- Overmixing the Filling. Mashing is good; whipping into submission is bad. Overworked potatoes get gluey and gummy. Use a potato masher for a few stirs, or a hand mixer on the absolute lowest setting for about 30 seconds. That’s it.
- Leaving Too Much Potato in the Shell. If you leave too thick a layer, you won’t have enough room for the glorious filling. Leave that 1/4-inch shell and scoop out the rest!
- Not Salting the Skin. This is a tragedy. A pale, unsalted skin is a wasted opportunity. Oil and salt the outside generously for a crisp, delicious edible shell.
Variations & Customizations (The Fun Part)
Stuffed potatoes are a vehicle for your best ideas. Here are three to get you started.
- The Buffalo Chicken Spud: Shred some cooked rotisserie chicken and toss it with 1/4 cup of Buffalo wing sauce. Mix this into the potato filling. Top with blue cheese crumbles before the second bake. BAM. Dinner is served.
- The Vegetarian Chili Bowl: Swap the sour cream for cream cheese. Mix in a cup of hearty, three-bean vegetarian chili and top with smoked Gouda and chopped cilantro. A truly filling, amazing meatless meal.
- The Fiesta Spud (Spicy!): Replace the cheddar with Pepper Jack cheese. Mix in diced jalapeños, a dash of cumin, and a spoonful of salsa. Top with extra sour cream and a sprinkle of taco seasoning after the second bake.
Your Burning Potato Questions, Answered
Q: Can I make the potatoes ahead of time?
A: Yes, you totally can! Bake the potatoes, scoop the centers, mix the filling, and stuff the shells. Stop before the second bake. Let them cool completely, wrap them tightly, and refrigerate for up to 3 days. When ready to serve, just do the 15-20 minute second bake.
Q: What kind of potatoes are best for stuffing?
A: Russet potatoes are the best choice, hands down. Their high starch content gives you that fluffy, light interior, and their thick skin holds up perfectly to scooping and restuffing.
Q: Why do my potatoes taste gummy after mashing?
A: You, my friend, overmixed them! Potato starch develops elasticity when agitated too much. Use a simple potato masher, not a food processor. Mix the ingredients just until combined—stop before it looks perfectly smooth. A little lumpiness is better than a gummy texture.
Q: Can I cook the potatoes in an air fryer?
A: Yes! It works beautifully for the first bake. Preheat your air fryer to 400°F (200°C) and cook the oiled, salted potatoes for 30-45 minutes, depending on size. The skin gets insanely crispy.
Q: What’s the best way to reheat leftovers?
A: The oven or air fryer is best. Microwave reheating makes the skin soft and rubbery. Wrap the potato in foil (or place it directly in the air fryer) and heat at 350°F (175°C) for about 15 minutes, or until heated through.
Q: I don’t have heavy cream. Can I use half-and-half?
A: Yes, you can use half-and-half, but it will result in a slightly less rich and creamy filling. You might need to add a bit more butter to compensate for the lower fat content.
Q: How do restaurants make the skin so crispy?
A: They do exactly what we did! Oil and coarse salt. The oil helps conduct the heat, and the coarse salt pulls moisture out of the skin, resulting in that shatteringly crisp texture. Many restaurants also bake them directly on the rack (no pan) to get 360-degree air circulation.
Final Thoughts: You Are Now a Potato Artist
You did it. You took a humble, brown potato and turned it into a culinary masterpiece. You have mastered the crisp skin, the fluffy interior, and the perfect stuffing technique.
Never again will you serve a plain baked potato. That is beneath you now. You are a Stuffed Potatoes master. Go forth, experiment with your toppings, and promise me you’ll share a photo of your beautiful, cheesy creation!

