
Genius Brunch Hack: The Fluffiest Slow Cooker Pancakes (No Flipping Required!)
Sunday morning. The light is perfect, the coffee is brewing, and the kids/roommates/inner voice are demanding pancakes. But wait—that means standing over a hot griddle, flipping, watching, and making sure everyone eats the perfect stack at the exact same time. Ugh. Isn’t breakfast supposed to be relaxing? I swear, traditional pancake-making is a culinary form of stress testing. But fear not, my lazy brunch friends, because I’m about to blow your mind with a hack so easy, it’s practically cheating: slow cooker pancakes. Yes, you heard that right. We pour the batter in the crock pot, walk away, and come back to a giant, fluffy, perfectly cooked pancake cake. This is the only way you should be making pancakes from now on.
Why These Slow Cooker Pancakes Are Your Weekend Savior

Why endure the griddle drama when you can achieve fluffy perfection the easy way? This recipe is a game-changer for several reasons:
First, zero flipping! You literally pour the batter and let the slow cooker work its magic. This frees you up to enjoy your coffee, read a book, or, you know, do that vital pre-brunch couch lounging.

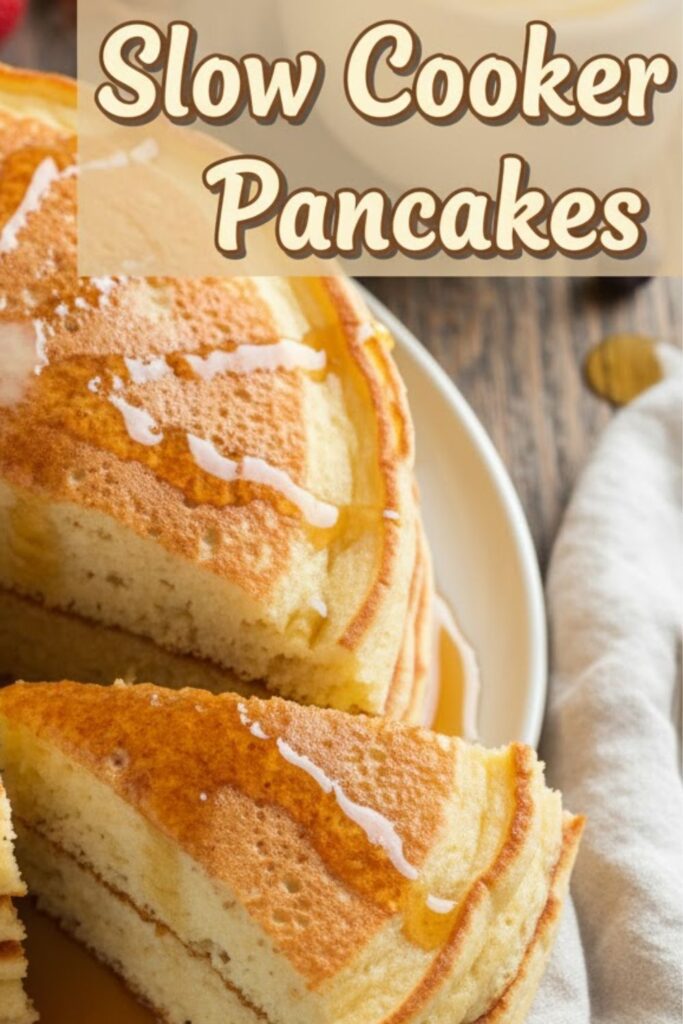
Second, the result is a giant, incredibly fluffy pancake cake. Because it cooks slowly, the texture is more like a baked cloud than a rubbery flapjack. You cut it into wedges, serve it up, and watch the impressed faces. Who knew your humble crock pot could turn into a bakery?
Finally, it’s perfect for feeding a crowd. No more sad, staggered servings where one person eats cold pancakes while the cook sweats over the stove. Everyone gets a hot, glorious slice of breakfast heaven simultaneously. IMO, this is the definition of brunch efficiency.
Ingredients: The Batter That Breaks the Internet

We’re using a slightly thicker batter than normal to stand up to the slow cooker’s heat. This is the classic, slightly sweet base that you can customize endlessly.
- For the Dry Ingredients:
- 2 cups all-purpose flour
- 2 tablespoons granulated sugar
- 2 teaspoons baking powder (The secret to lift!)
- 1 teaspoon baking soda
- 1/2 teaspoon salt
- For the Wet Ingredients:
- 2 cups buttermilk (Or regular milk + 1 tbsp vinegar/lemon juice, let stand 5 min)
- 1/4 cup vegetable oil or melted unsalted butter
- 2 large eggs
- 1 teaspoon vanilla extract
- For the Crock Pot:
- Cooking spray or butter
- Optional: 1/2 cup fresh blueberries or chocolate chips
Key Substitutions: No buttermilk? Regular milk with a little acidity (as noted above) works great. Want a protein boost? Swap 1/4 cup of the flour for your favorite vanilla protein powder. For a whole grain option, use half whole wheat flour and half all-purpose flour, but be prepared for a slightly denser pancake.
Tools & Kitchen Gadgets Used
You don’t need much, but a good mixer makes the prep ultra-fast.
- 6-Quart Slow Cooker (Crock Pot): Essential! Use the oval shape for a better “cake” shape.
- Large Mixing Bowl: For combining all that fluffy goodness.
- Whisk or Hand Mixer: For blending the batter (don’t overmix!).
- Measuring Cups and Spoons: For accurate proportions.
- Rubber Spatula: To ensure you scrape every last drop of batter into the cooker.
- Parchment Paper (Optional, but Recommended): Makes removal and cleanup a dream.
Step-by-Step Instructions: The Pour, Wait, and Eat Method
This is so easy, it feels illegal. Follow these simple steps for a stress-free brunch.
H3: Step 1: Prep the Pot
Generously grease the inside of your slow cooker insert with cooking spray or butter. If you want a guaranteed easy lift, line the bottom and sides with parchment paper, leaving some overhang. This also helps prevent over-browning on the edges.
H3: Step 2: Mix the Dry (Don’t Be a Lump!)
In your large mixing bowl, whisk together the flour, sugar, baking powder, baking soda, and salt. Whisking the dry ingredients ensures the leavening agents distribute evenly—no lumps allowed in this palace of fluff!
H3: Step 3: Combine the Wet and Dry
In a separate, smaller bowl, whisk the buttermilk, vegetable oil (or melted butter), eggs, and vanilla extract. Now, pour the wet mixture into the dry ingredients. Mix with a whisk or rubber spatula ONLY until just combined. A few lumps are okay—overmixing activates the gluten and gives you tough, chewy pancakes. We want fluffy!
H3: Step 4: Pour and Power Up
Pour the batter evenly into your prepared slow cooker insert. If you’re adding optional fillings like blueberries or chocolate chips, sprinkle them evenly over the top now.
H3: Step 5: The Low and Slow Bake
Secure the lid. Cook on HIGH for 1.5 to 2 hours. Do not open the lid and do not stir! Opening the lid releases the essential steam that cooks the center and adds height. The center will look slightly wet/jiggly when finished, but the edges should be pulling away from the sides. You can test it by gently pressing the center—it should spring back slightly.
H3: Step 6: Cool, Slice, and Serve
Crucial Step: Remove the insert from the heating unit and let the pancake cool in the slow cooker for 10-15 minutes with the lid slightly ajar. This allows the internal heat to finish cooking and helps the pancake set. Lift the giant pancake out using the parchment paper (if used) or a spatula. Slice it into wedges, just like a cake! Serve immediately with copious amounts of butter and maple syrup. Prepare for praise!
Calories & Nutritional Info (Estimated Per Serving – 1/8th of cake)

This is an estimate for one generous wedge (1/8th of the whole pancake cake), without toppings.
- Calories: ~300-350 kcal
- Protein: ~8-10g
- Fats: ~10-15g
- Carbohydrates: ~45-55g
- Fiber: ~1-2g
- Nutritional Notes: A comforting, high-carb breakfast. Using buttermilk provides a nice texture and a bit of added protein/calcium compared to standard milk.
Common Mistakes to Avoid (So You Don’t Make Pancake Soup)
You’re trying to make a cake, not a disaster. Steer clear of these rookie errors!
- Overmixing the Batter: The biggest mistake! Overmixing develops gluten, which makes your pancakes tough and chewy. Mix until just combined. Lumps are okay!
- Opening the Lid: Resist the urge to peek! As noted, the lid traps steam, which is essential for cooking the middle of the pancake cake and creating that beautiful height. Every time you open it, you lose that heat and ruin the texture.
- Not Greasing/Lining the Pot: The sides cook faster than the middle. Without proper greasing or the parchment paper sling, the edges stick and burn, and you’ll have a nightmare removing the whole thing. Grease well!
- Using Too Thin a Batter: If your batter is too runny, it might cook down into a dense, almost custard-like texture instead of a fluffy cake. Keep the batter thick; this recipe accounts for that.
- Serving Immediately: If you try to remove or slice the pancake immediately, the center will collapse into a gooey mess. Always let it cool and set for 10-15 minutes. Patience, friend!
Variations & Customizations: Your Pancake Playground
Once you master the basic slow cooker pancakes, you can get creative. Here are three fun ways to tweak the recipe:
H3: Birthday Cake Batter Fun
Add 1/4 cup of rainbow sprinkles and 1/2 teaspoon of almond extract to the batter for that classic birthday cake flavor. Top with a thin layer of vanilla icing (powdered sugar + milk) after slicing. It’s perfect for a celebratory brunch and will definitely impress any small human (or large one!).
H3: High-Protein Banana Nut
Swap 1/4 cup of the flour for vanilla or unflavored protein powder. Replace the oil with 1/2 cup mashed ripe banana. Add 1/4 cup chopped walnuts or pecans to the batter. This is a heartier, more filling version that feels less indulgent but tastes incredible.
H3: Spiced Apple Cinnamon
Before pouring the batter, mix 1/2 cup of finely diced apples (like Granny Smith) with 1 teaspoon of cinnamon and 1 tablespoon of brown sugar. Pour half the batter into the pot, layer the apple mixture, and top with the remaining batter. Serve with warm maple syrup or a dollop of whipped cream. Perfect for fall!
FAQ Section: Your Fluffy Pancake Questions Answered
H3: Do I have to use buttermilk?
Buttermilk is best because its acidity reacts perfectly with the baking soda and powder to create maximum lift and a tender texture. If you don’t have it, use the milk + vinegar/lemon juice substitute mentioned in the ingredients.
H3: Why did my pancake get sticky edges?
This often happens if you don’t grease the sides thoroughly, or if your slow cooker runs a little hot. Use the parchment paper sling to minimize contact with the edges.
H3: Can I use pancake mix instead of making batter from scratch?
Yes, you can! Prepare the pancake mix according to the package directions, but use about 20% less liquid than called for to ensure the batter is thick enough for the slow cooker.
H3: Can I cook slow cooker pancakes on LOW?
I don’t recommend it. Cooking on low takes much longer (up to 4 hours) and can result in a drier, tougher texture. Stick to the HIGH setting for the best result.
H3: Can I make this overnight?
No, the cooking time on HIGH is too short for overnight. The batter also needs to be cooked soon after mixing to maximize the effect of the leavening agents. This is a morning-of brunch dish.
H3: How do I store and reheat leftovers?
Store leftover wedges in an airtight container in the refrigerator for up to 3 days. Reheat them gently in a toaster oven or microwave. They are great as a grab-and-go breakfast!
H3: Is it okay if the top is not browned?
Absolutely! The top of a slow cooker pancake will not be browned because it’s cooked by steam, not direct heat. The bottom and edges should be light golden. The pale top is perfectly normal and a sign of fluffy success!
Final Thoughts: Ditch the Griddle, Grab a Fork!
You’ve officially joined the ranks of the slow cooker pancakes elite! No more standing, no more flipping, just easy, fluffy, delicious breakfast perfection. You’ve mastered the art of laziness disguised as gourmet cooking. Go forth, slice your cake, and enjoy the easiest Sunday brunch of your life. And when your friends ask how you did it, you can just smile mysteriously. 😉

