
The Sheet Pan Quesadillas That Will End Stovetop Tyranny
Let’s talk about the quesadilla paradox. It’s one of the easiest, most satisfying meals on the planet. But the moment you need to make more than one, you become a short-order cook chained to your stove, flipping and folding while your family eats in shifts. The first person is done before the last person even gets their plate. It’s a logistical nightmare. What if you could make one giant, crispy, perfectly golden quesadilla for everyone, all at once? My friends, I’m here to introduce you to the glorious, lazy genius of Sheet pan quesadillas.

This isn’t just a recipe; it’s a revolution. It’s a weeknight dinner hack, a game-day showstopper, and your official resignation from the one-at-a-time quesadilla flipping committee. Prepare to achieve maximum cheesy goodness with shockingly minimal effort.
Why This Recipe is Your New Secret Weapon
Still hovering over your skillet with a spatula? Let me show you a better way.

First, you get to feed everyone at once. This is the biggest selling point. You assemble one giant quesadilla, bake it, slice it, and everyone gets a hot, crispy, cheesy slice at the exact same time. It’s a miracle of modern convenience. No more cold quesadillas for the cook!
Second, the crispiness is next-level. Forget those sometimes-soggy, sometimes-burnt spots from the skillet. The oven’s high, dry heat circulates around the entire quesadilla, creating a perfectly golden, uniformly crispy top and bottom. It’s a texture lover’s dream.
Finally, the cleanup is a beautiful joke. We’re talking about one pan. ONE. You can even line it with parchment paper if you want to be extra lazy (and I fully support that). It’s the perfect meal for when you want something impressive but have absolutely zero desire to do dishes.
The Ingredient Lineup for Your Masterpiece

This is less of a strict recipe and more of a glorious template. Go wild.
- Large Flour Tortillas: 8-10 burrito-sized tortillas (10-inch). This is key to covering your whole pan.
- Melted Butter or Olive Oil: About 4 tablespoons. For brushing the pan and the top, ensuring maximum crispiness.
- Shredded Cheese: 3-4 cups of a good melting cheese. A Mexican blend, Monterey Jack, or a mix of cheddar and Oaxaca is perfect. Please grate your own if you can be bothered; it melts so much better.
- Your Filling of Choice: About 2-3 cups of cooked filling. Some ideas:
- Shredded Chicken: A rotisserie chicken is your best friend here.
- Seasoned Ground Beef: Cooked with your favorite taco seasoning.
- Black Beans & Corn: A can of each, rinsed and drained, for a great vegetarian option.
- Optional Add-ins:
- Diced bell peppers and onions
- A can of diced green chiles, drained
- For Serving: Salsa, sour cream, guacamole, fresh cilantro, sliced jalapeños.
Tools & Gadgets for Quesadilla Glory
You don’t need any fancy equipment for this. Your kitchen is ready.
- Large Rimmed Baking Sheet (Sheet Pan): This is the star of the show. A standard half-sheet pan (18×13 inches) is what you need.
- Parchment Paper (Optional): If you want to make cleanup so easy it feels illegal.
- Pastry Brush: For evenly brushing on the melted butter or oil. Your clean fingers also work in a pinch.
- Offset Spatula: Great for spreading the filling evenly.
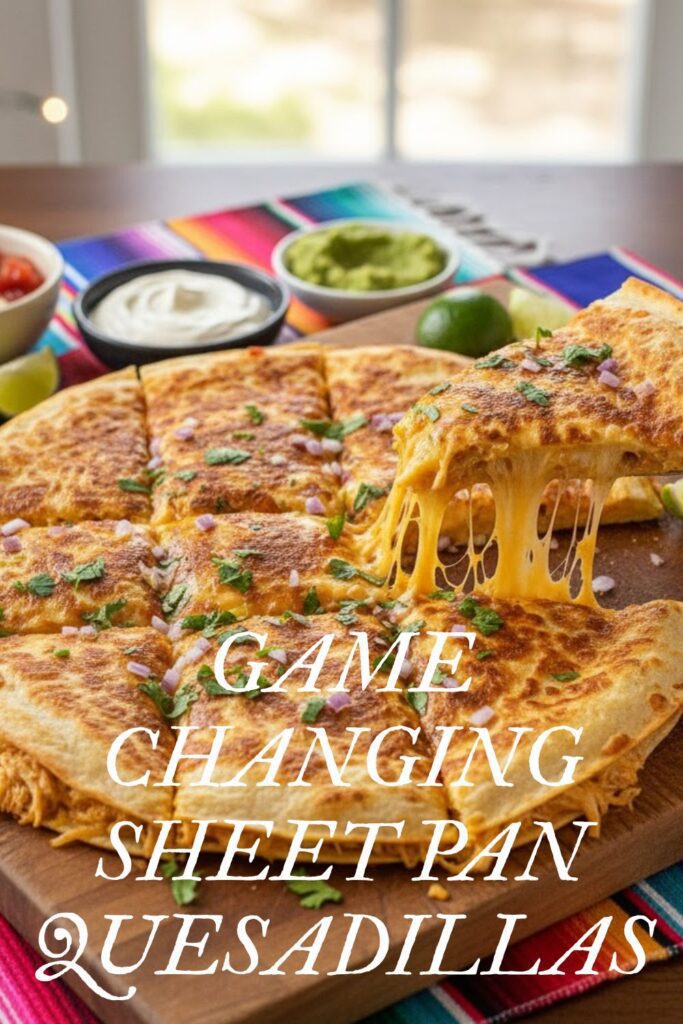
- Pizza Cutter: The absolute best tool for slicing your giant quesadilla. A large chef’s knife works too, but a pizza cutter is just more fun.
Step-by-Step to Giant Quesadilla Heaven
Ready to feel like a kitchen wizard? Follow these simple steps.
Step 1: Preheat and Prep
First things first, get your oven screaming hot. Preheat it to 425°F (220°C). Brush the bottom and sides of your large sheet pan generously with about half of the melted butter or oil.
Step 2: The Tortilla Mosaic
This is the fun part. Arrange the tortillas on the pan so they cover the entire bottom and hang over the sides by a few inches. You’ll need to overlap them. I usually use one in each corner and one in the middle of each long side. It will look like a beautiful, edible disaster. Trust the process.
Step 3: The First Layer of Cheese
Sprinkle about half of your shredded cheese evenly over the tortillas on the pan. This creates a delicious glue that holds everything together. Don’t be shy.
Step 4: Add Your Fillings
Spread your cooked filling (chicken, beef, beans, etc.) and any veggie add-ins in an even layer over the cheese. An even layer is key to an even bake, so take a second to spread it out properly.
Step 5: The Second Layer of Cheese
You know what to do. Sprinkle the remaining cheese over the filling. This is the top layer of gooey goodness that will seal everything in.
Step 6: The Great Fold-Over
Now, take the tortillas that are hanging over the edges and fold them back over the filling towards the center. Press down gently. You’ll likely have a square-ish gap in the very middle.
Step 7: The Final Seal
Take one or two more tortillas and place them in the center gap to completely enclose the filling, tucking the edges in slightly. You have now created a giant, rectangular tortilla pocket of dreams.
Step 8: Brush and Bake
Brush the top of your giant quesadilla with the remaining melted butter or oil. This is the secret to that perfectly golden, crispy top crust. Now, for the final genius move: place another sheet pan on top to press it all down.
Bake for 15 minutes with the top pan on. Then, carefully remove the top pan and bake for another 10-15 minutes, or until the top is a deep golden brown and beautifully crisp.
Step 9: Rest, Slice, and Serve
Carefully slide the quesadilla onto a large cutting board. Let it rest for 5 minutes! This is crucial. It allows the cheese to set up a bit so it doesn’t all ooze out when you cut it. Use a pizza cutter to slice it into squares or rectangles. Serve immediately with all your favorite dips.
Calories & Nutritional Info (A Delicious Guesstimate)

This is a giant cheese-filled tortilla. Let’s manage our expectations for the nutritional panel.
- Calories: Approximately 400-600 kcal per square (highly dependent on your fillings and the size of your squares).
- Fat: Glorious amounts, thanks to the cheese and butter.
- Carbohydrates: From the tortillas, of course.
- Protein: A solid amount, especially if you use a meat filling.
- The Bottom Line: It’s cheesy, crispy, and comforting. Enjoy it. That’s the whole point.
Common Mistakes to Avoid (Quesadilla Catastrophes)
It’s hard to go wrong, but here are a few ways to avoid disappointment.
- The Soggy Bottom: This is the ultimate quesadilla crime. It’s usually caused by using fillings that are too wet. If your salsa is watery or your beans aren’t drained well, you’re asking for a soggy mess. Keep your fillings relatively dry.
- A Pale, Flabby Top: You forgot to brush the top with butter or oil. This step is what helps the tortillas get golden, crispy, and delicious. Don’t skip it!
- The Tortilla Tumble: If you don’t overlap your tortillas enough in the beginning, you can end up with gaps where the cheesy filling leaks out and burns on the pan. Be generous with your overlap.
- The Cheesy Landslide: You cut into it the second it came out of the oven, didn’t you? Let it rest for five minutes. That brief pause allows the molten cheese to calm down and set, ensuring your slices hold together beautifully.
Variations & Customizations (Your Pan, Your Masterpiece)
The chicken and cheese classic is just a starting point.
- Philly Cheesesteak Quesadilla: Fill it with thinly sliced cooked steak, sautéed peppers and onions, and a mix of provolone and mozzarella cheese.
- Buffalo Chicken Quesadilla: Use shredded chicken tossed in buffalo sauce. Add a mix of mozzarella and blue cheese crumbles. Serve with a side of ranch or blue cheese dressing for dipping.
- Vegetarian Black Bean & Sweet Potato: Use a filling of cooked, mashed sweet potatoes mixed with black beans, corn, and a sprinkle of chili powder. Use a sharp cheddar or Monterey Jack cheese.
FAQ: Your Sheet Pan Quesadilla Queries, Answered
Let’s clear up some common questions about this giant, edible marvel.
1. Can I use corn tortillas?
I wouldn’t recommend it for this method. Large corn tortillas are hard to find, and they tend to crack and break when you try to fold them over, which would lead to a cheesy disaster. Large flour tortillas are your best bet.
2. How do I make it extra crispy?
Make sure your oven is fully preheated to a high temperature (425°F is great). Don’t be shy with the butter or oil on the pan and on top of the quesadilla. And pressing it with the second sheet pan is a key step!
3. Can I assemble this ahead of time?
You can prep all your fillings ahead of time (cook the meat, chop the veggies), but I recommend assembling it right before you plan to bake it. If you assemble it too far in advance, the tortillas can get soggy from the filling.
4. What’s the best way to reheat leftovers?
For the love of all that is crispy, do not use the microwave. It will turn your beautiful quesadilla into a sad, rubbery pancake. The best way to reheat it is in the oven or a toaster oven at 375°F (190°C) for 5-10 minutes, or in an air fryer until it’s warmed through and crispy again.
5. Can I make this on a smaller pan?
Absolutely. Just use a smaller baking sheet (like a quarter sheet pan) and fewer tortillas. Adjust the amount of filling and cheese accordingly.
6. Do I really need the second sheet pan on top?
It’s not strictly necessary, but it really helps! It presses everything together, ensuring the top and bottom tortillas make good contact with the filling and helps everything get evenly crispy.
7. What’s the best cheese for quesadillas?
You want a good melting cheese. Low-moisture cheeses are key. Monterey Jack, Oaxaca, asadero, and low-moisture mozzarella are all fantastic. A good sharp cheddar adds great flavor. A blend is usually best!
Final Thoughts
You are now armed with the ultimate kitchen hack for feeding a hungry crowd (or just a very hungry you). This sheet pan quesadilla is more than just a recipe; it’s a new way of life. A life with fewer dishes, less stress, and way more crispy, cheesy goodness.
So go on, retire from your short-order cook position. Embrace the simplicity of the sheet pan. And prepare to become a legend at your next game day party or family dinner. You’ve got this.

