
The Genius Sheet Pan Pancakes Recipe (No Flipping Required!)
Let’s paint a picture, shall we? It’s a beautiful, lazy weekend morning. The smell of coffee is in the air, and someone utters the magic word: “pancakes.” But you, the designated cook, know what this really means. It means you’ll be standing guard over a hot griddle, flipping flapjacks one by one, while everyone else eats in shifts. By the time you finally sit down with your own lukewarm stack, the fun is basically over. I call this the “tyranny of the griddle,” and I’m here to lead the revolution. Friends, it’s time to embrace the life-altering magic of sheet pan pancakes.

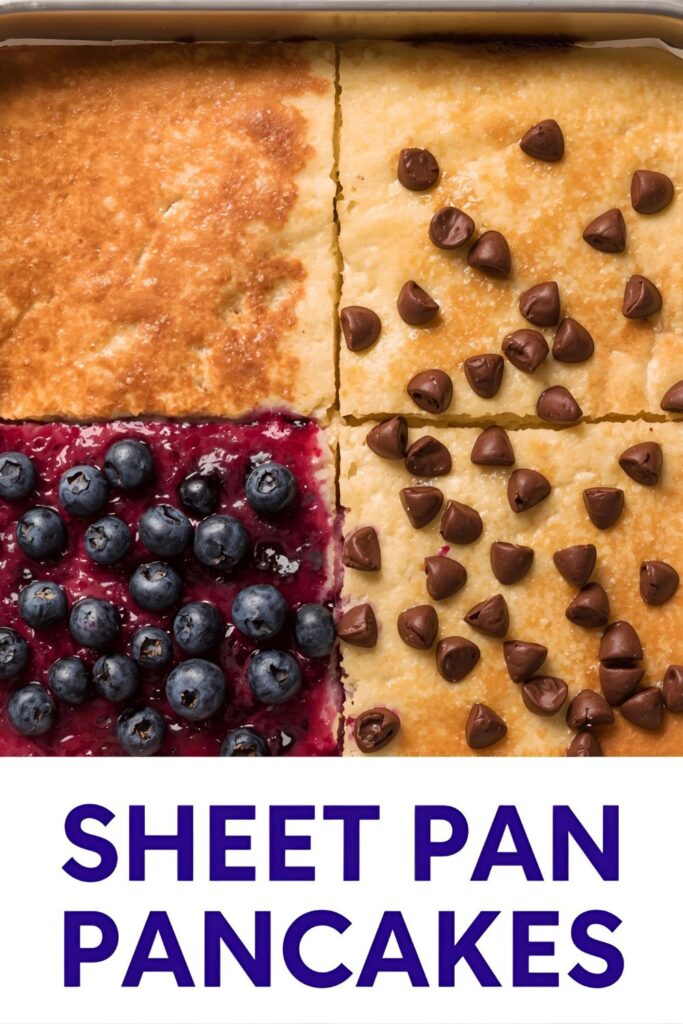
That’s right. We’re making one giant, fluffy, golden-brown pancake in the oven. No flipping, no batches, no sacrificing your morning to be a short-order cook. This is the ultimate brunch hack that lets you make delicious, customizable pancakes for a whole crowd, all at once. Prepare to have your mind, and your morning routine, completely blown.
Why This Recipe Is Your New Weekend Savior
If the idea of retiring your spatula hasn’t already sent you running for a baking sheet, let me count the ways this recipe will change your life.

First and foremost, everyone eats at the same time. Can I get an amen? You pop one pan in the oven, and 15 minutes later, you have a giant, fluffy pancake ready to be sliced and served to the entire family. Everyone gets a hot, fresh piece. It’s a brunch miracle.
Second, it’s a customizable toppings masterpiece. Do you have a kid who only eats chocolate chips, a partner who loves blueberries, and you’re feeling like a classic plain Jane? No problem! You can literally create zones on your pancake canvas—a chocolate chip quadrant here, a blueberry section there. Everyone gets what they want without you having to juggle three different batters.
Finally, it is almost laughably easy. You mix a single bowl of batter, pour it onto a pan, and the oven does all the work. The result is a pancake that’s incredibly fluffy and tender, with slightly crisp, caramelized edges that are, frankly, to die for. It’s less work for a better result. What’s not to love?
The Simple Ingredient Lineup

You can absolutely use your favorite “just-add-water” pancake mix for this (we love a shortcut!), but if you want to make them from scratch, here’s a simple, foolproof recipe.
- 2 cups all-purpose flour
- 2 tablespoons granulated sugar
- 2 teaspoons baking powder
- 1 teaspoon baking soda
- 1/2 teaspoon salt
- 1 3/4 cups buttermilk: This is the secret to a tender, fluffy pancake. Don’t skip it!
- 2 large eggs
- 4 tablespoons unsalted butter, melted and cooled slightly
- 1 teaspoon vanilla extract
- Your favorite toppings: Blueberries, chocolate chips, sliced bananas, sprinkles, chopped nuts, etc.
Key Substitutions:
- Boxed Mix: Seriously, if you have a favorite pancake mix, just prepare it according to the package directions and pour it on the sheet pan. It works beautifully.
- No Buttermilk? Make your own! Add 1 1/2 tablespoons of lemon juice or white vinegar to regular milk, let it sit for 5 minutes, and voilà.
- Gluten-Free: Use a good quality gluten-free all-purpose flour blend (one with xanthan gum) to make a GF version.
The Bare Minimum Tools
You don’t need anything fancy to join the sheet pan revolution.
- A Rimmed Baking Sheet: The star of the show. A standard 13×18-inch half-sheet pan is perfect. The rim is absolutely essential to contain the batter.
- Large Mixing Bowl: For whisking up your batter.
- Whisk: For, well, whisking. A spatula works too.
- Offset Spatula or Regular Spatula: Super helpful for spreading the batter evenly in the pan.
- Parchment Paper: Optional but highly recommended for zero sticking and easy cleanup.
Step-by-Step to No-Flip Freedom
Ready to change your breakfast game forever? It’s almost too easy.
Step 1: Prep Your Pan and Oven
First, get your oven preheating to 425°F (220°C). This high heat helps the pancake puff up nicely. Next, prepare your sheet pan. This is the most important step! Generously grease the pan with butter or non-stick spray. For extra insurance, line the pan with parchment paper first, then grease the parchment.
Step 2: Mix the Batter
In your large mixing bowl, whisk together the dry ingredients: flour, sugar, baking powder, baking soda, and salt. In a separate medium bowl, whisk the wet ingredients: buttermilk, eggs, melted butter, and vanilla extract.
Step 3: Combine (But Don’t Go Crazy!)
Pour the wet ingredients into the dry ingredients. Whisk them together just until combined. A few lumps are perfectly fine and are actually the secret to a tender pancake. If you overmix, you’ll get a tough, rubbery result. Put the whisk down and walk away.
Step 4: Pour, Spread, and Top
Pour the batter onto your prepared sheet pan. Use your offset spatula to gently spread it into an even layer, making sure it reaches all the corners. Now for the fun part! Sprinkle your toppings over the batter. Remember, you can create different “zones” for different tastes.
Step 5: Bake to Golden Perfection
Slide that beautiful pan into the hot oven and bake for 12-15 minutes. It’s done when the pancake is puffed, golden brown, and a toothpick inserted into the center comes out clean. The edges should be slightly browned and pulling away from the sides of the pan.
Step 6: Slice and Serve the Glory
Let the pancake cool in the pan for a few minutes. You can slice it into squares right in the pan or use the parchment paper to lift the whole thing out onto a cutting board. Serve warm with butter, maple syrup, and an overwhelming sense of accomplishment.
Calories & Nutritional Info (The Fine Print)

This will vary wildly based on your toppings, but here is a rough estimate for one plain square (assuming you cut the pan into 12 squares).
- Estimated Calories per Square: 150-200 calories
- Customizable Goodness: You control what goes in! Use whole wheat flour, reduce the sugar, or load it up with fruit to adjust the nutritional profile.
- Portion Control: Since you’re cutting it into squares, it’s actually easier to manage portion sizes than with a giant stack of traditional pancakes. Or not. You do you.
Common Mistakes to Avoid (Save Yourself the Heartache)
This recipe is simple, but a few missteps can lead to breakfast tragedy.
- The Sticking Situation: This happens when you don’t prep your pan properly. That pancake batter will fuse to an ungreased pan like superglue. Grease it like your life depends on it, or better yet, use parchment paper and grease it.
- The Overmixing Offense: I know it’s tempting to whisk until the batter is perfectly smooth, but please resist! Overmixing develops the gluten in the flour and leads to a tough, chewy pancake instead of a light, fluffy one. Lumps are your friends.
- The Topping Overload: Don’t go too crazy with heavy toppings. A mountain of fruit or chocolate chips can sink to the bottom of the batter, creating a gooey layer. A generous but even sprinkle is the way to go.
- Using a Rimless Pan: Do not, I repeat, DO NOT try this on a flat cookie sheet. You will have a batter-pocalypse on the bottom of your oven, and you will be very, very sad. A rimmed baking sheet is a must.
Variations & Customizations (The Fun Part)
The basic sheet pan pancake is a blank canvas. Go create your masterpiece.
Cinnamon Roll Swirl Pancakes
Before baking, swirl a mixture of 2 tablespoons of melted butter, 1/4 cup of brown sugar, and 1 tablespoon of cinnamon over the top of the batter. After it’s baked, drizzle it with a simple cream cheese glaze (cream cheese, powdered sugar, and a splash of milk). It’s divine.
Chocolate Peanut Butter Dream
Dollop peanut butter over the batter and use a knife to gently swirl it in. Then, sprinkle generously with chocolate chips. It’s a classic combo for a reason.
Savory Cheddar & Herb Pancakes
For a brunch-meets-lunch vibe, omit the sugar and vanilla from the batter. Instead, fold in 1 cup of shredded sharp cheddar cheese, 1/4 cup of chopped chives or green onions, and some black pepper. You can even add crumbled cooked bacon or sausage. Serve with a dollop of sour cream instead of syrup.
FAQ: Your Burning Pancake Questions, Answered
Let’s tackle the questions you’re probably pondering.
1. Do sheet pan pancakes taste like regular pancakes?
Yes, they taste just like your favorite fluffy pancakes! The texture is slightly different—a bit more uniform and cake-like, without the distinct “skin” of a griddled pancake. But you get the bonus of those delicious, slightly crispy caramelized edges.
2. Can I use my favorite pancake mix from a box?
One hundred percent, yes! This is one of the best things about this method. Just prepare your favorite brand of pancake mix according to the package instructions, pour it onto the prepared sheet pan, and bake as directed.
3. How do I keep the pancakes from sticking?
Parchment paper is your best friend. Line the pan with it, leaving a little overhang on the sides to use as “handles.” Then, give the parchment a quick spray with non-stick spray for double protection. The whole pancake will lift right out.
4. Can I make these gluten-free or dairy-free?
Absolutely. Use your favorite gluten-free pancake recipe or boxed mix. For dairy-free, use a plant-based milk and oil or a dairy-free butter substitute. The method remains exactly the same.
5. How do I store and reheat leftovers?
Leftovers are amazing! Store the cut squares in an airtight container in the fridge for up to 4 days. You can reheat them in the toaster, toaster oven, or microwave for a super-fast breakfast. They also freeze beautifully!
6. Can I make a smaller batch?
Yes! Just halve the recipe and use a smaller 9×13-inch quarter-sheet pan. Keep an eye on the baking time, as it might be a minute or two shorter.
7. Do they get as fluffy as regular pancakes?
They get incredibly fluffy! Because the heat in the oven surrounds the entire pan, they rise evenly and impressively, creating a wonderfully tender and airy texture all the way through.
Final Thoughts
You are now a member of the no-flip pancake club. Welcome. Your weekend mornings will be calmer, your family will be happier, and you will get to enjoy hot breakfast right alongside them.
So go forth and bake. Experiment with toppings, create your own signature flavor combinations, and reclaim your rightful place at the breakfast table. You’ve earned it. Now, if you’ll excuse me, I think it’s time to retire my spatula for good.

