
Easy Sheet Pan Bibimbap (Korean Flavors Without the Work!)
I have a deep, unwavering love for bibimbap. It’s a perfect food—a vibrant bowl of seasoned vegetables, savory meat, a spicy-sweet sauce, all crowned with a glorious fried egg. But let’s have a moment of real talk. Making traditional bibimbap at home can feel like you’re prepping for a multi-course dinner party for one. You’ve got one pan for the carrots, another for the mushrooms, a third for the spinach, a fourth for the meat… before you know it, you’ve used every pan you own and the sink is a war zone. Who has time for that on a Wednesday?

What if you could achieve that same kaleidoscope of flavor—including the coveted crispy rice—with just one pan? Welcome, my friend, to the glorious, life-altering magic of sheet pan bibimbap. This isn’t just a recipe; it’s a rebellion against dishes. It’s a weeknight dinner hack so brilliant, you’ll wonder how you ever lived without it.
Why This Recipe Will Become Your New Obsession
If the promise of “fewer dishes” hasn’t already sold you, allow me to elaborate on why this method is pure genius.

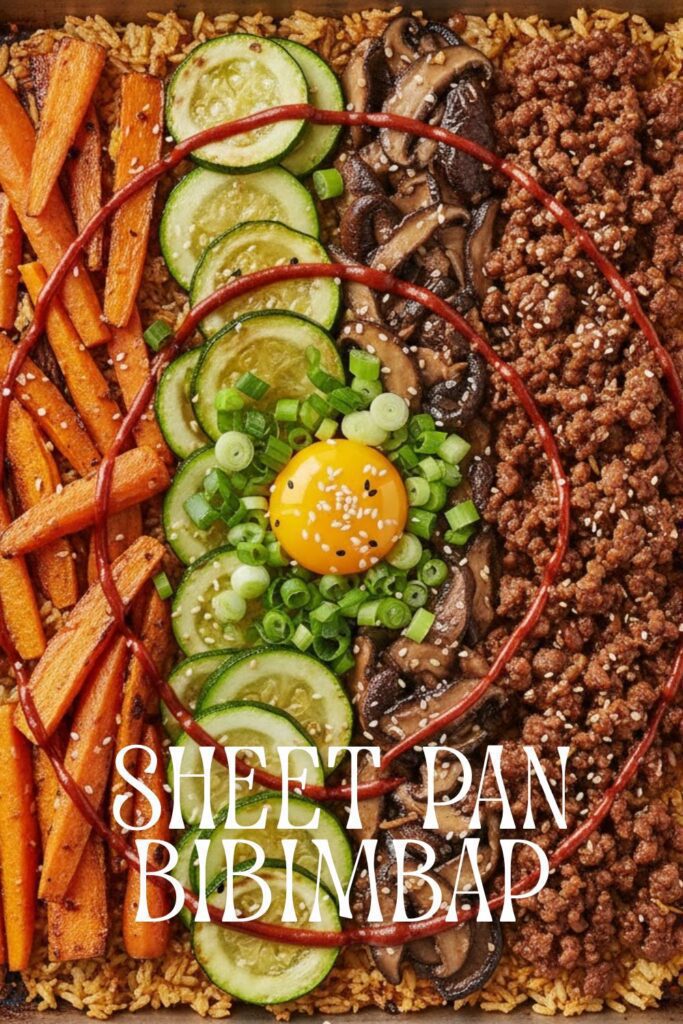
First, and most importantly, you get next-level crispy rice. In a traditional stone bowl (dolsot), the best part is the layer of crunchy, toasted rice at the bottom, called nurungji. By spreading the rice on a hot sheet pan and blasting it with heat, we recreate that incredible texture. You get crunchy bits, chewy bits, and soft bits all in one go. It’s a texture party, and everyone’s invited.
Second, the flavor gets a major upgrade. Roasting vegetables concentrates their sugars and brings out a deep, caramelized sweetness that you just don’t get from a quick sauté. The meat cooks right alongside them, with all the delicious juices mingling together. It’s a symphony of flavor created by pure, unadulterated laziness.
Finally, it’s ridiculously easy and visually stunning. You arrange everything in neat little rows on the pan, and it roasts into a beautiful mosaic of color. It looks like you’re an artist, but your only real skills were chopping and plopping. It’s the ultimate way to impress yourself, your family, or anyone lucky enough to be at your dinner table.
The Deliciously Simple Ingredient List

This recipe is all about getting those classic bibimbap flavors with easy-to-find ingredients. I’ll break it down into the pan components and the sauce that brings it all together.
For the Sheet Pan:
- 1 lb ground beef: You can also use thinly sliced sirloin or ribeye.
- 8 oz cremini mushrooms, sliced
- 2 carrots, julienned or cut into matchsticks
- 1 medium zucchini, julienned or cut into matchsticks
- 5 oz fresh spinach
- 4 cups cooked, day-old rice: This is the most important ingredient. Fresh, warm rice will steam, not crisp. Use leftover rice from the day before!
- 1 tablespoon soy sauce (or tamari)
- 2 teaspoons sesame oil
- 2 cloves garlic, minced
- 1 teaspoon grated ginger
For the Bibimbap Sauce & Toppings:
- 1/4 cup gochujang (Korean chili paste): The heart and soul of the dish. Find it in the international aisle.
- 2 tablespoons sesame oil
- 1 tablespoon soy sauce
- 1 tablespoon rice vinegar
- 1 tablespoon water
- 1 teaspoon sugar or honey (optional, but recommended)
- 4 large eggs
- Toppings: Kimchi, toasted sesame seeds, sliced green onions. These are not optional, IMO.
Key Substitutions:
- Protein Swap: Use ground pork, chicken, or crumbled firm tofu for a vegetarian/vegan option.
- Veggie Freedom: Feel free to use other veggies that roast well, like bell peppers, broccoli florets, or bean sprouts (add these with the spinach).
- Rice Alternative: Brown rice works, as long as it’s day-old. For a low-carb version, see the variations section!
The Minimalist’s Toolkit
You don’t need a kitchen full of gadgets for this. The beauty is in the simplicity.
- A Large, Rimmed Sheet Pan: Once again, the rimmed pan is your hero. It contains the magic and prevents any tragic spills in your oven.
- A Large Mixing Bowl: To marinate your protein and get it properly seasoned.
- A Small Bowl or Whisk: For mixing up that addictive bibimbap sauce.
- A Non-Stick Skillet: This is for the one thing the sheet pan can’t do—frying those perfect sunny-side-up eggs.
Step-by-Step to Bibimbap Bliss
Ready for the easiest bibimbap of your life? Let’s do this.
Step 1: Marinate the Meat
Preheat your oven to 425°F (220°C). In a large bowl, combine the ground beef (or your protein of choice), 1 tablespoon of soy sauce, 2 teaspoons of sesame oil, minced garlic, and grated ginger. Mix it all up and let it sit while you prep the veggies. This is where the flavor foundation is built.
Step 2: The First Veggie Roast
On your large sheet pan, arrange the mushrooms and carrots in separate sections. Drizzle them with a little olive oil and a pinch of salt. Roast for 10-12 minutes until they start to get tender and slightly browned. These tougher veggies need a head start.
Step 3: Add the Rest
Carefully pull the hot pan from the oven. Add the zucchini in its own little section and crumble the marinated beef into another. Spread the beef out so it cooks evenly. Pop the pan back in the oven and roast for another 8-10 minutes, until the beef is cooked through and the zucchini is tender-crisp.
Step 4: The Crispy Rice Magic
Again, pull the pan from the oven. Add the fresh spinach to an empty spot on the pan; the residual heat will wilt it perfectly. Now, for the main event: push the veggies and meat to the sides of the pan and dump your cold, day-old rice into the middle. Drizzle the rice with a bit more sesame oil, pat it down into an even layer, and sprinkle with salt. Return the pan to the oven for 5-7 minutes, or until you can hear it sizzling and the edges are getting golden.
Step 5: Make the Sauce and Fry the Eggs
While the rice is crisping, this is your multitasking moment. In a small bowl, whisk together the gochujang, sesame oil, soy sauce, rice vinegar, water, and sugar until smooth. In your non-stick skillet, fry your eggs to your desired doneness (a runny yolk is highly encouraged!).
Step 6: Assemble and Serve
Take the pan out of the oven. You can either serve directly from the pan (family style!) or scoop a generous portion of the crispy rice, roasted veggies, and beef into a bowl. Top with a fried egg, a generous drizzle of the bibimbap sauce, some kimchi, a sprinkle of sesame seeds, and green onions. Break that yolk and mix it all together. Pure heaven.
Calories & Nutritional Info (For the Curious)

This is a pretty well-rounded meal, but here’s a rough estimate per serving (assuming 4 servings).
- Estimated Calories per Serving: 500-650 calories
- Protein: A hefty 25-30g
- Carbohydrates: 50-60g
- Fiber: A solid dose from all the vegetables.
- Balanced Meal Alert: You’ve got protein, carbs, healthy fats, and tons of veggies all in one go. It’s a nutritional powerhouse that tastes like a treat.
Common Mistakes to Avoid (I Made Them So You Don’t Have To)
This recipe is simple, but a few wrong turns can lead to disappointment. Dodge these bullets.
- The Soggy Rice Catastrophe: I will say it again for the people in the back: you must use cold, day-old rice. Freshly cooked rice is too moist and will steam, turning into a gummy mess instead of a crispy delight.
- The Veggie Timing Fiasco: Don’t just throw all your vegetables on the pan at once. Carrots take way longer to cook than zucchini or spinach. Roasting them in stages ensures everything is perfectly cooked.
- The Bland Protein Blunder: Don’t just cook plain ground beef. That simple 5-minute marinade of soy sauce, sesame oil, garlic, and ginger is what gives the dish its savory, Korean BBQ-esque flavor base. Do not skip the marinade.
- Skimping on the Sauce: The gochujang sauce is not a suggestion; it’s the entire point. It brings everything together with its spicy, sweet, and funky flavor. Be generous with the sauce. No one ever complained about too much bibimbap sauce.
Variations & Customizations (Your Bibimbap, Your Rules)
The classic is great, but feel free to get creative. This method is incredibly versatile.
Spicy Pork Bulgogi Style
Use thinly sliced pork shoulder or loin instead of ground beef. Marinate it in a mixture of gochujang, soy sauce, grated pear (the secret ingredient!), garlic, and ginger. Add it to the pan for the last 8-10 minutes of cooking until it’s caramelized and cooked through.
Tofu & Mushroom Powerhouse (Vegan)
Use a block of extra-firm tofu, pressed and crumbled. Marinate it just like the beef. Go heavy on the mushrooms, using a mix of shiitake and cremini for a deep, umami flavor. Make sure your gochujang brand is vegan and skip the egg (or use a vegan egg substitute).
Keto-Friendly Bibimbap
Swap the rice for cauliflower rice. Since it cooks quickly, add it to the sheet pan during the last 5 minutes of roasting, just long enough to heat through and toast slightly. Swap the sugar in the sauce for a keto-friendly sweetener and use tamari instead of soy sauce.
FAQ: Your Burning Bibimbap Questions
Let’s clear the air on some common questions about this glorious sheet pan creation.
1. What exactly is Gochujang and is it super spicy?
Gochujang is a fermented Korean chili paste. It’s a fundamental ingredient in Korean cooking. It has a complex flavor that’s savory, sweet, and spicy all at once. The spice level varies by brand, but most standard versions have a pleasant, buildable heat, not a mouth-scorching fire.
2. Is this an authentic Korean recipe?
Let’s be real: no. An ajumma (Korean auntie) would probably laugh at this method. Authentic bibimbap involves careful, individual preparation of each component. This is a delicious, Korean-inspired hack designed for busy people who want those amazing flavors without the traditional labor. We’re honoring the flavors, not the technique.
3. How do I get the rice really crispy?
Three things are key: 1) Use cold, day-old rice. 2) Don’t overcrowd the pan. 3) Drizzle with oil and pat it down into a single layer so it has maximum contact with the hot pan.
4. Can I use brown rice or quinoa?
Yes! Both work wonderfully, as long as they are cooked and cooled from the day before. The texture will be slightly different, but still delicious.
5. Do I have to use a runny egg?
You don’t have to, but the runny yolk creates a rich, creamy sauce that coats everything when you mix it all up, and it’s a signature part of the bibimbap experience. If you’re not a fan, a fully cooked fried egg or even a soft-boiled jammy egg would also be great.
6. What’s the best way to julienne vegetables?
You can use a sharp knife and some patience, but a simple julienne peeler or a mandoline (use the guard!) makes incredibly fast work of it.
7. Can I meal prep this?
Absolutely! Roast the meat and veggies as directed and store them in the fridge. Store the rice, sauce, and toppings separately. When you’re ready to eat, you can reheat the meat/veggie mix and crisp up the rice in a hot pan or in the oven for a few minutes.
Final Thoughts
You are now in possession of a secret weapon against boring weeknight dinners. This sheet pan bibimbap is proof that you don’t need a mountain of dishes or hours of prep to create a meal that is vibrant, healthy, and outrageously delicious.
So go ahead, clear out your fridge, embrace the crispy rice, and become the sheet pan dinner hero you were always meant to be. I promise, once you try this, you’ll have a hard time going back to the old way.Easy Sheet Pan Bibimbap (Korean Flavors Without the Work!)
I have a deep, unwavering love for bibimbap. It’s a perfect food—a vibrant bowl of seasoned vegetables, savory meat, a spicy-sweet sauce, all crowned with a glorious fried egg. But let’s have a moment of real talk. Making traditional bibimbap at home can feel like you’re prepping for a multi-course dinner party for one. You’ve got one pan for the carrots, another for the mushrooms, a third for the spinach, a fourth for the meat… before you know it, you’ve used every pan you own and the sink is a war zone. Who has time for that on a Wednesday?
What if you could achieve that same kaleidoscope of flavor—including the coveted crispy rice—with just one pan? Welcome, my friend, to the glorious, life-altering magic of sheet pan bibimbap. This isn’t just a recipe; it’s a rebellion against dishes. It’s a weeknight dinner hack so brilliant, you’ll wonder how you ever lived without it.

