
Don’t Overthink It: The Ultimate Seasonal Fruit Platter Recipe (Minimal Effort, Maximum Wow!)
Let’s talk about the tyranny of the complicated recipe. Sometimes, you just want something utterly vibrant, impossibly fresh, and naturally delicious without spending three hours measuring obscure powders. You want to eat a Seasonal fruit bowl that tastes like sunshine and effort—but involves almost no effort at all. You deserve to be that person who brings the stunning, colorful platter to the party, the one that makes everyone ask, “What’s your secret?” I’m here to tell you the secret is simple: nature did most of the work! This is the ultimate guide to assembling a dazzling Seasonal fruit platter that is truly delicious and shockingly easy.
Why This Fruit Platter Recipe Is Pure Genius
Why just chop fruit when you can elevate it to a culinary masterpiece? Because this recipe is awesome, that’s why. It delivers a burst of flavor, nutrients, and color that instantly upgrades any meal or gathering.

First, the flavor is unbeatable. When you choose fruit that’s actually in season, it tastes exactly as it should—sweet, ripe, and vibrant. Second, it’s ridiculously easy to execute. You don’t cook anything! You just cut and arrange. Third, it’s the ultimate healthy crowd-pleaser that naturally caters to almost every diet (vegan, gluten-free, low-fat, etc.). Plus, a well-arranged fruit platter makes you look like a domestic god/goddess who put in way more effort than you actually did. Who needs a soufflé when you have perfectly ripe berries?
Ingredients: Nature’s Candy Aisle

The key to a stunning fruit platter is selecting a variety of colors, textures, and flavors that reflect the current Seasonal fruit harvest.
H3: The Stars of the Season (Pick 4-6 Items)
- Summer (e.g., Peaches, Watermelon, Berries): Look for ripe peaches, juicy watermelon, strawberries, blueberries, and raspberries.
- Fall (e.g., Apples, Pears, Grapes): Choose crisp apples (Honeycrisp, Gala), firm pears, and grapes still on the vine.
- Winter (e.g., Citrus, Kiwi, Pomegranate): Mandarins, oranges (peeled and segmented), kiwi slices, and bright red pomegranate seeds.
- Spring (e.g., Pineapple, Mango, Melons): Ripe mango, cantaloupe, and honeydew melon cubes.
H3: The Flavor Enhancers (The Secret Sauce)
- 1 small Lime or Lemon: Cut into wedges for a fresh, zesty squeeze over the finished platter.
- A few sprigs of Fresh Mint or Basil: Crucial for garnish! Adds a professional, aromatic touch.
- Optional: 1 tablespoon Honey or Maple Syrup: For a subtle drizzle over melons or tart berries.
- Optional: Small bowl of Greek Yogurt or Honey Cream Cheese Dip: For serving alongside.

Key Substitutions:
- Tartness Boost: If your fruit selection is too sweet, a pinch of flaky sea salt sprinkled lightly over melon or berries surprisingly enhances the flavor and cuts the sweetness.
- Color Pop: Use kiwi slices, star fruit slices, or passion fruit pulp to add visual interest, even if they aren’t strictly local to your region.
- Dip Swap: For a vegan option, whip up a simple dip using full-fat coconut cream mixed with a dash of vanilla extract.
Tools & Kitchen Gadgets Used: Your Fruit Prep Station
Keep it simple. You don’t need a vegetable peeler that sings opera.
- Large Serving Board/Platter: Mandatory for presentation! A simple wooden board, slate, or a large white platter works best.
- Sharp Chef’s Knife: For clean, crisp cuts.
- Small Paring Knife: For peeling kiwi, segmenting citrus, or fancy cuts.
- Melon Baller (Optional): Highly recommended! Instantly makes melon look professional and fun.
- Small Ramekins or Pinch Bowls: For dips, honey, or tart berries.
- Cutting Board: A stable, clean surface for prepping.
- Citrus Juicer (Optional): For extracting fresh juice for drizzling.
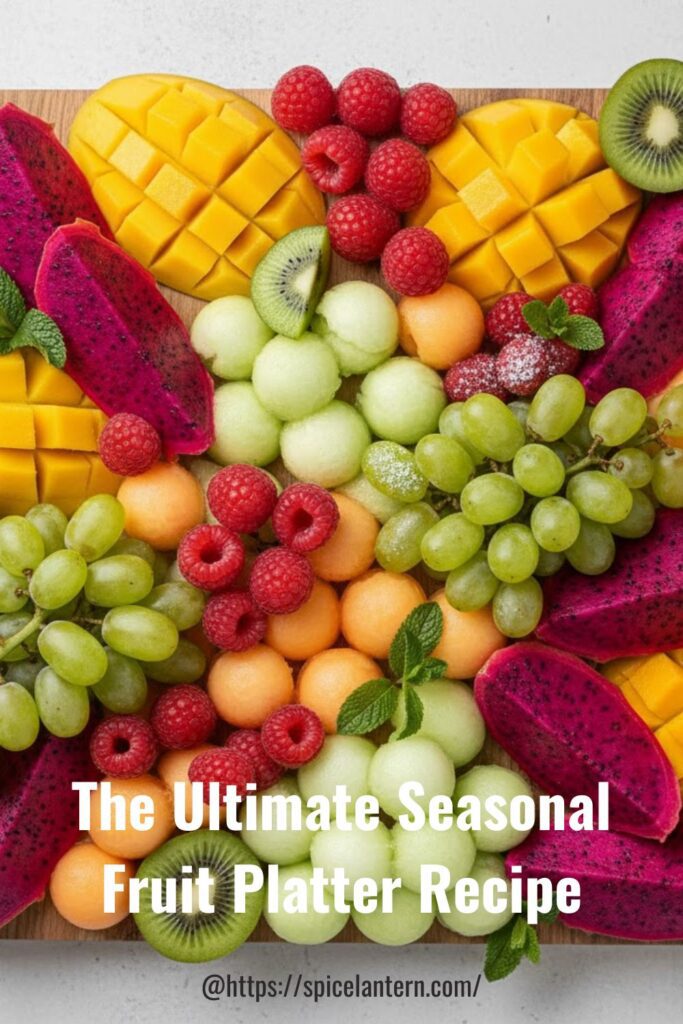
Step-by-Step Instructions: Arranging Edible Art
This is a masterclass in styling. You’re aiming for abundance, variety, and color contrast.
H3: Step 1: Wash, Chill, and Prep
Thoroughly wash all your Seasonal fruit. Chill any dips or spreads you plan to use. Slice firm fruits like apples and pears immediately before assembling and toss them with a squeeze of lemon or lime juice to prevent browning.
H3: Step 2: Slice for Visual Appeal
Don’t just cube everything! Slice firm fruits (kiwi, mango, melon, citrus) into various shapes: wedges, rounds, triangles, or use the melon baller for spheres. Keep soft berries whole.
H3: Step 3: Place the Anchors
Place your ramekins of dip, honey, or yogurt on the board first. These are your fixed points. Next, arrange your largest, most structured fruit pieces (like watermelon wedges or grape clusters on the vine) around the dips.
H3: Step 4: Create Color Contrast
Arrange the fruit by separating similar colors. Don’t put red strawberries right next to red raspberries. Use green (kiwi, green grapes) or white (melon, banana slices) fruit to create visual breaks between intense colors (red, purple, yellow).
H3: Step 5: The Fillers and Flourish
Use small berries and thin slices of fruit to fill in all the gaps between the larger pieces. You want the board to look abundant and overflowing. Tuck in a few sprigs of fresh mint or basil for that final, professional touch and a fresh scent.
H3: Step 6: The Finishing Zest
Just before serving, drizzle a small amount of honey or maple syrup over any tart berries. Squeeze a lime wedge lightly over the apple and pear slices for a bright finish. Serve immediately!
Calories & Nutritional Info: The Sweet Facts

Fruit is nature’s perfect dessert. These estimates are approximate per generous 1-cup serving (excluding dips).
- Estimated Calories per serving (1 cup mixed fruit): 80-120 calories
- Fat: $<1\text{g}$
- Carbohydrates: $20\text{g}-30\text{g}$ (mostly natural sugars and fiber)
- Fiber: $3\text{g}-5\text{g}$ (Excellent source!)
- Vitamins/Minerals: Rich in Vitamin C, potassium, and antioxidants.
- Hydration: High water content, especially melon and berries.1
- The Bottom Line: A super healthy, guilt-free way to satisfy that sweet tooth.
Common Mistakes to Avoid: Don’t Let Your Platter Wilt!
Fruit is delicate. Avoid these common errors for a vibrant, fresh platter.
- Slicing Apples Too Early: Apples and pears brown instantly! Slice these last and immediately toss them with lemon or lime juice (Step 1) to prevent oxidation.
- Using Overripe Fruit: Soft, mushy fruit leaks liquid onto the board, creating a sad, watery mess. Use firm, perfectly ripe Seasonal fruit only.
- Ignoring Color Contrast: A monochromatic board (all green or all yellow) is boring. Choose a variety of colors and arrange them strategically for maximum visual pop.
- Washing Berries Ahead of Time: Washed berries absorb water and get soggy quickly. Wash berries right before serving or tuck them in a dry, vented container.
- Overdosing on Dip: The fruit is the star! Keep the dip serving modest in a small ramekin. It’s an accompaniment, not the main attraction.
Variations & Customizations: Your Fruit Fantasy
The fruit platter is just the beginning! Remix it with these simple add-ons.
- Spicy Tajin Kick: Sprinkle a light dusting of Tajin seasoning (chili, lime, salt) over pineapple, mango, or watermelon wedges. The salty, spicy contrast is wildly addictive and viral!
- Savory Cheese & Fruit Plate: Incorporate cubes of mild cheese (Monterey Jack, mild cheddar) and salted almonds or walnuts into the fruit arrangement for a savory snack experience.
- Yogurt Bark Crumble: Crumble pieces of frozen yogurt bark (yogurt spread thin, topped with fruit and frozen solid) over the platter. This adds a beautiful icy, creamy texture and a fun element.
FAQ Section: Answering Your Fruit Prep Queries
You’ve got questions about this simple yet elegant dish. I’ve got answers.
H3: Q1: What is the best way to keep cut fruit fresh on a platter?
A1: Toss susceptible fruits (apples, pears, bananas) with a small amount of citrus juice (lemon or lime) to prevent browning. Keep the platter chilled by serving it on a cold surface or a platter nestled in ice.
H3: Q2: How far in advance can I cut the fruit?
A2: You can cut and store hard fruits (melons, pineapple) in airtight containers up to a day ahead. Soft fruits (berries, bananas, apples) should be cut right before serving for the best look and texture.
H3: Q3: Why is eating Seasonal fruit important?
A3: Seasonal fruit is generally fresher, tastes better, is often cheaper, and retains a higher nutrient content because it travels shorter distances and is picked at peak ripeness.2
H3: Q4: What is the best technique for slicing an orange?
A4: To segment an orange cleanly, slice off the top and bottom. Cut away the peel and white pith. Then, slice between the membranes to release clean segments (“supremes”). It looks elegant!
H3: Q5: What is a good, simple dip for a fruit platter?
A5: A simple mix of plain Greek yogurt, 1 tablespoon of honey, and ½ teaspoon of vanilla extract makes a delicious, protein-packed dip that complements most fruit flavors.
H3: Q6: Can I use frozen fruit on a platter?
A6: No, frozen fruit will thaw and become watery, ruining the texture and making the rest of the platter soggy. Stick to fresh, chilled fruit only.
H3: Q7: How do I make a fruit platter look abundant without buying too much?
A7: Use small fruits (berries, grapes) and small pieces of larger fruit to fill in every gap. Utilize height and tuck fresh herbs into empty spots. This makes a modest amount of fruit look overflowing and luxurious.
Final Thoughts: Simplicity Wins!
You did it! You created a magnificent, vibrant, and utterly fresh Seasonal fruit platter that makes everyone instantly happy. Go ahead, grab a ripe berry and pat yourself on the back. Doesn’t that taste exactly like pure, unadulterated nature? I knew it would. You’re officially a fruit platter styling guru. Are you ever going back to serving plain, boring fruit again? I highly doubt it. Enjoy your effortlessly elegant feast!

