The Ultimate Crunchy Fix: How to Master the Roasted Chickpea Snack
We have all been there. It is 3:00 PM on a Tuesday, your energy is cratering faster than a lead balloon, and you are staring down a vending machine like it holds the secrets to the universe. You want something salty, something crunchy, and something that won’t make you feel like a human trash can by dinner time. Why settle for neon-orange dust puffs when a high-protein, fiber-packed roasted chickpea snack is basically a culinary magic trick you can perform in your own kitchen?
Honestly, if you aren’t currently turning humble canned beans into “shatter-crisp” nuggets of joy, are you even living your best foodie life? It is the ultimate kitchen flex. I once served a batch of these to a friend who genuinely thought they were a high-end import from a boutique snack subscription. In reality, I just spent fifty cents on a can of garbanzos and ignored them in the oven for forty minutes. Ready to stop being a victim of the mid-afternoon slump? Let’s get roasting. 🙂
Why This Recipe is Actually Awesome
Why should you bother roasting your own beans when you could just buy a bag of chips? First off, the flavor profile is a tactical strike on your taste buds. Unlike mass-produced snacks that taste like salt and cardboard, you control the spice cabinet. You can go smoky, spicy, sweet, or “everything bagel” wild. It is the culinary equivalent of switching from black-and-white to technicolor.
TBH, the ease of cooking is the real hero here. You don’t need a culinary degree or a fancy deep fryer. You basically rinse, dry, and toss them in the oven. It impresses guests like crazy because people assume roasting legumes to this specific level of crunch requires some kind of secret ancient knowledge.
Our Top Pick

Papier Herb Garden Recipe Journal - Hardback Design
Capture your culinary ideas and favorite memories with this beautifully designed recipe journal. Organized sections for breakfast, lunch, dinner, and treats make it easy to record recipes, ratings, dietary notes, and cooking tips, along with measurement and conversion guides. Extra pages let you list favorite restaurants, shops, and places to try. Crafted with a premium hardback cover, luxurious 100gsm paper, and a gold foil accent, it’s both durable and stylish. Thoughtfully designed to suit any kitchen, it makes a practical, timeless gift for family, friends, or yourself.
Finally, let’s talk about the nutritional high ground. These aren’t empty calories; they are little protein grenades that keep you full until dinner. It’s high-protein, low-fat (depending on your olive oil enthusiasm), and makes you feel like a functional adult who actually cares about their gut biome. What more could you want from a legume?
The “Crunch Command” Ingredient List
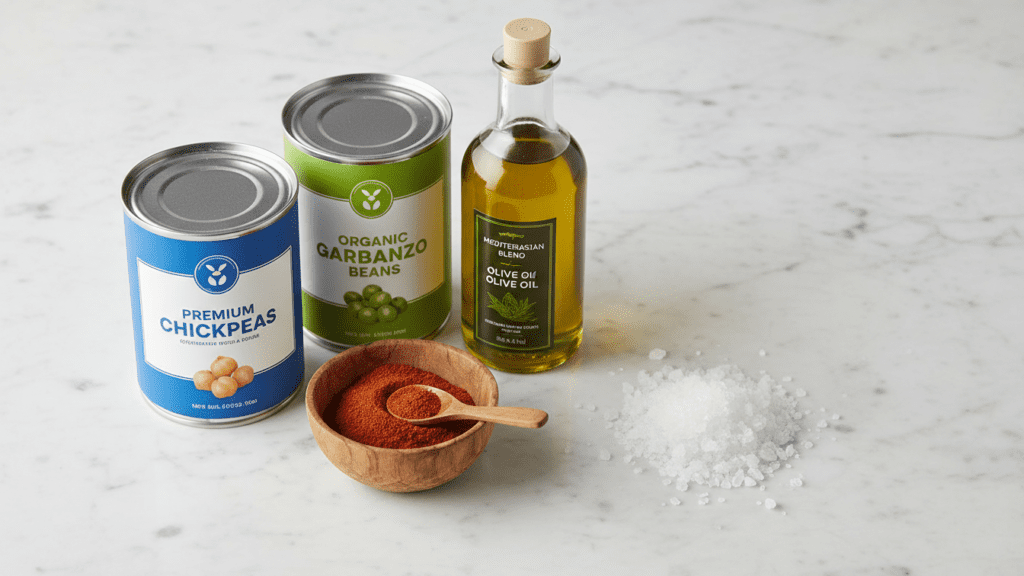
Don’t go hunting for rare organic dust in the deep woods. You just need the essentials, but for the love of all things holy, make sure your beans are dry!
- Canned Chickpeas (Garbanzo Beans): Two 15oz cans. FYI, the brand doesn’t matter, but the “rinse” does.
- Extra Virgin Olive Oil: Two tablespoons. It’s the glue for our spices and the key to the crunch.
- Sea Salt: A generous pinch.
- Smoked Paprika: For that “is this bacon?” vibe.
- Garlic Powder: Because we measure garlic with our hearts, not spoons.
- Cumin: For that earthy, Mediterranean depth.
- Key Substitution: If you’re out of olive oil, avocado oil works beautifully for high-heat roasting.
Tools & Kitchen Gadgets You’ll Need
To dominate the roasted chickpea snack game, you need gear that handles high heat and promotes airflow.
- Large Rimmed Baking Sheet: To give the beans room to breathe. Crowded beans are soggy beans.
- Fine Mesh Strainer: For the most thorough rinse of your life.
- Clean Kitchen Towel or Paper Towels: Absolute requirement. Moisture is the enemy of the crunch.
- Large Mixing Bowl: For the “spice tumble.”
- Parchment Paper: Or a silicone baking mat for easy cleanup.
- Kitchen Timer: Because “burnt” and “crunchy” are only two minutes apart.
Step-by-Step Instructions
Step 1: The Great Rinse
Open your cans and dump the chickpeas into your fine mesh strainer. Rinse them under cold water until the bubbles (aquafaba) disappear. We want clean beans, not bean-flavored soap suds.
Step 2: The Spa Treatment (Drying)
This is the most important step. IMO, if you skip this, you might as well just eat the beans cold from the can. Spread the chickpeas on a clean kitchen towel. Pat them dry like they’re a delicate infant. Roll them around until they are bone dry. If you have time, let them air dry for 20 minutes. The drier the bean, the louder the crunch! 🙂
Step 3: The Naked Roast

Preheat your oven to 400°F (200°C). Toss the completely dry chickpeas onto your baking sheet. Do not add oil yet. Roast them “naked” for 15 minutes. This evaporates any remaining internal moisture. FYI, this is the secret pro tip that separates the chefs from the amateurs.
Step 4: The Spice Tumble
Pull the pan out. Transfer the hot beans to your large bowl. Drizzle with olive oil and toss in your salt, paprika, garlic powder, and cumin. Stir until every chickpea looks like it’s wearing a beautiful, spiced coat.
Step 5: The Final Sizzle
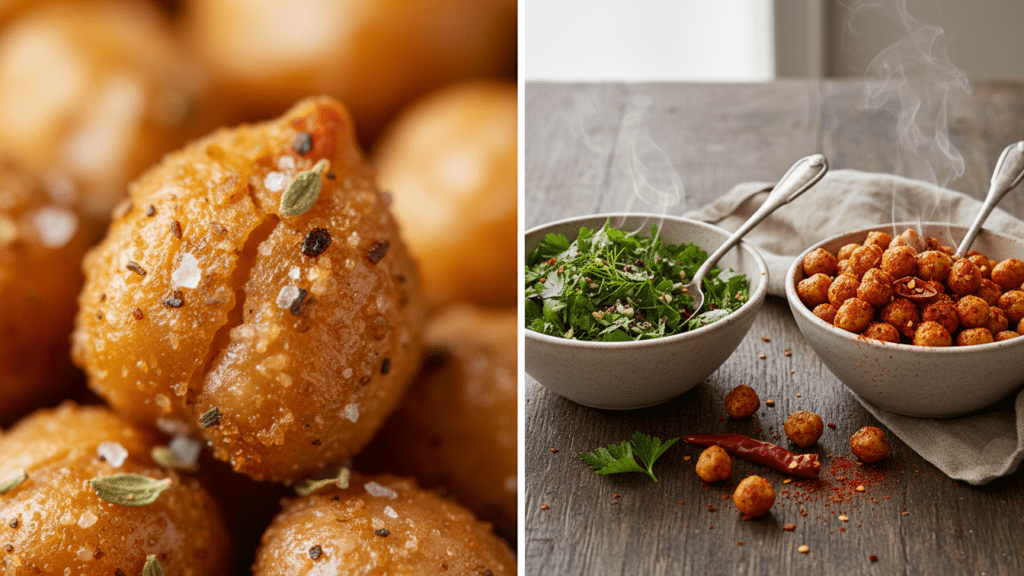
Put the spiced beans back on the tray and roast for another 20-25 minutes. Every 10 minutes, give the pan a good shake. You want them to be a deep golden brown. When you take one out and it shatters between your teeth without a “chewy” center, you have won.
Our Top Pick

LuBudingJoy Blank Recipe Book
B5 Blank Recipe Book – Create and organize your favorite recipes in one beautiful place. This hardcover recipe book (10" × 7.3") features 150 blank pages and includes DIY category stickers. Designed with conversion charts, content tables, and a back pocket for loose notes.
Step 6: The Cool Down
Turn off the oven and crack the door open. Let the chickpeas sit in there for 10 minutes as the oven cools. This final stage cures the crunch. Move them to a bowl and try not to inhale the entire batch in one sitting. I believe in you, but I also understand the struggle. :/
Calories & Nutritional Info
You are eating a snack that actually loves you back. Here is the breakdown per 1/2 cup serving:
- Calories: Approximately 140-160 kcal.
- Protein: A solid 6g-7g of plant power.
- Fiber: 5g (your digestive system is sending you a thank-you note).
- Healthy Fats: 4g from the olive oil.
- Iron: 10% of your daily value—basically a multivitamin you can crunch.
Common Mistakes to Avoid
- The Wet Bean Disaster: If there is water on the beans, they will steam, not roast. Dry them until they’re parched.
- Adding Spices Too Early: If you put garlic powder in at the start, it will burn and taste like a tire fire. Oil and spice halfway through.
- Crowding the Pan: If the chickpeas are touching, they won’t get crispy. Give them personal space.
- The Fridge Trap: Never store these in the fridge! The moisture will turn them into rubber. Store in an open jar or a paper bag.
- Impatience: Trying to eat them while they are still steaming. Let them cool to reach peak shatter-texture. TBH, patience is the hardest ingredient to find. 🙂
Variations & Customizations
Feeling like a snack scientist? Try these three spins:
The “Nacho Regular” Chickpea
Toss with nutritional yeast, chili powder, and onion powder. It tastes exactly like a certain famous orange chip but without the finger-staining evidence. It’s a vegan, keto-friendly miracle!
The Spicy Szechuan
Use toasted sesame oil instead of olive oil and toss with crushed Szechuan peppercorns and dried red chili flakes. The numbing heat is a sophisticated twist that pairs perfectly with a cold drink.
The Cinnamon Roll (Sweet Version)
Skip the savory spices. Use a neutral oil and toss with cinnamon and coconut sugar. It tastes like a tiny churro and is the best way to satisfy a 9:00 PM sugar craving without the guilt. IMO, this is the “final boss” of snack variations.
FAQ Section
Why are my roasted chickpeas not crunchy? You either didn’t dry them enough or you over-oiled them. Too much oil can actually keep the skins soft. Next time, use a lighter hand and a longer “naked roast” time!

How long do roasted chickpeas stay crunchy? If stored in a breathable container (like a paper bag), they stay crispy for about 2 days. In a sealed plastic bag, they’ll get soft within hours.
Can I make these in an air fryer? Absolutely! Use the same drying method and air fry at 390°F for 12-15 minutes, shaking the basket every 5 minutes. It’s faster but handles smaller batches!
Do I have to peel the chickpeas? You don’t have to, but if the skins fall off during drying, toss them! The loose skins become ultra-crispy like tiny chips.
Can I use dried chickpeas instead of canned? Yes, but you must soak and boil them first until they are tender. Canned is much faster and provides a consistent texture for snacking.
Are roasted chickpeas keto-friendly? They are moderate in carbs, so they fit in most keto diets if you watch your portions. Use the “nutritional yeast” variation to keep the carb count lower!
Why do some chickpeas “pop” in the oven? That is just steam escaping the bean. It’s totally normal and actually helps the texture. Don’t panic; the beans aren’t attacking you.
Final Thoughts
There you have it—a guide to the only roasted chickpea snack that won’t leave you disappointed and chewy-centered. It’s salty, it’s crunchy, and it’s a heck of a lot better for you than anything you’ll find in a foil bag.
Go ahead, give it a shot this weekend. And hey, if you end up naming your favorite spice blend after yourself, I won’t tell anyone. We’ve all been there. Tag me in your “crunch-test” videos, or just sit in your fiber-induced bliss. Happy roasting!