

Beyond Basic: The Viral Rainbow Arrangement Platter That Makes You Look Like an Artist
Let’s face it: we eat with our eyes first. A pile of cheese and crackers is fine, sure, but where is the drama? Where is the Instagram-worthy moment? If you’ve ever stared at a beautiful platter and wondered how they achieved that perfect gradient, you’ve come to the right place. We’re not just making an appetizer; we’re creating a mood, a masterpiece, a visual feast known as the Rainbow arrangement. This strategy is the viral hook your hosting game needs. It stops people mid-sentence and makes them reach for their phone before they even reach for a grape. Get ready to stop serving food and start serving art.
Why This Colorful Strategy Is a Hosting Superpower

Why should you organize your food by color instead of, say, by taste (boring!)? Because the Rainbow arrangement is effortless elegance. It taps into our inherent love for symmetry and vibrant colors, making even simple items like carrots and tomatoes look gourmet. It’s also incredibly flexible—you can use cheese, fruit, veggies, or even candy! This method is easy, requires no cooking, and generates more compliments than a new haircut. Seriously, you will convince everyone you have a secret artistic talent. Plus, it gently nudges people toward a more balanced plate because everything looks equally tempting. Win-win, I say!
Ingredients: Every Color Counts

To achieve that stunning gradient, you need to think of the spectrum. We’re aiming for Red, Orange, Yellow, Green, Blue, and Purple. Mix and match based on what’s in season or what you have on hand.
- Red (The Fire Starters):
- Strawberries: Halved or sliced.
- Cherry Tomatoes: Whole, or halved for safety.
- Red Bell Peppers: Sliced into strips.
- Substitution: Sliced radishes or raspberries.
- Orange (The Sunshine Section):
- Mandarin Oranges or Orange Slices: Peeled and segmented.
- Carrots: Cut into sticks.
- Cheddar Cheese Cubes: The easiest orange you’ll find!
- Substitution: Cantaloupe chunks or dried apricots.
- Yellow (The Bright Spot):
- Pineapple Chunks: For a tropical flair.
- Yellow Bell Peppers: Sliced.
- Banana Chips: Adds a nice crunch.
- Substitution: Sliced yellow squash or starfruit.
- Green (The Earthy Balance):
- Green Grapes: Kept on the vine for texture.
- Cucumber Slices: Thinly sliced.
- Kiwi Slices: Adds beautiful contrast.
- Substitution: Snap peas or green olives.
- Blue/Purple (The Pop of Drama):
- Blueberries: Small and scattered.
- Blackberries: Large and juicy.
- Red Grapes (the darkest ones): These pass for purple!
- Substitution: Purple cabbage (shredded thinly for texture).
Tools & Kitchen Gadgets Used

You don’t need to bake anything, so your tools are all about presentation and precision. Think more artist, less chef.
- Large Flat Platter or Wooden Board: The canvas for your edible masterpiece. The larger the board, the easier it is to create smooth color transitions.
- Sharp Chef’s Knife and Cutting Board: For prepping all the colorful ingredients.
- Small Ramekins or Bowls (2-3): For holding dips or small, tricky items (like blueberries or nuts) to keep the arrangement clean.
- Small Tongs or Skewers (Optional): Helpful for guests grabbing items.
- Small Crinkle Cutter (Optional): Adds fun texture to veggies like carrots.
Step-by-Step Instructions: Painting with Produce
Remember the order of the rainbow: Red, Orange, Yellow, Green, Blue, Purple (ROYGBIV). We’ll use this as our guide to create a seamless gradient.
Step 1: Prep and Dry Your Palette
Wash and thoroughly dry all your produce. Wiping down the fruit and veggies is key—any lingering moisture can make the board look sloppy. Slice, cube, or chop all your ingredients so they are ready to place.
Step 2: Place the Anchors
If you are using dips (hummus, ranch), place the ramekins on the board first. This helps break up the space. Alternatively, you can create a centerpiece with a pile of something neutral, like crackers or a block of cheese.
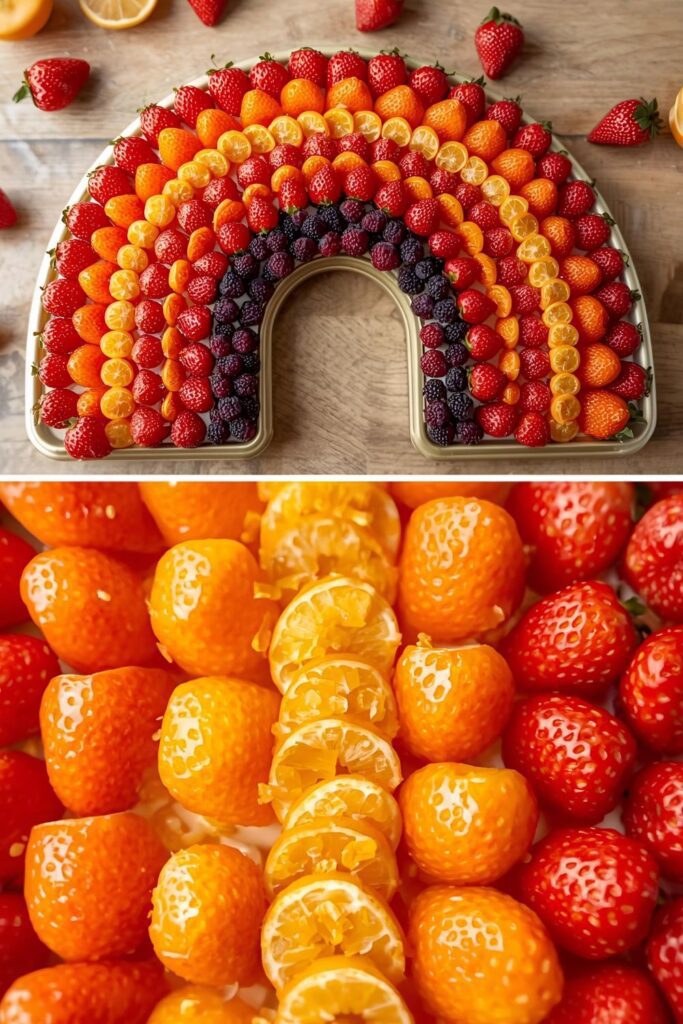
Step 3: Lay the Red and Orange Zones
Start on one side of the board with your Red items (strawberries, tomatoes). Arrange them in a curved line or small semi-circle. Immediately next to the red, place your Orange items (carrots, orange slices). Ensure the edges of the red and orange items are touching for a seamless color blend.
Step 4: Build the Yellow and Green Centers
Continue the pattern with Yellow (pineapple, yellow peppers). This color often helps brighten the center. Follow immediately with the Green items (cucumbers, green grapes). Use the grapes on the vine to create flow and fill space dramatically.
Step 5: Finish with Blue and Purple
Complete the rainbow with your Blue and Purple ingredients (blueberries, blackberries). If you are using a large board, you will create a full arch; if it’s a smaller board, you might fill one half or a diagonal stripe.
Step 6: Fill and Garnish
Now, use your smaller, filler items (nuts, small crackers, or edible flowers if you’re feeling extra) to fill any tiny gaps between the color zones. The goal is to make the board look abundant and dense. Drizzle a tiny bit of honey over the fruit sections if you want some sparkle.
Calories & Nutritional Info (Colorful and Guilt-Free)
This platter is mostly fruits and vegetables, so it’s a pretty guilt-free indulgence! Since it’s a grazing board, these are rough estimates for a moderate serving size (a small handful of each color).
- Estimated Calories Per Serving (Moderate): Approximately 150-250 calories. (Low, unless you load up on cheese and nuts).
- Primary Nutrients: Vitamins and Fiber (high-five, produce!).
- Sugar Content: Natural sugars, mostly from the fruit.
- Redeeming Factor: Eating this rainbow ensures you consume a wide spectrum of antioxidants and phytochemicals. Health food, baby!
Common Mistakes to Avoid (The Color Catastrophes)
Don’t let your inner perfectionist turn this into a disaster. Avoid these common pitfalls!
- Mixing Colors: This is the biggest no-no! If you mix the colors, you lose the Rainbow arrangement effect. Keep the zones distinct but touching for that gorgeous gradient.
- Serving Wet Produce: Wet fruit or veggies lead to a soggy, messy board. Always pat everything down with a towel after washing.
- Lack of Contrast/Texture: A board full of only soft fruit is boring. Ensure you have crunchy textures (carrots, nuts, crackers) to break things up.
- Forgetting the Volume: A sparse rainbow looks sad and cheap. Pack the ingredients tightly. You want them touching and overflowing slightly for that viral, abundant look.
- Using Pre-cut Fruit: Sliced fruit like apples and bananas oxidizes (browns) quickly. Slice these right before serving for maximum freshness.
Variations & Customizations: Beyond the Fruit Bowl
This Rainbow arrangement principle works for almost any type of food. Get creative!
- Dessert Rainbow: Create the gradient using colorful candies, mini macarons, colored icing cookies, and fruit. Think red velvet bites, orange gummy bears, yellow meringues, and purple rock candy. Fun!
- Vegetarian/Dip Rainbow: Focus on colorful veggies paired with multiple dips. Use red bell peppers with salsa, orange carrots with hummus, green cucumbers with guacamole, and purple cabbage with a blue cheese (or vegan cheese) dip.
- Keto/Low-Carb Rainbow: Skip the high-sugar fruits (like grapes and pineapple) and focus on colorful low-carb options: red peppers, orange cheese, yellow peppers, green olives, cucumbers, and blackberries (in moderation).
FAQ Section: All Your Colorful Concerns Answered
Got a question about making this edible masterpiece? You are not alone!
- Do I have to follow the ROYGBIV order exactly? You don’t have to, but the traditional ROYGBIV order works best because it creates the most visually pleasing, natural gradient. Deviate at your own peril (and risk of aesthetic chaos)!
- How far in advance can I prepare the Rainbow arrangement? You can prep and slice all the non-browning produce (carrots, peppers, grapes) up to a day ahead. Assemble the final board no more than 1 hour before serving for the freshest look.
- What’s the best way to keep the colors vibrant? Keep the board chilled until the last minute and avoid placing it in direct sunlight. A spritz of water mixed with lemon juice can help prevent some cut fruit from browning.
- Can I use vegetables that aren’t naturally rainbow colors? Yes! You can use cauliflower or broccoli, but they won’t help your rainbow gradient. Use them as a neutral, textured border or placed next to the green section.
- What size platter should I use for a party of 10? For 10 people, aim for a platter that is at least 18×18 inches or larger. You need the surface area to achieve that full, flowing rainbow effect without overcrowding.
- I have a neutral dip (hummus). Where should I place it? Place neutral dips in a small white ramekin in the center or slightly off to one side. Its neutrality won’t interrupt the color flow, but it acts as a good focal point.
- Is this type of arrangement only good for appetizers? Definitely not! This Rainbow arrangement technique works for dessert boards, breakfast boards (waffles, fruit, yogurt), or even elaborate sandwich platters. The principle of visual color-blocking is universal.
Final Thoughts: You Are Now a Color Genius
You have successfully graduated from basic charcuterie boards to the next level: the spectacular Rainbow arrangement. You didn’t even have to turn on the stove! You created a feast that is beautiful, fun, and honestly, a little bit smug (in the best way, of course). Go enjoy the gasps of delight when you unveil this work of art. Now that you know the secret, you’ll never settle for a messy, boring platter again. Share your creation online—I need to see that glorious gradient!

