

The Best Pumpkin Cheesecake Recipe That’ll Outshine Any Pie
Alright, let’s settle this age-old holiday debate once and for all. Pumpkin pie or pumpkin cheesecake? While pumpkin pie has its charm (like, a very distant, slightly bland charm), there’s a new sheriff in town, and it’s gloriously creamy, perfectly spiced, and undeniably decadent. Yes, I’m talking about the Pumpkin Cheesecake recipe that is about to become your new favorite fall dessert. Forget those sad, watery pumpkin pies. We’re aiming for pure, unadulterated pumpkin perfection here. This cheesecake is so good, it might just make you question all your previous life choices involving pie. Are you ready to upgrade your autumn dessert game? You bet you are.
Why This Pumpkin Cheesecake is a Must-Make
Still clinging to your grandma’s pumpkin pie recipe? Bless your heart. But seriously, this pumpkin cheesecake is a dessert revolution. Here’s why you need it in your life ASAP.
Creamy Dreamy Perfection

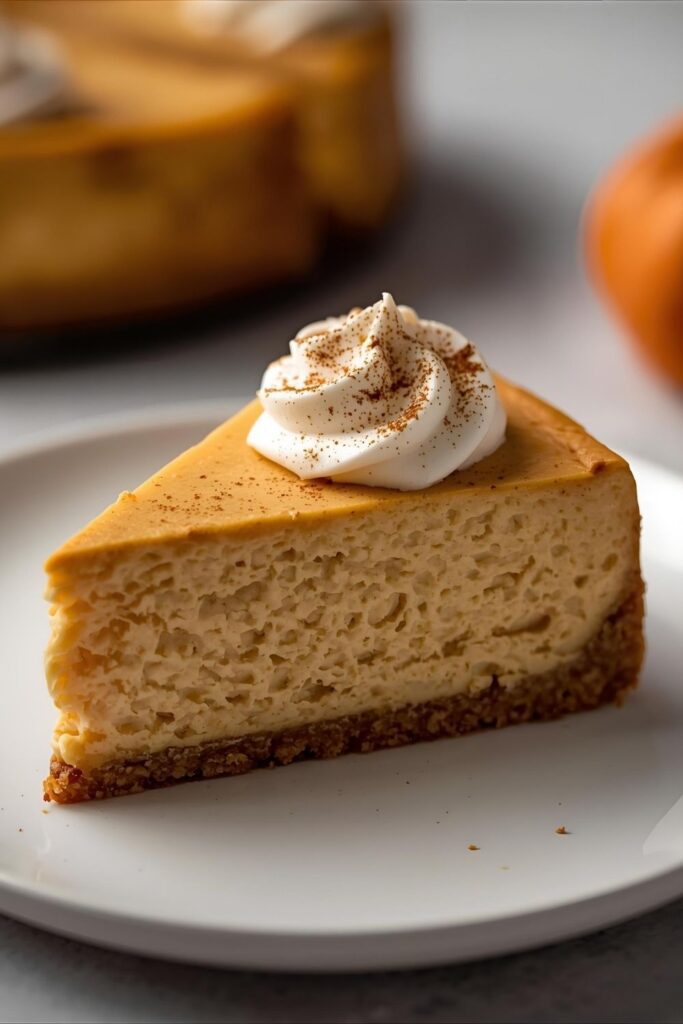
This isn’t just a cheesecake; it’s an experience. We’re talking about a velvety smooth, rich, and utterly luxurious filling that practically melts in your mouth. It’s got that signature cheesecake tang, perfectly balanced with the warm, comforting flavors of pumpkin and autumn spices.
Goodbye, Soggy Crust!
Let’s be honest, soggy pie crusts are a crime against humanity. Our pumpkin cheesecake features a crisp, buttery graham cracker crust that provides the perfect textural contrast to the creamy filling. No more sad, flabby bottoms for you!
The Ultimate Crowd-Pleaser

Whether it’s Thanksgiving, a fall dinner party, or just a Tuesday night when you deserve something amazing, this cheesecake is guaranteed to impress. It looks stunning, tastes incredible, and will have everyone asking for the recipe. You might even get a standing ovation. IMO, that’s worth the effort.
Ingredients You’ll Need for Your Fall Masterpiece
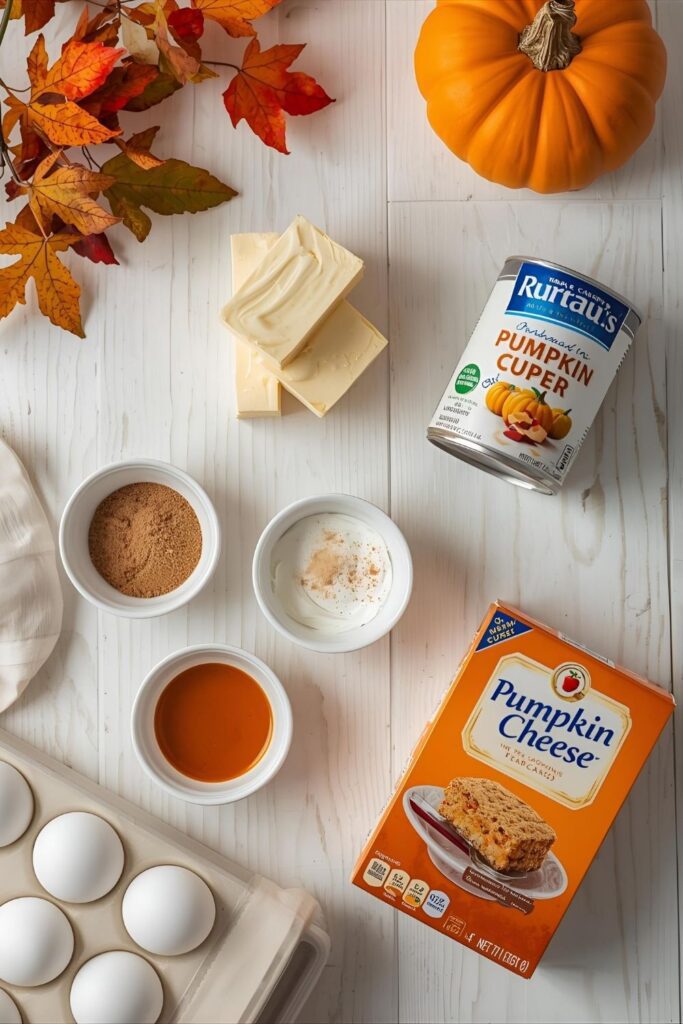
For a truly epic pumpkin cheesecake, high-quality ingredients at the right temperature are key. Seriously, room temperature cream cheese and eggs are non-negotiable!
For the Graham Cracker Crust
- Graham Cracker Crumbs: 1 ½ cups (about 10-12 full graham cracker sheets, crushed).
- Granulated Sugar: ¼ cup.
- Ground Cinnamon: ½ teaspoon.
- Unsalted Butter: 6 tablespoons, melted.
For the Pumpkin Cheesecake Filling
- Full-Fat Cream Cheese: 32 ounces (four 8-oz blocks), softened to room temperature. I’m telling you again for a reason!
- Canned Pumpkin Puree: 15 ounces (one standard can), not pumpkin pie filling. This is pure pumpkin.
- Granulated Sugar: 1 cup.
- Packed Light Brown Sugar: ½ cup.
- Large Eggs: 4, at room temperature.
- Heavy Cream: ¼ cup.
- Vanilla Extract: 1 tablespoon.
- Pumpkin Pie Spice: 2 teaspoons. If you don’t have it, use 1 tsp cinnamon, ½ tsp ginger, ¼ tsp nutmeg, and ⅛ tsp cloves.
- Ground Cinnamon: ½ teaspoon (extra for that deeper spice kick).
- Pinch of Salt: Just to bring out all those amazing flavors.
The Essential Tools & Kitchen Gadgets
Don’t worry, you won’t need anything too exotic for this.
- 9-inch Springform Pan: Your cheesecake’s best friend. This allows for easy removal without flipping the whole thing.
- Food Processor: Excellent for making uniform graham cracker crumbs. A ziplock bag and rolling pin work too!
- Electric Mixer: A stand mixer with a paddle attachment is ideal, but a good hand mixer will totally get the job done.
- Large Roasting Pan: You’ll use this for the all-important water bath. Make sure your springform pan fits inside it with room to spare.
- Heavy-Duty Aluminum Foil: For waterproofing your springform pan like a pro.
- Mixing Bowls, Spatulas, Measuring Cups & Spoons: The usual kitchen warriors.
Step-by-Step Instructions: Time to Create Magic
Alright, put on your apron, grab a cup of coffee (or wine, no judgment), and let’s bake the best pumpkin cheesecake ever.
Step 1: Preheat & Prep Your Pan
Preheat your oven to 325°F (160°C). Grab your 9-inch springform pan. Now, wrap the outside of the pan tightly with two or three layers of heavy-duty aluminum foil. This creates a waterproof seal, preventing water from the water bath from seeping in and giving you a soggy crust. Set it aside like the VIP it is.
Step 2: Craft the Glorious Crust
In a food processor, pulse the graham crackers until you have fine, even crumbs. Alternatively, put them in a ziplock bag and crush them with a rolling pin until fine (great for stress relief, BTW!). In a medium bowl, combine the graham cracker crumbs, granulated sugar, and cinnamon. Pour in the melted butter and mix until the crumbs are thoroughly moistened and resemble wet sand. Press this mixture firmly and evenly into the bottom of your prepared springform pan. Use the bottom of a glass or your hands to get it really compact. Bake the crust for 10 minutes, then remove it from the oven and let it cool slightly while you prepare the filling.
Step 3: Cream Cheese & Sugars First!
In the bowl of your stand mixer fitted with the paddle attachment (or using a large bowl and a hand mixer), beat the room temperature cream cheese on medium speed until it’s super smooth and creamy, with no lumps at all. Scrape down the sides of the bowl frequently to ensure everything gets incorporated. Add both the granulated sugar and brown sugar, and beat until just combined and smooth.
Step 4: Add the Pumpkin & Spices
Reduce the mixer speed to low. Add the canned pumpkin puree, heavy cream, vanilla extract, pumpkin pie spice, extra ground cinnamon, and a pinch of salt. Mix until everything is just incorporated. Again, scrape down the bowl.
Step 5: Incorporate the Eggs (Gently!)
Now for the eggs. Add them one at a time, mixing on the lowest speed possible just until the yolk breaks and disappears into the batter. Do NOT over-mix the eggs! This is a huge culprit for cheesecake cracks. Over-mixing incorporates too much air, which expands during baking and then collapses, causing cracks.
Step 6: The Water Bath Bake
Pour your silky smooth pumpkin cheesecake filling over the cooled graham cracker crust in the springform pan. Smooth the top with a spatula. Place the foil-wrapped springform pan into your larger roasting pan. Carefully pour boiling water into the roasting pan until it reaches about halfway up the sides of the springform pan. Carefully transfer the roasting pan with the cheesecake to your preheated oven. Bake for 60 to 75 minutes. The cheesecake is done when the edges are set and slightly puffed, but the center 2-3 inches still has a slight, ethereal wobble to it. Don’t worry, it will set completely as it cools.
Step 7: The Critical Cool Down (Patience, Grasshopper)
Once baked, turn off your oven but leave the cheesecake inside with the oven door propped open slightly for 1 hour. This gradual cooling prevents drastic temperature changes that can cause cracks. After an hour, carefully remove the cheesecake from the water bath (discard the water) and place it on a wire rack to cool completely to room temperature. Finally, cover the cheesecake loosely with plastic wrap and refrigerate for at least 8 hours, or ideally overnight. This chilling period is crucial for setting, flavor development, and that perfect creamy texture.
Calories & Nutritional Info
Let’s call it “worth every single bite” information.
- Serving Size: 1 slice (1/12th of the cheesecake)
- Calories: Approximately 600-650 kcal (depending on toppings)
- Fat: ~40-45g
- Carbohydrates: ~50-55g
- Sugar: ~35-40g
- Protein: ~10g (Disclaimer: These are estimated values. Actual nutritional content can vary based on specific ingredient brands and serving sizes.)
Common Mistakes to Avoid (The Cheesecake Commandments, Fall Edition)
Preventing a cheesecake disaster is easier than you think. Learn from my past blunders!
- Using Cold Ingredients: If your cream cheese and eggs are not at room temperature, your batter will be lumpy and uneven. Seriously, plan ahead!
- Over-mixing the Batter: This is the arch-nemesis of crack-free cheesecakes. Too much air means too many cracks. Beat on low speed and only until just combined, especially after adding eggs.
- Skipping the Water Bath: Don’t even think about it! The water bath provides even, gentle heat and a humid environment. This prevents the edges from drying out and cracking, giving you that silky texture.
- Opening the Oven Door Too Often: Every time you peek, you let out precious heat and steam, messing with the cheesecake’s even bake. Be strong. Resist the urge.
- Impatient Cooling: Whipping a hot cheesecake straight into the fridge is a recipe for disaster (and cracks). The gradual cooling in the oven and then at room temperature is crucial.
- Using Pumpkin Pie Filling: This is not the same as pumpkin puree. Pie filling already has sugar and spices, and it will throw off the balance of your cheesecake. Make sure your can says “100% Pure Pumpkin.”
Variations & Customizations
Want to get a little wild with your pumpkin perfection? Here are some ideas.
1. Streusel Topping Dream
Instead of just plain whipped cream, add a crunchy streusel topping! Combine ½ cup flour, ¼ cup brown sugar, ¼ cup cold butter (cubed), and ½ tsp cinnamon. Sprinkle over the cheesecake during the last 15-20 minutes of baking.
2. Spiced Pecan Praline Topping
For a decadent crunch, make a simple pecan praline sauce. Melt butter, brown sugar, and a splash of cream, then stir in toasted pecans. Drizzle over cooled cheesecake before serving. Talk about fancy!
3. Gingersnap Crust Upgrade
Swap out half of your graham cracker crumbs for crushed gingersnap cookies. This gives the crust an amazing spicy kick that complements the pumpkin perfectly. IMO, a solid move.
FAQ Section: Your Pumpkin Cheesecake Questions Answered
Why did my pumpkin cheesecake crack?
Usually, cracks happen due to over-mixing (too much air), rapid temperature changes (not cooling slowly), or skipping the water bath. Small cracks are normal and can be hidden with toppings, so don’t fret!
How do I know when my pumpkin cheesecake is fully baked?
The edges will look set and firm, but the very center (about 2-3 inches wide) will still have a slight jiggle to it when you gently move the pan. It will finish cooking as it cools.
Can I make pumpkin cheesecake ahead of time?
Absolutely! This cheesecake is actually better made a day or two in advance. The flavors meld, and the texture becomes perfectly firm and creamy. Store it covered in the refrigerator.
How long does pumpkin cheesecake last in the fridge?
Properly stored in an airtight container in the refrigerator, it will stay fresh and delicious for up to 5-7 days.
Can I freeze pumpkin cheesecake?
Yes! Cheesecake freezes beautifully. Once fully chilled, you can wrap it whole (or in slices) tightly in plastic wrap, then a layer of aluminum foil. Freeze for up to 2-3 months. Thaw overnight in the refrigerator before serving.
My cream cheese isn’t soft enough! What do I do?
If you’re in a pinch, you can unwrap the cream cheese blocks and microwave them on low power for 10-20 seconds, checking and flipping them every few seconds until slightly soft but not melted.
What’s the best way to cut a clean slice of cheesecake?
Use a sharp, thin knife. For extra clean slices, dip the knife in hot water and wipe it clean between each cut.
Final Thoughts
So, there you have it. You’ve officially mastered the art of the perfect pumpkin cheesecake. No more settling for mediocre pies! This dessert is rich, flavorful, and will make you the undisputed champion of fall baking. Go ahead, bask in the glory. Take that first creamy, spiced bite. You’ve earned it. And don’t be surprised if your holiday guests start asking for this specific cheesecake every single year. You’re welcome. 😉

