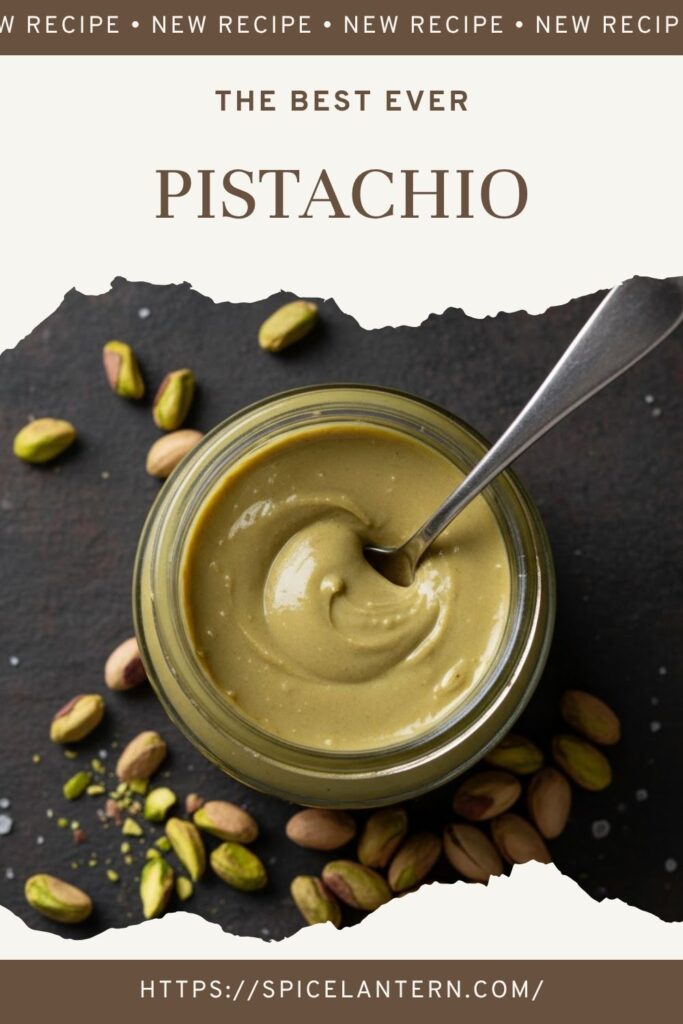
Get That Green Gold: The Ultimate Homemade Pistachio Butter Recipe (Better Than Store-Bought!)
Let’s talk about the rock star of the nut world. That tiny, vibrant green celebrity that instantly makes any dessert look (and taste) ridiculously gourmet. Yes, I’m talking about the Pistachio. But shelling those little gems is a total nightmare, and finding a decent Pistachio paste or butter that isn’t packed with sugar and green dye? Impossible. I’m here to tell you to stop settling! We’re making the ultimate homemade Pistachio butter—a smooth, creamy, intensely nutty spread that will change your baking, your breakfast, and your life. Get ready for pure, concentrated green gold!
Why This Homemade Pistachio Recipe Is Your New Kitchen Obsession

Why spend $20 on a tiny jar of store-bought paste that tastes vaguely like almond extract? Because this recipe is awesome, that’s why. It delivers an intense, complex, naturally vibrant flavor and a velvety smooth texture that only comes from using fresh, high-quality nuts.
First, the flavor is unmatched. We maximize the natural richness of the nuts, unlike the diluted, often artificial store-bought versions. Second, it’s ridiculously versatile—spread it on toast, mix it into yogurt, swirl it into ice cream, or just eat it by the spoonful. Third, it’s surprisingly simple, relying on one piece of equipment to do all the heavy lifting. Plus, think of the elegance! Casually serving a dessert featuring homemade pistachio butter? You’re officially a culinary genius.
Ingredients: The Green Gold Standard

The secret to great nut butter is simple—nuts and power. The rest is for minor adjustments.
H3: The Core Component
- 2 cups Shelled Pistachios (Raw, Unsalted): Crucial! Use shelled nuts. If yours are roasted, the flavor will be more intense; if they’re salted, omit the salt later.
H3: The Flavor Enhancers
- 1-2 tablespoons Neutral Oil: Grapeseed, sunflower, or melted coconut oil. Optional, but helps jumpstart the blending process if your machine struggles.
- 1-2 teaspoons Powdered Sugar: For a hint of sweetness, optional.
- ¼ teaspoon Fine Sea Salt: To enhance the nuttiness. Omit if using salted pistachios.
- ½ teaspoon Almond Extract (Optional): Many classic Italian pistachio desserts include a touch of almond extract to enhance the flavor. Try it!
H3: Optional Boosters
- 1 tablespoon Maple Syrup or Honey: For a sweeter spread.
- Pinch of Cardamom: Adds a sophisticated, warm spice note.
Key Substitutions:
- Nut Swap: The same technique works for cashews or almonds (just omit the almond extract!).
- Oil Swap: Any neutral oil with a high smoke point works well. If you want a savory paste, try using pistachio oil for maximum flavor.
- Sweetener Swap: Liquid sweeteners like maple syrup or honey are great but may result in a slightly looser final consistency.
Tools & Kitchen Gadgets Used: Your Pistachio Powerhouse
You only need one piece of equipment to turn nuts into butter. Choose wisely!
- High-Powered Food Processor (Mandatory): This is the key tool! You need power and patience. A high-speed blender also works, but the food processor is easier for scraping.
- Baking Sheet & Parchment Paper: For toasting the nuts.
- Airtight Glass Jar: For storing your finished butter.
- Rubber Spatula: Essential for scraping down the sides during the blending process.
- Measuring Cups and Spoons: For accurate flavor adjustments.
Step-by-Step Instructions: The Alchemy of Nut Butter
Patience is key here. The nuts go from whole to powder to a thick paste, and finally, to smooth butter. Don’t rush it!
H3: Step 1: Toast for Flavor Depth
Preheat your oven to $350^{\circ}\text{F}$ ($175^{\circ}\text{C}$). Spread the shelled pistachios on a parchment-lined baking sheet. Toast for 5-7 minutes, stirring halfway, until they are fragrant. Do not let them burn! Burning ruins the flavor. Let the pistachios cool for about 5 minutes (they should still be warm, but not scorching hot).
H3: Step 2: The Initial Grind
Transfer the slightly warm pistachios to the bowl of your high-powered food processor. Process continuously for 2-3 minutes until the nuts grind into a fine powder. Stop and scrape down the sides with your spatula.
H3: Step 3: From Powder to Paste
Continue processing. The powder will start to clump together and form a thick, stiff paste (this is the hard stage!). This takes another 2-3 minutes. Keep scraping down the sides.
H3: Step 4: The Liquid Gold Release
Keep processing! The heat and friction will force the nuts to release their natural oils. The paste will transform into a smooth, velvety, liquid butter. This stage can take an additional 5-8 minutes, depending on your machine. Be patient! You’ll need to stop and scrape the sides frequently.
H3: Step 5: Flavor & Final Adjustments
Once the butter is smooth, add the salt, powdered sugar (if using), almond extract (if using), and neutral oil (if using). Pulse a few more times to incorporate. If the butter is still too thick, add 1 tablespoon of oil at a time until you reach your desired creamy consistency.
H3: Step 6: Store and Chill
Transfer the warm, creamy Pistachio butter to your airtight glass jar. Seal the jar. The butter will be quite runny when warm. Store in the refrigerator—it will thicken considerably as it chills. Use in all your baking, spreading, and spooning adventures!
Calories & Nutritional Info: The Healthy Fat Facts

Pistachios are a great source of healthy fats and protein.1 These estimates are approximate per 2-tablespoon serving.
- Estimated Calories per serving (2 tbsp): 170-200 calories
- Fat: 14-18g (mostly unsaturated healthy fats)
- Carbohydrates: 6-8g (minimal, varies with added sugar)
- Protein: 6-8g (Excellent source!)
- Fiber: Good source of dietary fiber.
- The Bottom Line: A fantastic source of healthy fats, protein, and energy, making it a wonderful addition to a balanced diet.
Common Mistakes to Avoid: Don’t Ruin Your Nut Butter!
Achieving that smooth butter texture requires precision and patience. Avoid these pitfalls.
- Using Cold Nuts: Cold nuts take much longer to release their oils and put excessive strain on your processor. Toasting them gently helps warm them up and jumpstarts the oil release process.
- Quitting During the Paste Stage: The paste stage is the hardest and longest part! Many people quit here, thinking their machine is broken. Keep going; the oils will release!
- Adding Too Much Oil Too Soon: Only add supplemental oil if your processor is genuinely struggling. Start with minimal oil; the nuts should release enough on their own. Too much oil makes it runny.
- Using a Low-Powered Blender: A standard blender is often designed for liquid. A food processor has stronger torque for breaking down dense solids like nuts. Use the right equipment!
- Over-Sweetening: Pistachios have a delicate flavor. Start with minimal sugar and taste-test to avoid overwhelming the natural nuttiness.
Variations & Customizations: Your Green Dream Lab
Once you have the butter base, you can flavor it in endless ways!
- Savory Pesto Pistachio Butter: Omit the sugar. Add ½ cup fresh basil, 1 minced garlic clove, and 2 tablespoons grated Parmesan cheese during the final blending step. Use as a base for pasta or a spread for savory sandwiches.
- White Chocolate Swirl: Melt ½ cup of high-quality white chocolate chips with a teaspoon of coconut oil. After the pistachio butter is in the jar, drizzle the white chocolate on top and use a knife to swirl it gently before chilling.
- Spicy Honey Pistachio Butter: Add 1 tablespoon of hot honey (or honey mixed with a pinch of cayenne) during the final flavoring step. The sweet heat and savory nuts are an incredible combination.
FAQ Section: Answering Your Green Gold Queries
You’ve got questions about this magnificent spread. I’ve got answers.
H3: Q1: What makes homemade pistachio butter better than store-bought?
A1: Homemade butter is more flavorful, often smoother, and lacks the artificial green dyes, excessive sugar, and stabilizers typically found in commercial products.
H3: Q2: How do I store homemade pistachio butter?
A2: Store your pistachio butter in an airtight jar in the refrigerator for up to 3 weeks. The oil may separate slightly; just stir it vigorously before use.
H3: Q3: Why did my food processor get hot? Is that normal?
A3: Yes, it is normal! The friction generated by processing the nuts is what causes the oils to release. The heat is necessary, but if your processor feels dangerously hot, stop and let it rest for 5 minutes before continuing.
H3: Q4: Should I use raw or roasted pistachios?
A4: Raw pistachios are best as you can toast them yourself (Step 1), which maximizes freshness and aroma. If you buy pre-roasted, ensure they are unsalted.
H3: Q5: How do I use pistachio butter in baking?
A5: Use it anywhere you would use peanut butter or almond paste! Swirl it into brownie batter, mix it into frosting, spread it onto cookies, or use it as a filling for tarts.
H3: Q6: Why is my pistachio butter not vibrantly green?
A6: The natural color of pistachios is a muted, pale green/yellow. The bright green color of commercial products usually comes from added food dye. To keep it natural, embrace the pale green!
H3: Q7: Can I make this with the shells still on?
A7: No! You must use shelled pistachios. Attempting to process the shells will ruin your machine and your appetite.
Final Thoughts: The Green Revolution is Complete!
You did it! You created a batch of vibrant, velvety smooth, and intensely flavored Pistachio butter. Go ahead, take a proud spoonful. Doesn’t that taste exactly like pure, concentrated elegance? I knew it would. You are now the master of the nut butter domain. Are you ever going back to those pale, sugary jars again? I highly doubt it. Enjoy your gourmet, green victory!