
Forget the Waitlist: The Ultimate Outback Blooming Onion Copycat Recipe
Let’s just be honest. There’s only one reason you brave the endless waits and the dimly lit dining room of a certain Aussie-themed restaurant: that massive, deep-fried, beautifully spiced orb of glory. Yes, I’m talking about the Outback blooming onion. It’s the appetizer that demands communal consumption and zero regrets. But why deal with the hassle, the questionable accents, and the inevitable table-side argument over who gets the last petal? I’m here to tell you that you can achieve that perfectly crispy, spicy, and satisfying flavor with the ultimate Outback blooming onion copycat recipe, made fresh and hot in your own kitchen. Your life is about to get a whole lot crispier.
Why This Blooming Onion Recipe is Pure Genius

Why recreate a deep-fried monstrosity at home when you could just order takeout? Because this recipe is awesome, that’s why. It delivers that signature crispy, spiced exterior and the sweet, tender onion flavor that makes the original so utterly addictive, and we do it without a commercial deep fryer!
First, the flavor is spot-on. We nail that blend of paprika, cayenne, and secret spices that makes the dipping sauce utterly irresistible. Second, it’s ridiculously fun to make. Cutting the onion into a “bloom” is surprisingly therapeutic! Third, you control the quality of the oil and the ingredients. Plus, the sheer wow-factor of setting this golden flower down on your table is a guaranteed conversation starter. Who needs a steak when you have a mountain of fried onion petals?
Ingredients: The Heart of the Outback


The recipe has two parts: the perfectly seasoned batter and the zesty dipping sauce. Don’t skip the seasoning on either!
H3: For the Blooming Onion
- 1 very large Yellow Onion (Sweet Onion): Look for one that’s about 1-1.5 lbs. The larger, the better for the “bloom.”
- 2 cups All-Purpose Flour: For the dry dredge and the batter.
- 1 cup Ice Water: Crucial for the crispy batter!
- 1 large Egg: Beaten lightly.
H3: For the Signature Spice Blend (The Secret Weapon)
- 2 tablespoons Smoked Paprika: Adds depth and color.
- 1 tablespoon Garlic Powder: Essential for the savory base.
- 1 tablespoon Onion Powder: Enhances the onion flavor.
- 1 teaspoon Cayenne Pepper: Adjust to your preferred heat level!
- 1 teaspoon Dried Oregano: Adds a nice herb note.
- 1 teaspoon Salt and ½ teaspoon Black Pepper: For seasoning.
H3: For the Zesty Dipping Sauce
- 1 cup Mayonnaise: Full-fat is best for richness.
- ¼ cup Ketchup: Adds color and a slight tang.
- 2 tablespoons Prepared Horseradish: Crucial for the zesty kick! Don’t use horseradish sauce; use the prepared root.
- 1 teaspoon Smoked Paprika: Ties the sauce flavor back to the onion.
- 1 teaspoon Dried Oregano: For flavor cohesion.
- ½ teaspoon Garlic Powder and ½ teaspoon Onion Powder: For seasoning.
- Dash of Cayenne Pepper: For heat.
Key Substitutions:
- Onion Swap: You must use a sweet yellow or Vidalia onion. A regular white onion is too harsh for this large of an application.
- Flour Swap: A gluten-free 1:1 baking blend works well for both the dredge and the batter.
- Horseradish Swap: You can try a mix of Worcestershire sauce and a pinch of dry mustard for a savory-tangy kick, but prepared horseradish is best for accuracy.
- Dairy Swap (Dipping Sauce): Use a quality vegan mayonnaise for a dairy-free version.
Tools & Kitchen Gadgets Used: Your Frying Fortress
Deep frying at home requires safety and the right gear. Don’t be a hero—be smart!
- Large Heavy-Bottomed Pot or Dutch Oven: Essential for safe deep frying. You need high walls and a heavy base.
- Deep-Fry Thermometer: CRUCIAL! Oil temperature must be maintained accurately for a crispy, non-greasy result.
- Wire Cooling Rack: For draining the excess oil after frying.
- Large Bowl (for the dredge) and Medium Bowl (for the batter): You need two separate stations.
- Whisk: For making the batter and the dipping sauce.
- Sharp Chef’s Knife: For cutting the onion into the “bloom.”
- Tongs or Spider Strainer: Long-handled! For safely lowering and removing the onion from the hot oil.
- Measuring Cups and Spoons: For accurate seasoning.
Step-by-Step Instructions: The Onion’s Grand Opening
The cutting and the chilling are the secrets here. Follow these steps for a perfect bloom!
H3: Step 1: Prep the Onion (The Cutting Technique)
Peel the large sweet onion. Cut off the top (stem end). Do not cut off the root end! Place the onion cut-side down. Starting about ½ inch away from the root end (the base), cut straight down through the onion, stopping before you cut through the root. You want 12-16 evenly spaced cuts. This is the “bloom.” Place the onion root-side up in a bowl of ice water for 30 minutes. This helps the petals separate and keeps the onion firm.
H3: Step 2: Make the Spice Mix & Dip
In a small bowl, combine all the signature spice blend ingredients (paprika, cayenne, oregano, powders, etc.). Set aside. In a separate small bowl, whisk together all the dipping sauce ingredients until perfectly smooth. Chill the sauce immediately—it tastes better cold!
H3: Step 3: The Dredge & The Soak
Drain the onion and pat it dry. Gently open the petals. In one bowl, combine 1 cup of flour and 1 tablespoon of the spice mix (this is your dry dredge). In another bowl, whisk the egg, ice water, the remaining 1 cup of flour, and the remaining spice mix until a smooth, thin batter forms.
First, dredge the onion entirely in the dry flour mix, ensuring the dredge gets between all the petals. Shake off excess. Next, soak the onion in the batter, working the batter between the petals.
H3: Step 4: The Final Chill (Set the Batter)
Place the batter-coated onion back on a plate or small wire rack and refrigerate for at at least 30 minutes. This is CRUCIAL! Chilling firms the batter, helping it stick to the onion during frying.
H3: Step 5: Heat the Oil (Safety First!)
Fill your heavy-bottomed pot or Dutch oven with 3-4 inches of vegetable or peanut oil. Secure your deep-fry thermometer to the side. Heat the oil to $350^{\circ}\text{F}$ ($175^{\circ}\text{C}$). Maintain this temperature exactly! Too low, and the onion gets greasy; too high, and the batter burns before the onion cooks.
H3: Step 6: Fry to Golden Glory
Carefully and slowly lower the chilled blooming onion root-side down into the hot oil using your long tongs or a spider strainer. Fry for 8 to 10 minutes, rotating occasionally, until it’s deep golden-brown and crispy.
H3: Step 7: Drain and Serve
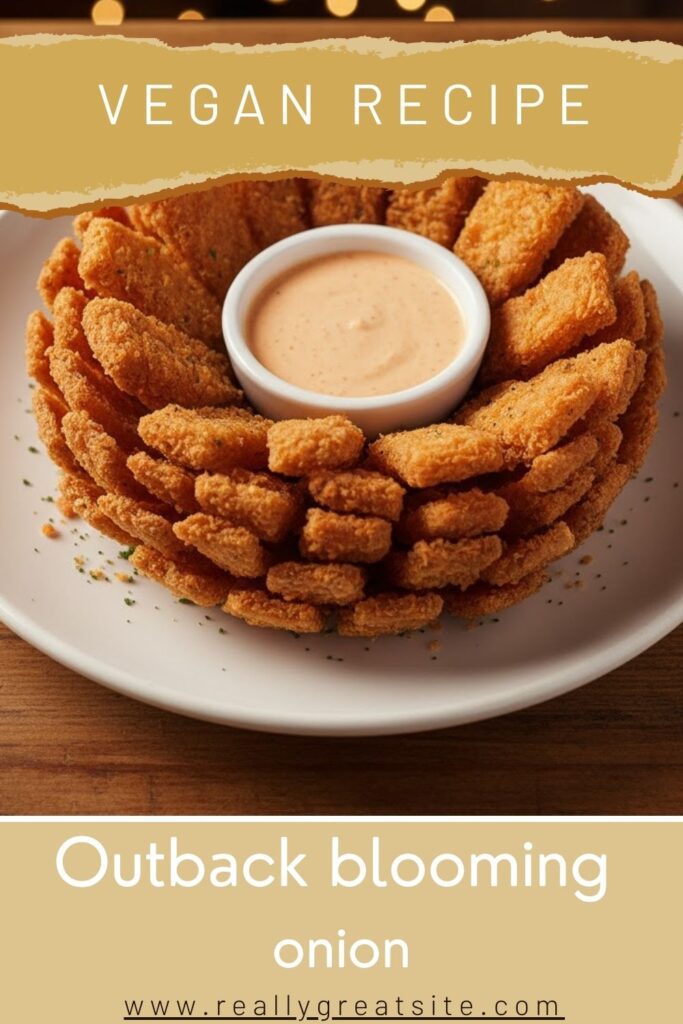
Carefully lift the onion out of the oil. Place it on a wire cooling rack (set over paper towels) to drain excess oil. Sprinkle lightly with a pinch of extra salt. Place the onion on a serving platter with the chilled zesty dipping sauce in the center. Serve immediately while it’s still piping hot and crispy!
Calories & Nutritional Info: The Delicious Truth

We’re not going to lie; this is a decadent appetizer. These estimates are highly variable but represent a standard restaurant-sized portion.
- Estimated Calories per serving (1/4 of the onion): 500-700 calories
- Fat: 40-60g (mostly from the deep-frying oil)
- Carbohydrates: 40-60g (flour, onion)
- Protein: 8-12g
- Sodium: High, due to salt in the batter/sauce.
- Fiber: Good source of fiber from the onion!
- The Bottom Line: This is an indulgent appetizer. Share it widely!
Common Mistakes to Avoid: Don’t Let Your Onion Collapse!
Perfect frying requires attention. Avoid these simple errors for a flawless bloom.
- Cutting Through the Root: Do NOT cut all the way through the base of the onion. The root is the anchor. Cutting through it causes the onion to fall apart into petals in the hot oil.
- Skipping the Chill Step: If you don’t chill the onion (Step 4), the batter won’t adhere properly, and it will fall off in the oil, leaving you with naked, sad petals.
- Incorrect Oil Temperature: This is crucial. Oil below $325^{\circ}\text{F}$ ($160^{\circ}\text{C}$) makes the onion greasy. Oil above $375^{\circ}\text{F}$ ($190^{\circ}\text{C}$) burns the crust before the onion inside is tender. Use a thermometer!
- Forgetting the Ice Water Soak: Soaking the cut onion in ice water helps the petals fully separate and retain their crispness. This is a key step for the signature “bloom.”
- Overcrowding the Pot: Only fry one onion at a time! Adding a second onion will drop the oil temperature too quickly, leading to a greasy result.
Variations & Customizations: Your Blooming Creativity
The original is great, but your kitchen, your rules!
- Air Fryer/Baked Bloom (Lighter Option): After the final batter chill, mist the onion generously with cooking spray. Air fry at $375^{\circ}\text{F}$ ($190^{\circ}\text{C}$) for 15-20 minutes or bake on a rack at $400^{\circ}\text{F}$ ($200^{\circ}\text{C}$) for 25-35 minutes, until golden and crisp. The texture is slightly different but still delicious!
- Spicy Chipotle Dip: Replace the horseradish in the dipping sauce with 1 tablespoon of canned chipotle peppers in adobo (minced) and use smoked paprika. This gives the sauce a deep, smoky heat.
- Herb & Parmesan Bloom: Add 2 tablespoons of grated Parmesan cheese to the batter mix. Use fresh thyme and rosemary (finely chopped) in the spice blend for a more savory, Italian-herb profile.
FAQ Section: Answering Your Onion Queries
You’ve got questions about this deep-fried delicacy. I’ve got answers.
H3: Q1: What kind of onion is best for a blooming onion?
A1: A large, firm sweet onion (like a Vidalia or Walla Walla) is best. Their mild flavor holds up well to the deep-frying process.
H3: Q2: How do I cut the onion without it falling apart?
A2: Do not cut off the root end! Leave about a half-inch of the root end intact. The root acts as the anchor, holding all the petals together during the cutting and frying process.
H3: Q3: What temperature should the oil be for frying?
A3: The oil should be precisely $350^{\circ}\text{F}$ ($175^{\circ}\text{C}$). This temperature ensures the batter crisps quickly without burning and the onion cooks through without absorbing too much grease.
H3: Q4: Can I reuse the frying oil?
A4: Yes, you can strain the oil through a fine mesh sieve or cheesecloth after it cools completely. Store it in an airtight container in a cool, dark place. The oil will keep for a few uses.
H3: Q5: How far in advance can I prepare the blooming onion?
A5: You can cut the onion and soak it in ice water a few hours ahead of time. You can also batter the onion and chill it (Step 4) up to an hour before frying. Fry right before serving!
H3: Q6: What can I use if I don’t have a deep fryer?
A6: Use a large, heavy-bottomed Dutch oven or stockpot with high sides. This ensures even heat and prevents splatters. Always use a thermometer and never overfill the pot with oil.
H3: Q7: How do I make the dipping sauce less spicy?
A7: Reduce the amount of prepared horseradish or omit it entirely. You can replace the zestiness with a squeeze of fresh lemon juice or a little extra ketchup.
Final Thoughts: Onion Overlord Status Achieved!
You did it! You’ve conquered the intimidating deep fryer and created a magnificent, perfectly crispy, spicy Outback blooming onion copycat. Go ahead, tear off a petal and take a proud dip. Isn’t that better than paying restaurant prices? I knew it would be. You are now the undisputed Overlord of Appetizers. Are you ever going back to order the original again? I highly doubt it. Enjoy your savory, homemade victory!

