

The Easiest 3-Ingredient No-Bake Truffles That Look Super Fancy
Have you ever scrolled through social media, seen those pictures of perfect, elegant chocolate truffles, and thought, “Wow, I could never make those”? It seems like the kind of dessert that requires a culinary degree, a French accent, and a whole lot of patience. Well, I’m here to tell you to grab your apron, because you’re about to become a chocolatier. These ridiculously easy No-bake truffles are your secret weapon, your ticket to dessert glory, and the best part? You don’t even have to turn on your oven.
H2: So, Why Are These Truffles Basically Magic?

Let’s count the ways this recipe will become your new go-to. First, the ingredient list is almost embarrassingly short. We’re talking three simple ingredients. That’s it. This isn’t just a recipe; it’s a magic trick that transforms humble cookies and cream cheese into decadent, melt-in-your-mouth orbs of pure joy.
They are the ultimate fake-out dessert. They look stunning and taste incredibly rich, so everyone will assume you slaved away for hours. They’re the perfect make-ahead treat for parties, holidays, or any time you need to impress someone (including yourself). And did I mention there’s no baking? In the heat of summer or the chaos of the holidays, not having to touch your oven is a gift from the universe.
H2: The Holy Trinity of No-Bake Ingredients

Prepare to be amazed by the simplicity. This is all you need to achieve truffle greatness.
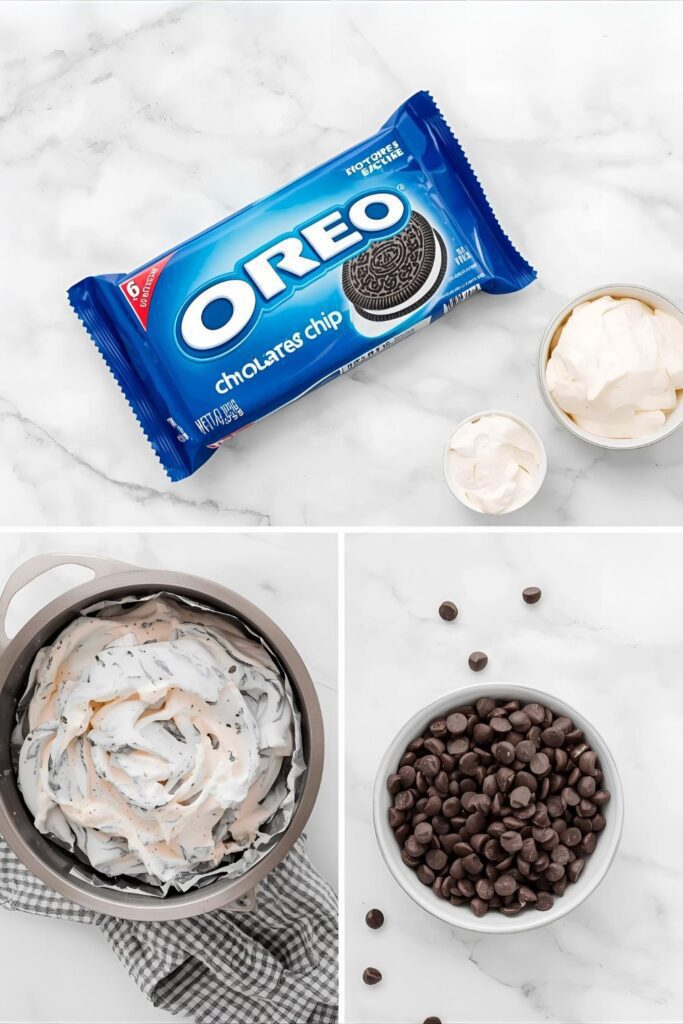
- 1 package (about 14-15 oz) of chocolate sandwich cookies (like Oreos): The entire cookie—cream filling and all. This is not the time to be shy.
- 8 ounces of full-fat cream cheese, softened to room temperature: This is non-negotiable. It must be softened, or you’ll have a lumpy mess.
- 12 ounces of good-quality melting chocolate: You can use semi-sweet chocolate chips, almond bark, or candy melts. Pick your favorite!
H2: The Tools of the Truffle Trade
You don’t need any fancy equipment, but these items will make the process a breeze.
- Food Processor: The fastest and easiest way to turn your cookies into fine crumbs.
- OR a Large Ziploc Bag and a Rolling Pin: For a more… therapeutic approach to crushing cookies.
- Large Mixing Bowl: To combine your ingredients.
- Silicone Spatula: For scraping the bowl and making sure you don’t waste a single crumb.
- Baking Sheet lined with Parchment Paper: Essential for chilling the truffles and preventing them from sticking.
- Small Cookie Scoop (about 1 tablespoon size): This is the secret to getting perfectly uniform, bite-sized truffles.
- Microwave-Safe Bowl: For melting your chocolate.
- Two Forks or a Chocolate Dipping Tool: To elegantly dip your truffles without covering your entire hand in chocolate.
H2: Let’s Get Rolling: Your Step-by-Step Guide to Glory
Follow these simple steps, and you’ll be swimming in truffles in no time.
H3: Step 1: Crush Those Cookies
Place the entire package of cookies into the bowl of your food processor. Pulse until they are crushed into very fine crumbs. If you don’t have a food processor, place the cookies in a large ziploc bag, seal it, and smash them with a rolling pin until they are completely pulverized. You want a fine, sandy texture.
H3: Step 2: Combine the Magic
In your large mixing bowl, combine the fine cookie crumbs with the softened cream cheese. Mix with a spatula (or your clean hands) until the mixture is thoroughly combined and forms a thick, dough-like consistency.
H3: Step 3: Roll ‘Em Up
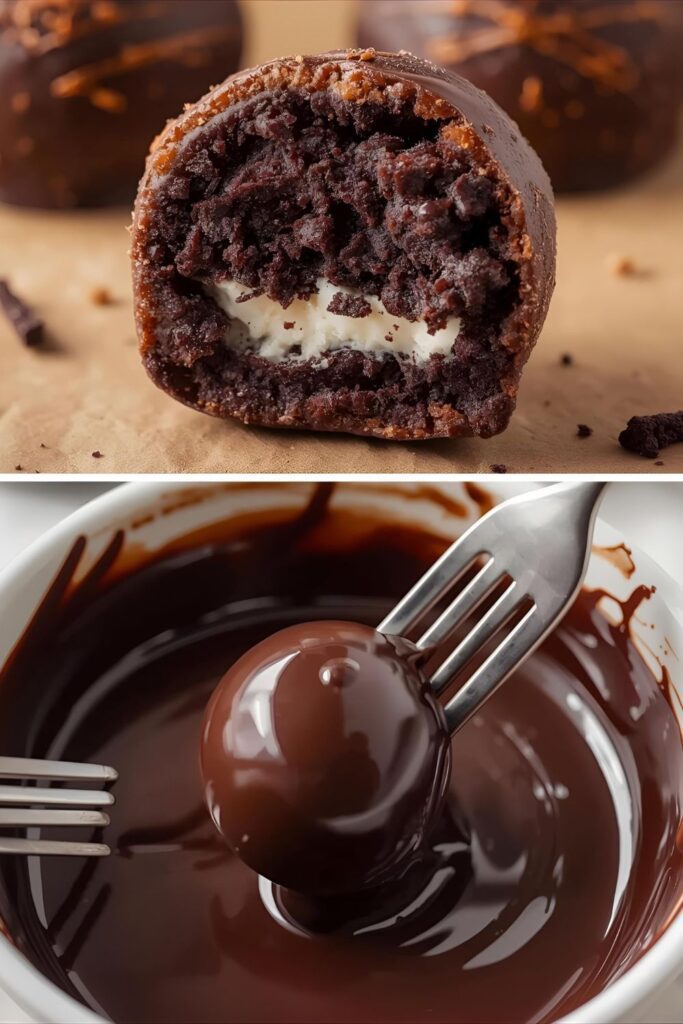
Using your small cookie scoop or a tablespoon, portion out the mixture and roll it between your palms to form smooth, 1-inch balls. Place the truffle balls on your parchment-lined baking sheet.
H4: Step 4: Chill Out (This Is a Crucial Step!)
Place the baking sheet with the truffle balls into the freezer for at least 15-20 minutes. The truffles need to be firm before you dip them in hot chocolate. Do not skip this step, or your truffles will disintegrate into a sad, chocolatey soup.
H5: Step 5: Melt the Chocolate
While the truffles are chilling, melt your chocolate. Place the chocolate chips or wafers in a microwave-safe bowl and heat in 30-second intervals, stirring well after each one, until the chocolate is smooth and completely melted.
H6: Step 6: Take the Plunge
Remove the chilled truffles from the freezer. Working one at a time, drop a truffle ball into the melted chocolate. Use your two forks to gently roll it around until it’s fully coated. Lift it out with one fork, tap it gently on the side of the bowl to let the excess chocolate drip off, and then use the second fork to slide it back onto the parchment paper.
H7: Step 7: The Final Chill
If you want to add sprinkles or any other toppings, do it now while the chocolate is still wet. Once all the truffles are dipped, place the baking sheet in the refrigerator for about 10-15 minutes, or until the chocolate shell is completely hardened.
H2: The Nutritional Lowdown (Per Truffle)
Let’s be real, this is a treat. But if you must know, here’s a rough estimate per truffle.
- Calories: Approximately 100-120 kcal
- Protein: 1g
- Carbohydrates: 12g
- Fat: 7g
- Sugar: 9g
H2: Common Truffle Tragedies and How to Avoid Them
Even with a recipe this easy, things can go wrong. Let’s make sure they don’t.
- Using Cold Cream Cheese: If your cream cheese isn’t fully softened, it won’t blend smoothly with the cookie crumbs. You’ll be left with unsightly white specks. Patience is key; let it come to room temperature.
- Skipping the Chill Time: I’ve said it before, and I’ll say it again. A room-temperature truffle ball will melt and fall apart the second it hits the warm chocolate. Chilling is mandatory.
- Burning the Chocolate: Chocolate is delicate. If you just blast it in the microwave for two minutes straight, it will seize up and become a grainy, unusable mess. Melt it in short 30-second bursts and stir, stir, stir.
- A Messy Dip: Don’t try to be a hero and use your fingers. The two-fork method is your best friend. It keeps your hands clean and gives you a much smoother, professional-looking finish.
H2: Get Fancy: Truffle Variations
The classic is amazing, but why not experiment?
- Holiday Peppermint Truffles: Add 1/4 teaspoon of peppermint extract to the cream cheese and cookie mixture. After dipping in chocolate, immediately sprinkle the tops with crushed candy canes. So festive!
- White Chocolate Raspberry Truffles: Use Golden Oreos instead of chocolate ones. Mix in 1/4 cup of crushed freeze-dried raspberries to the cookie mixture. Dip in melted white chocolate for a sweet and tangy treat.
- Salted Caramel Mocha Truffles: Add 1 teaspoon of instant espresso powder to the cookie crumbs. After dipping in semi-sweet chocolate, drizzle the tops with melted caramel and a sprinkle of flaky sea salt.
H2: FAQ: Your No-Bake Truffle Questions Answered
Here are some answers to common questions about your new favorite dessert.
H3: Do I really need a food processor?
Nope! A Ziploc bag and some pent-up aggression with a rolling pin work just fine. Just make sure you get the crumbs as fine as possible for the smoothest texture.
H3: How do I store these truffles?
Store them in an airtight container in the refrigerator for up to one week. They need to be kept chilled because of the cream cheese.
H3: Can I freeze these no-bake truffles?
Yes, they freeze beautifully! Place the finished truffles in a single layer in a freezer-safe container. They will last for up to 2 months. Let them thaw in the fridge for about 15-20 minutes before serving.
H3: My melted chocolate is too thick for dipping. What can I do?
If your chocolate is too thick, you can stir in 1/2 to 1 teaspoon of coconut oil or vegetable shortening (not butter or water!) to the melted chocolate. This will thin it out and make it much smoother for dipping.
H3: Can I make these vegan or dairy-free?
Absolutely. Use a vegan brand of chocolate sandwich cookies, a dairy-free cream cheese alternative, and dairy-free chocolate chips for melting. The process is exactly the same.
H3: What other coatings can I use besides melted chocolate?
After you roll the balls (and before chilling), you can roll them in other toppings instead of dipping them. Try rolling them in cocoa powder, powdered sugar, finely chopped nuts, or colorful sprinkles.
H3: Do I have to use Oreo brand cookies?
Not at all! Any brand of chocolate sandwich cookie will work perfectly.
H2: Final Thoughts: You Are Now a Dessert Genius
Congratulations! You are officially that person. The person who brings stunning, homemade truffles to the party. The person who looks like a dessert pro with what was actually minimal effort. Go ahead, take a bow, and accept the compliments. You’ve earned it. Now go enjoy a well-deserved truffle (or five).

