

The Easiest No-Bake Tart That Looks Dangerously Professional
Let’s be honest, making a truly beautiful tart seems like a final-level boss in the world of home baking. You picture fragile pastry, blind-baking with pie weights, and the constant, nagging fear of a soggy bottom. It’s the kind of thing you admire from behind a bakery window, not something you casually whip up. But what if you could create a dessert so elegant, so decadent, and so professional-looking that people will ask you which pâtisserie you bought it from? And what if you could do it without ever turning on your oven? My friends, welcome to the glorious, deceptive world of the No-bake tart.
H2: So, Why Is This No-Bake Tart a Secret Weapon?

This isn’t just a dessert; it’s a masterpiece of culinary illusion. It’s a showstopper that requires less effort than making a batch of cookies. The magic is in the contrast: a crisp, chocolatey, cookie-crumb crust against a silky, melt-in-your-mouth, intensely rich chocolate ganache filling. It’s pure, unadulterated luxury.
This tart is the definition of foolproof. You can’t underbake it, you can’t overbake it, and the most complicated step is waiting for it to chill. It’s the ultimate make-ahead dessert, perfect for dinner parties when you want to look like you have it all together. It’s the answer to hot summer days, last-minute celebrations, and any and all chocolate emergencies. IMO, it’s the most impressive-for-how-easy-it-is dessert on the planet.
H2: Your Simple Ingredient List for a Showstopper
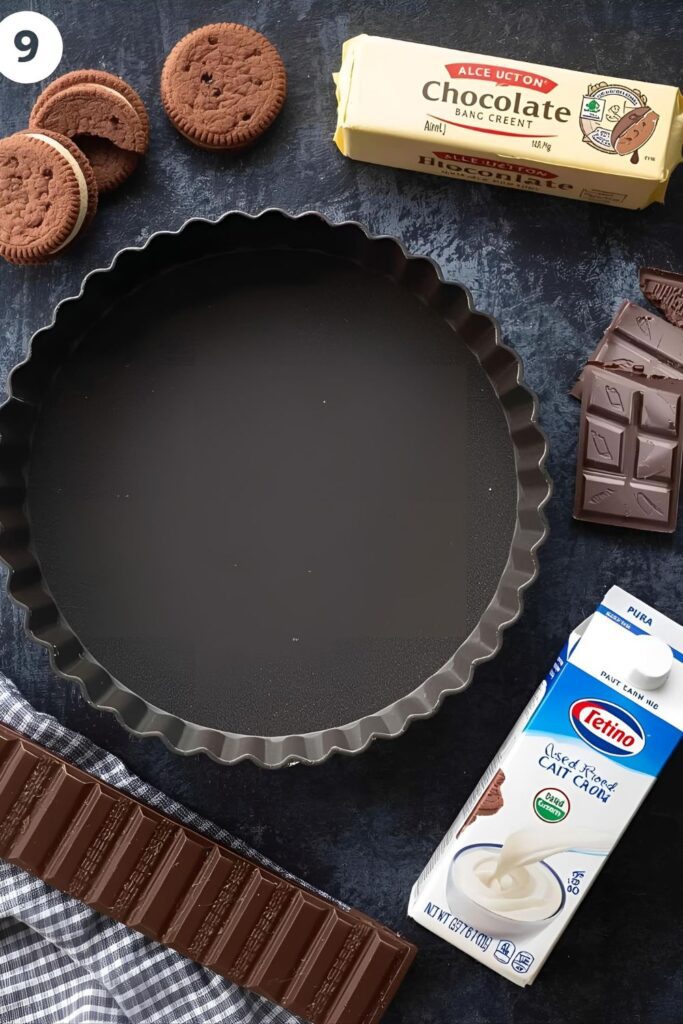

You don’t need a long, complicated list to create something this decadent. Quality is key here.
H3: For the Chocolate Cookie Crust
- 1 1/2 cups chocolate cookie crumbs: This is about 20-25 chocolate sandwich cookies (like Oreos), filling and all.
- 6 tablespoons unsalted butter, melted: This is the delicious glue that holds our crust together.
H3: For the Silky Chocolate Ganache Filling
- 8 ounces good quality semi-sweet or dark chocolate (60-70% cacao): Finely chopped. Using a good quality chocolate bar will yield a much better result than standard chocolate chips.
- 1 cup heavy cream: This is what gives the ganache its rich, creamy, and silky texture.
H3: For the Optional (But Highly Recommended) Garnish
- Fresh raspberries or strawberries: The tartness of the berries cuts through the richness of the chocolate perfectly.
- A pinch of flaky sea salt: To sprinkle on top, enhancing the deep chocolate flavor.
H2: The Tools of the (No-Bake) Trade
You don’t need much, but one piece of equipment is the true hero of this recipe.
- A 9-inch Tart Pan with a Removable Bottom: This is the most important tool. It’s the secret to getting that perfect, clean, professional look.
- Food Processor: The quickest way to turn cookies into crumbs. A Ziploc bag and a rolling pin also work for a more hands-on approach.
- A Medium Saucepan: For gently heating the cream.
- A Heatproof Bowl: For making your glorious ganache.
- A Silicone Spatula or Whisk: For bringing the ganache together.
- An Offset Spatula (or the back of a spoon): For smoothing out the filling.
H2: Let’s Get Assembling: Your Step-by-Step Guide
This is so easy you’ll feel like you’re cheating. (You are, and it’s wonderful.)
H3: Step 1: Make and Chill the Crust
First, create your cookie crumbs by pulsing the cookies in a food processor until they are fine. In a bowl, mix the cookie crumbs with the melted butter until the mixture looks like wet sand. Now, dump the crumbs into your tart pan with the removable bottom. Use the flat bottom of a glass or your fingers to press the mixture firmly and evenly into the bottom and up the sides of the pan. Place the crust in the freezer to chill and firm up for at least 15-20 minutes while you make the filling.
H3: Step 2: Prepare the Ganache
Finely chop your good quality chocolate and place it in the heatproof bowl. The smaller the pieces, the faster and more evenly it will melt. In your saucepan, heat the heavy cream over medium heat until it just begins to gently simmer around the edges. Do not let it come to a rolling boil!
H3: Step 3: The Magic Moment
Immediately pour the hot cream over the chopped chocolate. Now for the hard part: let it sit for 5 minutes without touching it. Don’t stir it, don’t poke it, don’t even look at it too hard. Just let the heat of the cream work its magic on the chocolate.
H3: Step 4: Whisk to Silky Perfection
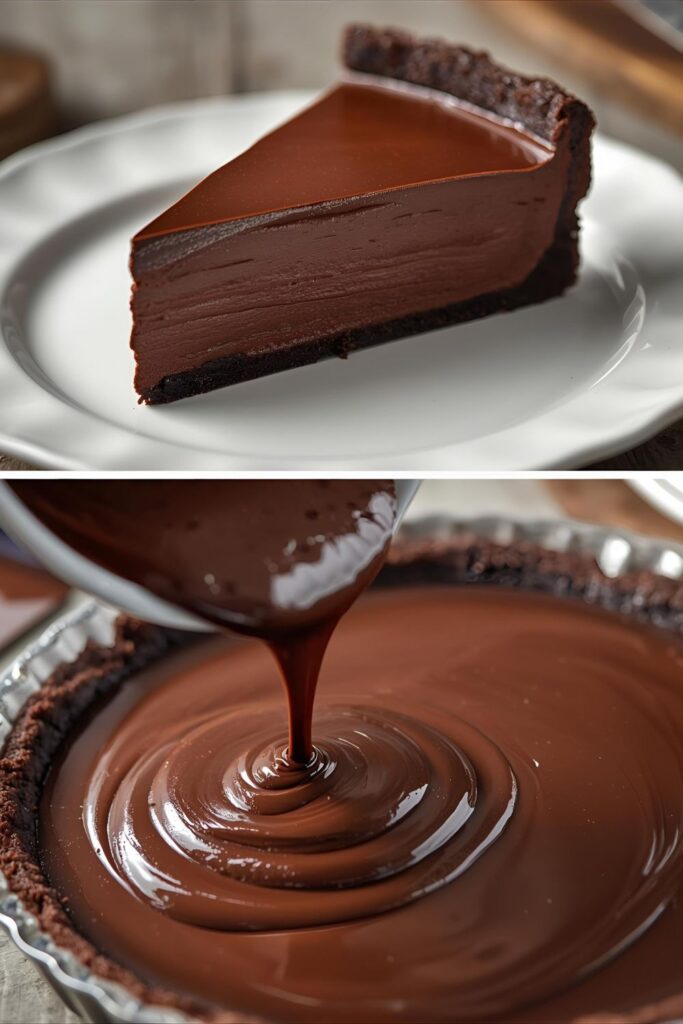
After the 5 minutes are up, gently start whisking the mixture, starting from the center and working your way out in small circles. You’ll see it transform from a separated-looking mess into a smooth, glossy, and beautifully thick ganache.
H3: Step 5: Fill and Chill (Again)
Take your chilled crust out of the freezer. Pour the silky ganache into the crust and use your offset spatula to smooth the top into a perfect, even layer. Now, place the entire tart in the refrigerator to chill for at least 4 hours, or until the ganache is firm to the touch. Overnight is even better.
H3: Step 6: Decorate and Serve Your Masterpiece
When you’re ready to serve, carefully push the bottom of the tart pan up to release your beautiful creation. Transfer it to a serving plate. Decorate the top with fresh raspberries and a light sprinkle of flaky sea salt. Slice with a hot, sharp knife and prepare for the applause.
H2: The Nutritional Guesstimate (Per Slice)
This is an indulgent dessert, meant to be savored. Here’s a rough idea of what you’re getting in each slice.
- Calories: Approximately 400-450 kcal
- Protein: 4g
- Carbohydrates: 35g
- Fat: 30g
- Pure Bliss: 100% of your daily value.
H2: Common Tart Tragedies and How to Avoid Them
Don’t let these simple mistakes get between you and perfection.
- The Tart Pan Prison: If you don’t use a tart pan with a removable bottom, you will not be able to get the tart out in one piece. You’ll be scooping it out with a spoon, which is still delicious but far less elegant.
- A Crumbly Crust: You have to press the crust mixture down firmly. If you’re too gentle, your crust will disintegrate when you try to slice it. Use a glass or measuring cup to really pack it in.
- A Grainy, Split Ganache: This happens if your cream is too hot or if you start stirring too early. Heat the cream just until it simmers, and then have the patience to let it sit for the full 5 minutes before whisking.
- Slicing a Soupy Tart: Ganache needs time to set. If you slice it too early, the filling will be soft and gooey. Four hours of chilling is the minimum. Be patient; the reward is worth it.
H2: Pimp Your Tart: Fun Variations
The classic is divine, but feel free to play with the formula.
- Salted Caramel Chocolate Tart: Before pouring in the ganache, pour a thin layer of your favorite store-bought or homemade salted caramel sauce over the chilled crust.
- White Chocolate Raspberry Tart: Make the crust with shortbread cookies or Golden Oreos. Make the filling with a white chocolate ganache (use a 3:1 ratio of white chocolate to cream, as it’s softer). Top with a mountain of fresh raspberries.
- Peanut Butter Cup Tart: Press a layer of creamy peanut butter mixed with a little powdered sugar onto the crust before adding the dark chocolate ganache. Top with chopped peanut butter cups.
H2: FAQ: Your Burning No-Bake Tart Questions
Let’s clear up some common questions about this oven-free wonder.
H3: Can I use a regular pie dish?
You can, but you’ll lose the beautiful fluted edges and the ability to serve it whole on a platter. The removable bottom of a tart pan is really what makes this dessert look so professional.
H3: What’s the best way to get clean slices?
The secret is a large, sharp knife and hot water. Run the blade of the knife under hot water, wipe it dry, and then make a slice. Repeat this for every single cut. It melts the chocolate just enough to give you a perfect, clean edge.
H3: Can I make this tart ahead of time?
Yes! This is the perfect make-ahead dessert. You can make it up to 2 days in advance and keep it covered in the refrigerator. Just add the fresh berry garnish right before serving.
H3: Can I freeze this no-bake tart?
You bet. It freezes beautifully. Wrap it well in plastic wrap and then foil. It will keep in the freezer for up to a month. Thaw it in the refrigerator for a few hours before slicing and serving.
H3: Can I use chocolate chips instead of a chocolate bar?
You can, but the texture might be slightly different. Chocolate chips often contain stabilizers to help them keep their shape, which can sometimes result in a slightly less silky ganache. For the best results, use a good quality baking chocolate bar that you chop yourself.
H3: How can I make this vegan/dairy-free?
Easily! Use vegan chocolate sandwich cookies for the crust, vegan butter or coconut oil, full-fat canned coconut cream (the thick part) instead of heavy cream, and your favorite dairy-free dark chocolate.
H3: My ganache seems too thin. What did I do?
Don’t panic! It will seem quite liquidy when you pour it into the crust. It thickens and sets up into a firm but silky consistency as it chills. Just trust the process and give it the full chilling time.
H2: Final Thoughts: You Are Now a Pastry Imposter
And there you have it. A dessert that is the very definition of elegant, decadent, and stunningly beautiful, all achieved without a single moment of baking anxiety. You’ve successfully created a pâtisserie-level masterpiece with just a few ingredients and a refrigerator. Go on, serve it with a confident flourish. You’ve officially earned your crown as the ruler of effortless, impressive desserts.

