
The Ultimate No-Bake Lemon Bars (So Easy It’s Almost Criminal)
It’s hot. The sun is blazing. Your kitchen feels like the surface of Mercury, and the absolute last thing you want to do is turn on your oven. But you’re craving something sweet, something bright, something that tastes like a sunny day without, you know, the oppressive heat. Do you give up and resign yourself to a sad, melty popsicle? No. You are a culinary genius in waiting, and you are about to whip up the most refreshing, impressive, and ridiculously easy dessert of the summer: these glorious No-bake lemon bars.
This isn’t just a recipe; it’s your official permission slip to skip the baking and go straight to the bliss. We’re talking about a buttery, crumbly crust and a silky, zesty lemon filling that sets up like magic in your fridge. Prepare to become the undisputed champion of summer desserts.
Why This Recipe Is Your New Summer Fling

Still thinking about turning on that oven? Don’t you dare. Here’s why this recipe is your new best friend.
First, it is truly, deeply no-bake. I mean it. Not a single second of oven time is required. Your kitchen stays cool, your electricity bill stays low, and your sanity remains intact. It’s the ultimate lazy-day dessert that tastes like you put in a ton of effort.

Second, the flavor is pure sunshine. These bars are the perfect balance of sweet and tart. The filling is creamy, zesty, and bursting with bright lemon flavor, all sitting on a rich, buttery graham cracker crust. It’s like a lemon meringue pie and a cheesecake had a beautiful, easygoing baby.
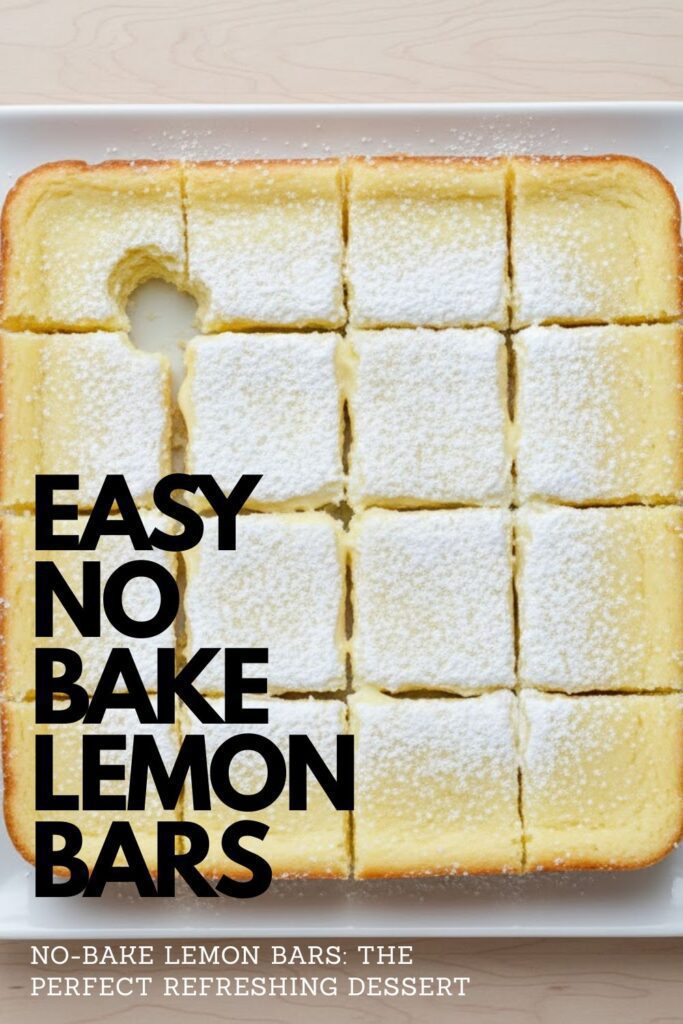
Finally, they are deceptively elegant. You slice these into perfect little squares, dust them with a bit of powdered sugar, and they look like they came from a fancy bakery. Bring these to a BBQ or potluck, and watch them disappear. No one needs to know it took you about 15 minutes of active work. It’ll be our little secret.
The (Shockingly Simple) Ingredient List

Here is your very manageable shopping list. You’re going to love how short it is.
For the Buttery Crust:
- Graham Cracker Crumbs: 1.5 cups. You can buy them pre-crushed or unleash your daily frustrations on a sleeve of graham crackers in a Ziploc bag.
- Granulated Sugar: 1/4 cup.
- Unsalted Butter: 6 tablespoons, melted. This is the magical glue that holds our crusty dreams together.
For the Silky Lemon Filling:
- Sweetened Condensed Milk: One 14-ounce can. This is the secret weapon! Do not, under any circumstances, use evaporated milk. That would be a soupy tragedy.
- Fresh Lemon Juice: 1/2 cup. This absolutely must be fresh-squeezed. The bottled stuff tastes like sadness and regret.
- Lemon Zest: 1 tablespoon. This is where all the bright, aromatic lemon flavor lives. Don’t skip it!
- Cream Cheese (Optional but recommended): 4 ounces, softened to room temperature. This adds a bit of stability and a lovely tangy cheesecake-like flavor.
Tools & Kitchen Gadgets for Your No-Bake Victory
You don’t need any fancy equipment for this sunny delight.
- 8×8 Inch Square Baking Pan: The perfect size for these bars.
- Parchment Paper: This is non-negotiable if you ever want to get the bars out of the pan in one piece.
- Two Mixing Bowls: One for the crust, one for the filling.
- A Whisk: For creating that silky-smooth lemon filling.
- A Rubber Spatula: For scraping the bowl and spreading the filling.
- A Microplane or Zester: The absolute best tool for getting fine lemon zest without any of the bitter white pith.
- A Citrus Juicer: To get every last drop of that precious fresh lemon juice.
Step-by-Step Guide to Lemon Bar Paradise
Ready to assemble the easiest, most refreshing dessert of your life? Let’s do it.
Step 1: Create the Crust
In a medium bowl, combine the graham cracker crumbs and granulated sugar. Pour in the melted butter and stir with a fork until the mixture is evenly moistened and looks like wet sand.
Dump this mixture into your 8×8 inch pan lined with parchment paper (leave an overhang on two sides to act as handles!). Press the crumbs down firmly and evenly into the bottom of the pan. You can use the bottom of a measuring cup to get it nice and compact. Pop the crust into the freezer to chill for 15 minutes while you make the filling.
Step 2: Whip Up the Lemon Filling
In your other mixing bowl, pour in the sweetened condensed milk. If you’re using the optional (but highly recommended) cream cheese, add it now and whisk until completely smooth.
Add the fresh lemon juice and lemon zest. Whisk everything together vigorously for about a minute. You’ll feel the mixture magically start to thicken. This is a beautiful chemical reaction between the acid in the lemon juice and the proteins in the milk. Science is delicious!
Step 3: Assemble and Chill (The Hardest Part)
Take your chilled crust out of the freezer. Pour the luscious lemon filling over the crust and use your spatula to spread it into a smooth, even layer.
Now for the true test of your patience. Cover the pan with plastic wrap and place it in the refrigerator to chill for at least 4 hours, or until the filling is completely firm and set. I know, it’s torture. But this step is crucial.
Step 4: Slice and Serve Your Masterpiece
Once the bars are fully set, use the parchment paper handles to lift the entire slab out of the pan. Place it on a cutting board. You can dust the top with powdered sugar for a final flourish. Slice into squares and serve chilled. Prepare for the rave reviews.
Calories & Nutritional Info (A Sweet Disclaimer)

It’s a dessert made of butter, sugar, and sweetened condensed milk. Let’s be real.
- Calories: Approximately 200-280 kcal per bar (assuming 16 bars).
- Fat: A happy, satisfying amount.
- Sugar: Yes. It’s a sweet treat.
- Joy Factor: Off the charts.
- In summary: It’s a perfectly portioned indulgence. Enjoy it!
Common Mistakes to Avoid (Lemon Bar Lemons)
Even a no-bake recipe has its potential pitfalls. Here’s how to avoid them.
- Using Bottled Lemon Juice: I will die on this hill. Bottled lemon juice lacks the bright, fresh flavor and can sometimes have a metallic aftertaste. You MUST use fresh-squeezed lemon juice. It makes all the difference.
- A Crumbly, Sad Crust: You either didn’t use enough butter or didn’t press the crust down firmly enough. You need to really compact those crumbs so they form a solid base. Chilling it is also key.
- Runny, Soupy Filling: You got impatient and didn’t chill the bars long enough. That 4+ hours in the fridge is when the magic happens and the filling sets up. Don’t cut corners here!
- Forgetting the Zest: The juice provides the tartness, but the zest provides the pure, aromatic lemon flavor. All the essential oils are in the skin. Don’t you dare skip the zest!
Variations & Customizations (Your Bars, Your Rules)
The classic is a star, but feel free to put your own spin on it.
- Golden Oreo or Shortbread Crust: Not a fan of graham crackers? Make the crust with crushed Golden Oreo cookies or shortbread cookies instead. The buttery flavor is a perfect match for the lemon filling.
- Raspberry Swirl Lemon Bars: After you pour the lemon filling into the crust, dollop a few teaspoons of raspberry jam or purée on top. Use a toothpick to gently swirl it into the lemon filling before chilling. It’s beautiful and delicious.
- Vegan No-Bake Lemon Bars: This is totally doable! Use a vegan graham cracker or cookie crust (with vegan butter). For the filling, use a can of sweetened condensed coconut milk and make sure your cream cheese substitute is vegan. The flavor is incredible!
FAQ: Your No-Bake Lemon Bar Questions, Answered
Let’s tackle some common questions about these sunny squares.
1. How do no-bake lemon bars set without baking?
The magic is in the chemical reaction between the acidic lemon juice and the proteins in the sweetened condensed milk. The acid causes the milk to thicken and set, much like making a posset.
2. How long do these need to chill to be firm?
You need to chill them for at least 4 hours, but overnight is even better for a perfectly firm, clean slice.
3. Can I freeze no-bake lemon bars?
Yes! They freeze beautifully. Once they are fully set, slice them into bars and place them in a freezer-safe container, with parchment paper between the layers. They’ll last for up to 3 months. They’re actually delicious straight from the freezer!
4. How do I store them?
Store them in an airtight container in the refrigerator. They will stay fresh and delicious for up to 5 days.
5. Can I use limes instead of lemons?
Absolutely! You’ll have delicious no-bake key lime bars. Use the same measurements.
6. My bars are a little too tart. How can I fix this next time?
The tartness depends on your lemons. If you prefer a sweeter bar, you can slightly reduce the amount of lemon juice (don’t go below 1/3 cup, or it may not set properly) or add a little powdered sugar to the filling.
7. What’s the best way to get clean slices?
Make sure the bars are thoroughly chilled. Use a large, sharp knife. For extra-clean cuts, run the knife under hot water and wipe it dry between each slice.
Final Thoughts
You are now a No-Bake Lemon Bar expert. You hold the power to create a bright, zesty, and ridiculously impressive dessert with minimal effort and maximum reward. This recipe is your secret weapon for surviving summer heatwaves, your go-to for last-minute potlucks, and your personal slice of sunshine on a plate.
So go on, ditch the oven. Squeeze some lemons. And prepare to be hailed as the dessert hero you were always meant to be.

