
The Easiest No-Bake Chocolate Bark (That Looks Deceptively Fancy)
Let’s set the scene. You’ve just remembered you promised to bring a dessert to a party that starts in two hours. Or maybe you need a last-minute holiday gift that doesn’t scream “I bought this at a gas station.” You stare into your pantry, a wasteland of half-eaten chip bags and questionable canned goods, and a wave of panic sets in. Fear not, my friend. You are about to become a culinary hero with this ridiculously easy no-bake chocolate bark. It requires almost zero skill, minimal time, and makes you look like a gourmet chocolatier.

This isn’t just a recipe; it’s your get-out-of-jail-free card for all future dessert-related emergencies. It’s the “I totally meant to do this” of the confectionary world, and it is absolutely glorious.
Why This Recipe is Your New Secret Weapon
So, what makes this chocolate bark so incredible? I’m so glad you asked.

First and foremost, it’s practically foolproof. Can you melt chocolate without setting off the smoke alarm? Can you sprinkle things on top of other things? If you answered yes to both, congratulations, you have all the necessary qualifications to make this recipe. No ovens, no candy thermometers, no weird techniques.
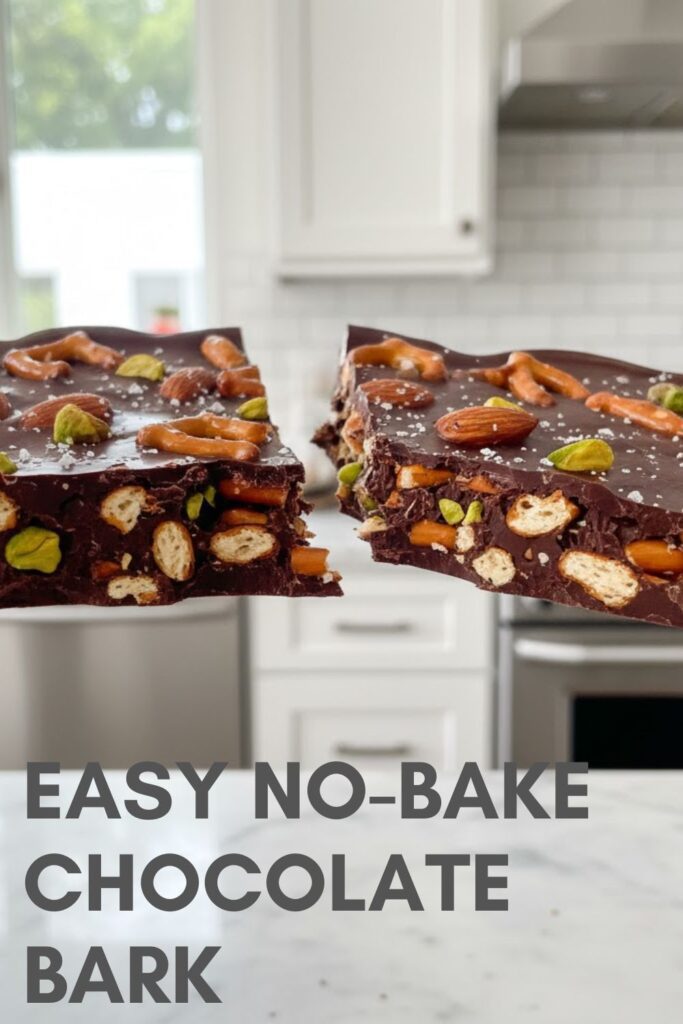
Second, it’s the ultimate “choose your own adventure” dessert. You can throw literally anything on this bark. Pretzels, nuts, dried fruit, sprinkles, potato chips—if you can dream it, you can bark it. It’s the perfect way to clean out those tiny amounts of leftover snacks in your pantry.
Finally, it’s an impressive, last-minute gift. Break it into jagged, artisanal-looking shards, pop them in a clear bag with a ribbon, and suddenly you’re a thoughtful gift-giver who makes handcrafted confections. No one needs to know it took you 10 minutes of active work and an hour of Netflix-watching while it chilled. It’s our little secret.
The Ingredient Lineup (Or, What to Rummage For)

This is less of a strict list and more of a beautiful suggestion. The only non-negotiable is the chocolate.
- Good Quality Chocolate: 12 ounces (about 2 cups of chocolate chips or a couple of bars). Use chocolate you’d actually enjoy eating on its own. This is the star of the show, so don’t use the waxy, sad stuff. Dark, semi-sweet, milk, or white chocolate all work.
- Your Toppings of Choice: This is where the fun begins. You’ll want about 1 to 1.5 cups of toppings in total. A great formula is something salty, something crunchy, and something chewy. My go-to combo includes:
- Roughly chopped pretzels
- Toasted nuts (almonds, pecans, or pistachios are amazing)
- Dried fruit (cranberries or chopped apricots for a pop of color and tang)
- Flaky Sea Salt: A final sprinkle of something like Maldon sea salt is chef’s kiss. It makes the flavors pop and looks incredibly fancy.
The Tools of the Trade (It’s Not Much)
You won’t need to dig out any complicated machinery for this operation.
- Baking Sheet: A standard half-sheet pan is perfect.
- Parchment Paper or a Silicone Baking Mat: This is non-negotiable unless you enjoy chiseling chocolate off a metal pan for the rest of eternity.
- Microwave-Safe Bowl: For melting your chocolate into a glorious, molten pool.
- Silicone Spatula: For scraping every last bit of that precious melted chocolate out of the bowl.
- Offset Spatula (Optional): If you want to feel like a real pastry chef and get a perfectly even layer of chocolate, an offset spatula is your best friend. A regular spatula or the back of a spoon also works just fine.
Step-by-Step Guide to Bark Brilliance
Ready for the easiest recipe of your life? Let’s do this.
Step 1: Prepare Your Workspace
Line your baking sheet with parchment paper or a silicone mat. Make sure the parchment is big enough to cover the whole sheet. This single action will be the difference between a 30-second cleanup and an existential crisis at your kitchen sink.
Step 2: Melt That Chocolate
Place your chocolate chips or chopped chocolate bars into your microwave-safe bowl. Microwave on 50% power for 1-minute intervals, stirring with your spatula after each interval. Why half power? Because it prevents the chocolate from getting scorched and angry. Continue until the chocolate is almost completely melted, with just a few small lumps remaining. Then, just stir until those last lumps melt away from the residual heat. This prevents overheating. You’re so clever.
Step 3: Spread It Out
Pour the beautifully melted chocolate onto your prepared baking sheet. Using your spatula (fancy offset one or otherwise), spread the chocolate into a thin, even layer. It doesn’t have to be a perfect rectangle. Rustic, free-form shapes are what we’re going for here. You’re an artist, remember?
Step 4: Go Wild with Toppings
Now, the fun part. While the chocolate is still wet, sprinkle your chosen toppings evenly all over the top. Don’t be shy. Press them down very gently with your hand or the spatula to make sure they adhere to the chocolate as it sets. Finish with a final, delicate flourish of flaky sea salt.
Step 5: The Hardest Part… Patience
Place the baking sheet in the refrigerator and chill for at least 30-60 minutes, or until the bark is completely firm. You should be able to snap it cleanly. If it’s still bendy, it needs more time to chill out.
Step 6: Break It Up and Admire Your Work
Once it’s rock solid, lift the parchment paper off the baking sheet. You can either use your hands to break the bark into random, beautiful shards or use a large knife for cleaner edges. Now, step back and admire your creation. You did it, you magnificent chocolatier, you.
Calories & Nutritional Info (A Vague Estimation)

TBH, the nutritional info for this is a bit of a wild card, as it depends entirely on your toppings. But let’s give it a shot.
- Calories: A 2×2 inch piece of dark chocolate bark with nuts and pretzels can range from 150-250 kcal.
- Healthy-ish Perks: If you use high-cacao dark chocolate (70% or more), nuts, and seeds, you’re getting a decent dose of antioxidants, healthy fats, and fiber.
- It’s Still Candy: Let’s be real, this is a treat. It’s delicious and delightful, not a health food. Enjoy it in moderation. 🙂
Common Mistakes to Avoid (Or, How Not to Ruin Chocolate)
It’s hard to mess this up, but where there’s a will, there’s a way. Here’s what to watch out for.
- The Scorched Earth Method: Microwaving your chocolate on full power for too long is a surefire way to burn it. Burned chocolate is grainy, bitter, and belongs in the trash. Use 50% power and stir frequently.
- The Dreaded Chocolate Seizure: Chocolate’s mortal enemy is water. If even a tiny drop of water gets into your melting chocolate, it will “seize” – becoming a stiff, grainy, un-spreadable mess. Make sure your bowl and spatula are bone dry.
- Using Subpar Chocolate: Your bark is only as good as your base. Using cheap, waxy chocolate will result in a bark that tastes, well, cheap and waxy. Spend the extra dollar on a brand you enjoy eating.
- Impatience: If you don’t chill it long enough, you’ll have a soft, messy bark that doesn’t snap. Give it the full time in the fridge. It’s worth the wait.
Variations & Customizations (The Bark Universe is Vast)
The basic recipe is just the beginning. The possibilities are truly endless.
- Holiday Peppermint Bark: A classic for a reason. Use a layer of dark or semi-sweet chocolate, let it set, then spread a layer of melted white chocolate on top. Sprinkle generously with crushed candy canes before the white chocolate sets.
- Spicy Aztec Chocolate Bark: Use a good quality dark chocolate (70% or higher). Before you pour it, stir in 1/2 teaspoon of cinnamon and a pinch of cayenne pepper. Top with roasted pepitas (pumpkin seeds) and a sprinkle of flaky salt.
- Keto-Friendly Trail Mix Bark: This one is perfect for a low-carb treat. Use a sugar-free chocolate like Lily’s. Top with a mix of toasted almonds, pecans, sunflower seeds, and unsweetened coconut flakes. It’s delicious and won’t spike your blood sugar.
FAQ: Answering Your Chocolate-Covered Questions
Here are some answers to the questions you’re probably pondering.
1. What is the absolute best chocolate to use for bark?
For melting and spreading, chocolate bars (like Ghirardelli or Scharffen Berger) or high-quality melting wafers (callets) work best. Chocolate chips are designed to hold their shape, so they can sometimes be a bit thicker when melted, but they still work fine in a pinch!
2. How should I store my no-bake chocolate bark?
Store it in an airtight container in the refrigerator for up to 2 weeks. If your house is cool, you can keep it at room temperature, but the fridge will ensure it stays nice and snappy.
3. Why isn’t my chocolate bark snappy? It’s kind of soft.
This usually means one of two things: it either didn’t chill long enough, or it has gotten too warm sitting at room temperature. Pop it back in the fridge for a bit, and it should firm right up.
4. Can I make this recipe vegan?
Absolutely! Just use a high-quality dark chocolate that is dairy-free (most good quality dark chocolates are) and ensure all your toppings are vegan. It’s one of the easiest desserts to make vegan.
5. How long does the bark really take to set?
In the refrigerator, it will be fully firm in about 30-60 minutes. If you’re really in a hurry, you can pop it in the freezer for 15-20 minutes, but keep an eye on it to prevent condensation from forming on the chocolate.
6. Can I swirl different types of chocolate together?
Yes, and it looks beautiful! Melt your different chocolates (e.g., dark and white) in separate bowls. Pour one onto the pan, then drizzle or dollop the other on top. Use a toothpick or skewer to gently drag through the colors to create a marbled effect before adding toppings.
7. Do I need to temper the chocolate for this?
Nope! That’s the beauty of this no-bake recipe. Tempering is a process that gives chocolate a glossy finish and a sharp snap at room temperature. Since we’re storing our bark in the fridge, we can skip that complicated process entirely. We love a good shortcut.
Final Thoughts
You are now a certified Bark-itect. You have the power to transform a few simple ingredients into a stunning, delicious treat in under an hour. Whether you need a quick dessert, a homemade gift, or just a way to deal with a sudden and intense chocolate craving, this recipe has your back.
So go on, raid your pantry and create your own signature chocolate bark. Just, you know, try to share it. Or don’t. I won’t tell.

