

The Easiest No-Bake Cheesecake That’s Actually Foolproof
Let’s talk about cheesecake. That glorious, creamy, tangy dessert that we all crave on a deep, spiritual level. But then the fear sets in. You start having flashbacks to recipes that mention “water baths,” “springform pans wrapped in foil,” and the ever-present terror of a giant crack forming across the top of your masterpiece. Who needs that kind of stress in their life? Not you. That’s why you need this ridiculously easy, impressively delicious No-bake cheesecake recipe.
This is your secret weapon. Your ace in the hole. It’s the dessert you bring to a party that makes everyone think you’re a baking prodigy, when in reality, you just stirred a few things together and let your refrigerator do all the hard work. Prepare to enter a world of creamy, dreamy cheesecake without ever turning on your oven.
Why This Recipe Is Your New Obsession

So, why is this the only no-bake cheesecake recipe you’ll ever need? Oh, let me count the ways. The most obvious reason? Absolutely no oven is required. This makes it the undisputed champion of summer desserts, small apartment kitchens, and anyone who is generally terrified of baking. Can I get an amen?
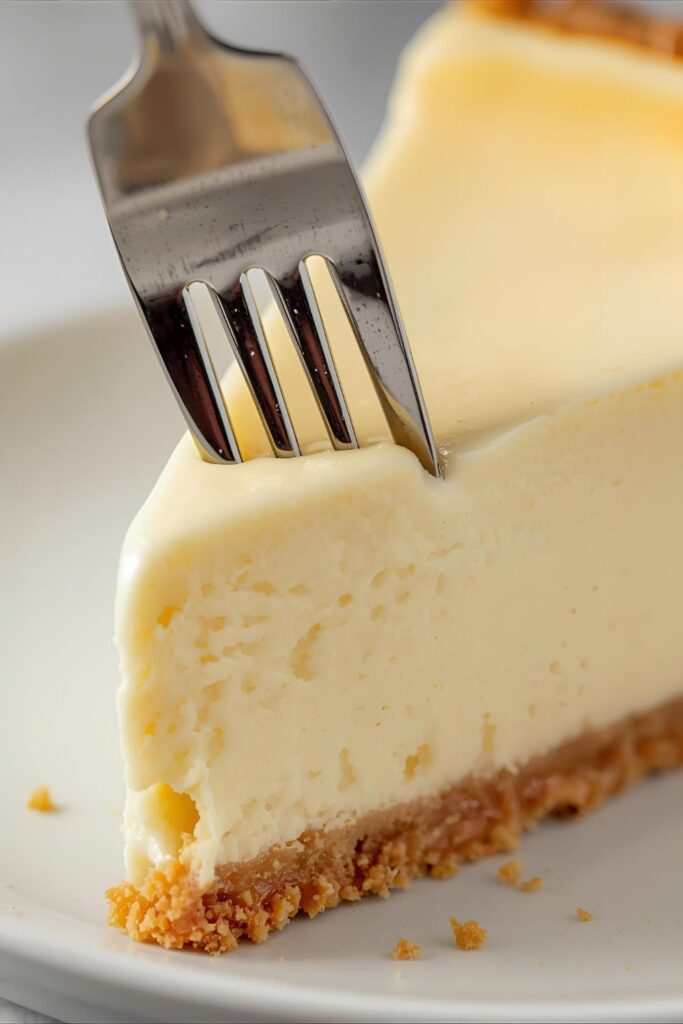
Beyond that, the texture is pure heaven. It’s lighter and creamier than its baked counterpart, with an almost mousse-like consistency that melts in your mouth. It sets up perfectly firm for beautiful, clean slices, yet remains unbelievably silky and smooth.
TBH, the effort-to-reward ratio is off the charts. You get a stunning, crowd-pleasing dessert that looks and tastes like it came from a fancy bakery, but the process is basically “mix, spread, chill.” It’s your go-to for last-minute dinner parties, holidays, or just a Tuesday night when you deserve something amazing.
The Simple Ingredients You’ll Need
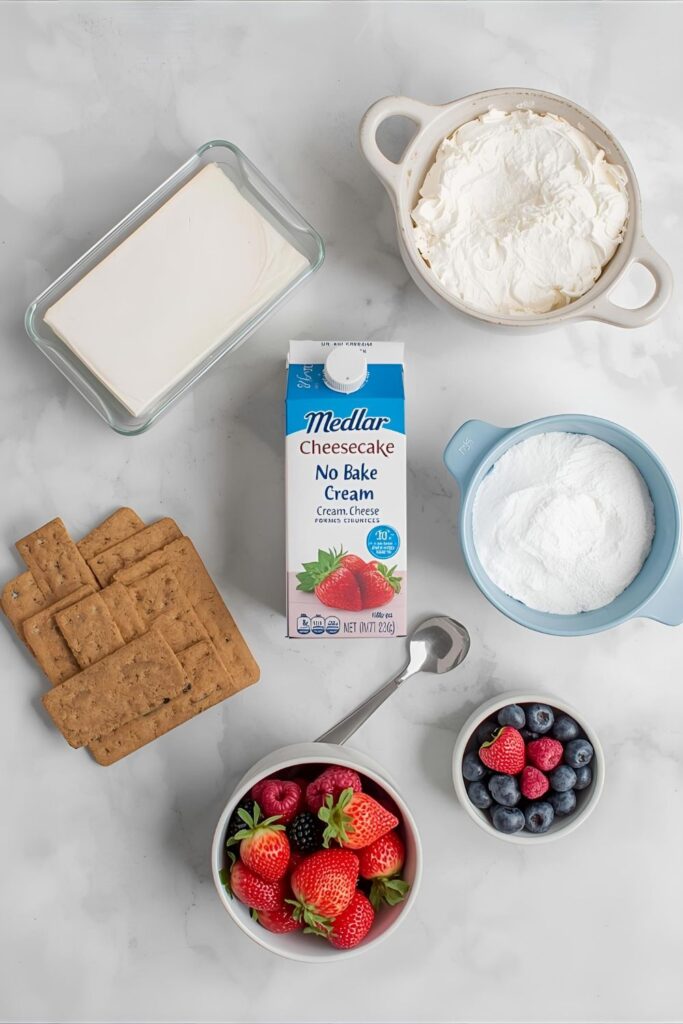
The magic of this recipe lies in its simplicity. No weird, hard-to-find ingredients here—just pure, unadulterated goodness.
For the Buttery Graham Cracker Crust:
- Graham Cracker Crumbs: 1 ½ cups. You can buy the crumbs or make your own by pulverizing about 10 full sheets of graham crackers.
- Unsalted Butter: 6 tablespoons, melted. This is the glue that holds our glorious crust together.
- Granulated Sugar: 1/4 cup. Just to add a little extra sweetness and crunch.
For the Creamy, Dreamy Filling:
- Cream Cheese: 16 ounces (two 8-ounce blocks). This must be full-fat and at room temperature. I am not kidding. Cold cream cheese is the enemy of a smooth filling.
- Heavy Whipping Cream: 1 cup, very cold. This is the key to the light, airy texture.
- Powdered Sugar: 1 cup, sifted if it’s lumpy. Do not substitute with granulated sugar unless you enjoy a grainy texture.
- Sour Cream: 1/4 cup. This adds a subtle, delicious tang that is the hallmark of a great cheesecake.
- Lemon Juice: 1 tablespoon, fresh is best. Brightens up all the flavors.
- Vanilla Extract: 2 teaspoons. Use the good stuff!
Tools & Kitchen Gadgets Used
While you don’t need an oven, a few key tools will make this process ridiculously easy.
- A 9-inch Springform Pan: This is the ideal pan because it allows you to remove the sides for a stunning presentation. A regular 9-inch pie plate will work in a pinch, but the slices won’t be as neat.
- Electric Mixer (Hand or Stand): You really need this to get the cream cheese perfectly smooth and to whip the heavy cream to stiff peaks. Doing this by hand is a workout I wouldn’t wish on anyone.
- Food Processor: The fastest and easiest way to turn graham crackers into fine, sandy crumbs for your crust. A zipper bag and a rolling pin also work if you need to release some aggression.
- Mixing Bowls: You’ll need at least one large and one medium bowl.
- Rubber Spatula: For scraping down the bowl and making sure every last bit of that creamy filling makes it into the pan.
- Offset Spatula: Not essential, but it’s the best tool for getting that perfectly smooth, professional-looking top.
Step-by-Step Instructions: The Path to No-Bake Bliss
Ready to become a cheesecake champion? Let’s do this.
- Make and Press the Crust: In a medium bowl, combine the graham cracker crumbs and sugar. Pour in the melted butter and mix with a fork until all the crumbs are evenly moistened (it should look like wet sand). Firmly press the mixture into the bottom and about an inch up the sides of your 9-inch springform pan. Use the bottom of a measuring cup to pack it down tightly. Pop the crust in the freezer to set while you make the filling.
- Whip the Cream: In a large, chilled bowl, use your electric mixer to beat the cold heavy cream until it forms stiff peaks. This means when you lift the beaters out, the peak of cream holds its shape. Set this aside.
- Beat the Cream Cheese: In a separate large bowl, beat the room temperature cream cheese and powdered sugar on medium speed until it is completely smooth and creamy. This is the most important step for a non-lumpy filling, so scrape down the sides and bottom of the bowl several times.
- Add the Flavor: Beat in the sour cream, lemon juice, and vanilla extract until everything is well combined and smooth.
- Fold it All Together: Now, gently fold the whipped cream into the cream cheese mixture using a rubber spatula. Do this in two or three additions. Be gentle! You want to keep all that air you whipped into the cream, as this is what gives the cheesecake its light texture.
- Assemble and Smooth: Spoon the heavenly filling onto your chilled crust. Use an offset spatula or the back of a spoon to spread it into an even, smooth layer.
- The Ultimate Test of Patience: Cover the cheesecake with plastic wrap and chill in the refrigerator for at least 6-8 hours, but overnight is best. Do not rush this step! The cheesecake needs this time to fully set up so you can get beautiful, clean slices.
Calories & Nutritional Info
Here’s a rough estimate per slice, assuming you cut the cheesecake into 10 delicious servings.
- Calories: Approximately 550-650 per slice.
- Fat: Around 45g.
- Carbohydrates: Roughly 35g.
- Protein: About 7g.
- A Note: Let’s be real. This is a glorious, full-fat dessert. It’s meant to be an indulgence, so enjoy every single bite. 🙂
Common Mistakes to Avoid (Your Guide to Cheesecake Perfection)
Avoid these rookie mistakes for a flawless cheesecake every single time.
- The Lumpy Filling Fiasco: I’m going to say it one more time for the people in the back: your cream cheese must be at room temperature. Cold cream cheese will not blend smoothly, and you will be left with tiny, unappetizing lumps. Set it on the counter for at least an hour before you start.
- The Soupy, Sad Cheesecake: If your cheesecake doesn’t set, it’s usually one of two culprits. Either you didn’t whip your heavy cream to stiff peaks, or you didn’t chill the cheesecake long enough. Be patient! Give it the full 6-8 hours.
- The Crust That Crumbles: If your crust falls apart, you probably didn’t use enough melted butter or you didn’t pack it down firmly enough in the pan. Make sure every crumb is moistened and really press it in there.
- Going Low-Fat: This is not the time to skimp. Full-fat block cream cheese and heavy whipping cream are non-negotiable. Low-fat or whipped tub-style cream cheese doesn’t have the right structure and your cheesecake will not set properly.
Variations & Customizations
Once you’ve nailed the classic, you can get creative. The possibilities are endless!
- Oreo Cookie Monster: Use a crust made from crushed Oreo cookies (about 25 cookies, no need to remove the filling). For a fun, kid-friendly twist, add a few drops of blue food coloring to the filling to make a “cookie monster cake” and top with mini Oreos.
- Key Lime Pie Hybrid: Swap the lemon juice for fresh key lime juice and add the zest of two limes to the filling. Serve with extra whipped cream and lime slices. It’s tangy, refreshing, and incredible.
- Salted Caramel Pretzel: Use a crust made from crushed pretzels instead of graham crackers. After the cheesecake has chilled, drizzle the top generously with salted caramel sauce and sprinkle with more crushed pretzels for a perfect sweet-and-salty crunch.
FAQ Section: Your No-Bake Questions, Answered
H3: Why didn’t my no-bake cheesecake set?
This is the number one question! It’s almost always because the heavy cream wasn’t whipped to stiff peaks, or the cheesecake simply wasn’t chilled long enough. Give it time!
H3: Can I freeze no-bake cheesecake?
Yes! It freezes beautifully. You can freeze the whole cheesecake or individual slices. Wrap it well in plastic wrap and then foil. It will last for up to 3 months. Thaw it in the refrigerator before serving.
H3: What is the difference between baked and no-bake cheesecake?
Baked cheesecake typically contains eggs and is baked in a water bath, which gives it a denser, richer, more custard-like texture. No-bake cheesecake is eggless and relies on the whipped cream and the chilling of the cream cheese to set up, resulting in a lighter, creamier, almost mousse-like texture.
H4: Can I use a regular 9-inch pie dish?
You can, but the presentation won’t be as clean since you can’t remove the sides. It will still taste just as delicious, though!
H3: How long does no-bake cheesecake last in the fridge?
It will keep well, covered, in the refrigerator for up to 4 days. After that, the crust may start to get a little soft.
H3: Can I use Cool Whip instead of making my own whipped cream?
You can substitute an 8-ounce tub of Cool Whip, but the flavor and texture won’t be as rich or authentic. IMO, taking the extra two minutes to whip your own heavy cream is 100% worth it.
H3: My filling tastes a little grainy. What went wrong?
You likely used granulated sugar instead of powdered sugar. Powdered sugar dissolves instantly into the cream cheese, creating a perfectly smooth texture. Granulated sugar can leave a gritty mouthfeel.
Final Thoughts
You did it! You are now the proud owner of a recipe for a perfect, show-stopping cheesecake that requires absolutely zero baking skills. You can walk into any gathering, cheesecake in hand, and command the respect you deserve.
So go ahead, and embrace the easy life. Whip up this creamy masterpiece, top it with your favorite fruit, chocolate, or caramel, and enjoy the sweet, sweet victory of making a perfect dessert without breaking a sweat.

