

The Easiest No-Bake Cake That Tastes Incredibly Decadent
Let’s be honest, the desire for a rich, chocolatey cake and the motivation to actually bake one are often in a toxic, codependent relationship. We all want the glory of serving a stunning dessert, but the thought of preheating, mixing, and anxiously watching the oven is… a lot. What if you could achieve cake nirvana without any of that drama? My friends, I’m here to introduce you to your new secret weapon, the glorious No-bake cake. This isn’t just a dessert; it’s a life hack that results in a ridiculously delicious, fudgy, and crunchy slice of heaven.
H2: So, Why Is This “Un-Baking” Method So Awesome?

This recipe is the definition of foolproof. You literally cannot mess it up. There’s no risk of a sunken middle, no dry and crumbly texture, no burnt edges. It’s a simple process of melting, mixing, and chilling. It’s the perfect dessert for a hot day when turning on your oven feels like a personal attack, or for a busy holiday season when oven space is prime real estate.
The texture is what makes this cake a true showstopper. It’s a dense, fudgy chocolate matrix, studded with crunchy biscuit pieces. Every bite is a delightful contrast of smooth and crisp. It looks incredibly impressive when you slice into it, revealing a beautiful mosaic pattern. Everyone will think you’re a pastry genius, and you never have to tell them your greatest skill was crushing cookies in a bag.
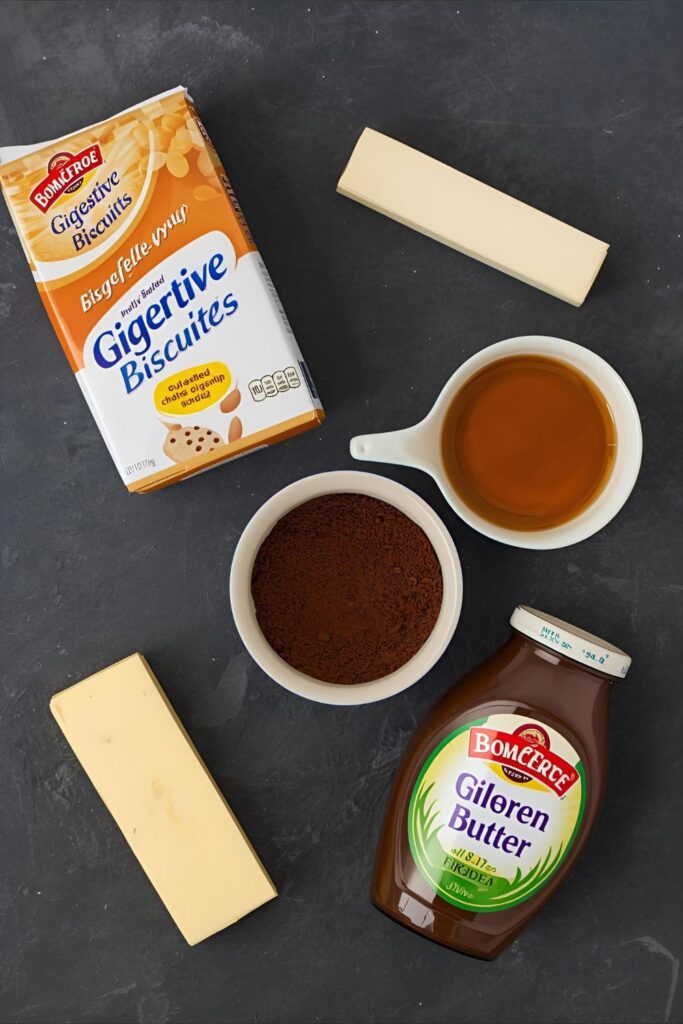
H2: Your Simple Shopping List for No-Bake Glory

You don’t need a pantry full of fancy ingredients. This recipe is all about simple, accessible goodness.
- 1 package (about 7-9 oz) of digestive biscuits or graham crackers: These are the crunchy foundation of our cake. Shortbread or any other plain, crisp cookie also works.
- 1/2 cup (1 stick) unsalted butter: This is what makes the chocolate mixture rich and luscious.
- 1/4 cup unsweetened cocoa powder: For that deep, intense chocolate flavor.
- 1/2 cup golden syrup or corn syrup: This provides sweetness and that perfect, slightly chewy, fudgy texture.
- 2-3 tablespoons of milk: Just to help everything meld into a smooth, pourable consistency.
- For the optional (but highly recommended) ganache topping:
- 1 cup semi-sweet chocolate chips
- 1/2 cup heavy cream
H2: The Tools of Your No-Bake Trade
Put away your stand mixer. You won’t be needing it.
- A Large Saucepan: For melting everything together into a chocolatey dream.
- A 7 or 8-inch Loaf Pan or a 6-inch Round Cake Pan: This will be the mold for your creation.
- Parchment Paper: This is non-negotiable for easy removal.
- A Silicone Spatula: For mixing and scraping every last bit of chocolate.
- A Large Ziploc Bag and a Rolling Pin (or a can of beans): Your official biscuit-crushing apparatus.
H2: Let’s Get Assembling: Your Step-by-Step Guide
This is more of an assembly project than a baking one. You’ve got this.
H3: Step 1: Prep Your Pan and Biscuits
First, line your loaf pan or cake pan with parchment paper, leaving some overhang on the sides to act as “handles.” This is your secret to getting the cake out cleanly. Now for the fun part: place your biscuits in a Ziploc bag, seal it, and gently crush them with a rolling pin. You’re not looking for fine crumbs; you want small, irregular, bite-sized pieces.
H3: Step 2: Create the Chocolate Magic
In your large saucepan, combine the butter, golden syrup, and cocoa powder. Place it over low heat and stir continuously until the butter is completely melted and the mixture is smooth and glossy. Do not let it boil! Once it’s smooth, remove it from the heat and stir in the milk.
H3: Step 3: Combine and Conquer
Pour the broken biscuit pieces into the saucepan with the warm chocolate mixture. Use your spatula to gently fold everything together until every single piece of biscuit is lovingly coated in chocolate.
H3: Step 4: Press and Chill
Scrape the mixture into your prepared pan. Use the back of your spatula to press it down firmly and evenly. This step is crucial for making sure your cake holds together and doesn’t crumble when you slice it. Now, place the pan in the refrigerator to chill for at least 4 hours, or overnight, until it’s completely firm.
H3: Step 5: The Optional (But Amazing) Ganache
About 30 minutes before you’re ready to serve, make the ganache. Place the chocolate chips in a heatproof bowl. Gently heat the heavy cream in a small saucepan until it just begins to simmer. Pour the hot cream over the chocolate chips and let it sit for 5 minutes without stirring. Then, whisk until it’s a smooth, silky river of chocolate.
H3: Step 6: Garnish, Slice, and Serve
Remove the chilled cake from the fridge. Pour the ganache over the top and smooth it out. You can let it set in the fridge for another 15 minutes, or serve it with the ganache still soft. Use the parchment handles to lift the cake out of the pan, slice with a sharp knife, and accept your standing ovation.
H2: The Nutritional Guesstimate (Per Slice)

This is a rich, decadent dessert. Let’s not pretend otherwise. Enjoy it!
- Calories: Approximately 350-400 kcal (with ganache)
- Protein: 4g
- Carbohydrates: 45g
- Fat: 22g
- Sugar: 30g
H2: Common No-Bake Blunders to Avoid
Don’t let these simple mistakes get in your way.
- Turning Your Biscuits to Dust: The joy of this cake is the textural contrast. If you pulverize the biscuits in a food processor, you’ll end up with a dense, pasty texture. You want noticeable chunks of biscuit.
- Boiling the Chocolate Mixture: If you get the butter and syrup mixture too hot, it can separate or become grainy. Melt it gently over low heat just until everything is combined and smooth.
- A Loosely Packed Cake: If you just dump the mixture in the pan without pressing it down, it will fall apart when you try to slice it. Use your spatula to pack it in tightly.
- Impatience: This cake needs time to set in the fridge. I know it’s tempting, but if you slice it too early, you’ll have a gooey, delicious mess instead of clean, beautiful slices. The chill time is not a suggestion.
H2: Pimp Your Cake: Fun Variations
The basic recipe is a perfect canvas for your creativity.
- Rocky Road Extravaganza: Add 1 cup of mini marshmallows and 1/2 cup of chopped walnuts or pecans to the biscuit mixture for that classic rocky road flavor and texture.
- Mint Chocolate Masterpiece: Add 1 teaspoon of peppermint extract to the melted chocolate mixture. Top the finished cake with crushed Andes mints or peppermint candies for a festive, minty kick.
- Fruity & Nutty Delight: Fold in 1/2 cup of dried cranberries or cherries and 1/2 cup of chopped pistachios or almonds for a more sophisticated, trail-mix-inspired vibe.
H2: FAQ: Your Burning No-Bake Cake Questions
Got questions about this oven-free wonder? I’ve got answers.
H3: What are the best biscuits to use?
Classic digestive biscuits (like McVitie’s) are traditional and perfect. Graham crackers or a simple shortbread cookie also work wonderfully. You want something crisp and plain.
H3: Can I make this no-bake cake vegan?
Absolutely! Use a good quality vegan butter or margarine, your favorite plant-based milk (like oat or almond), and vegan-friendly biscuits (many digestive biscuits and graham crackers are accidentally vegan, just check the label!). Use dairy-free chocolate for the ganache.
H3: How do I store it?
Store your no-bake cake in an airtight container in the refrigerator. It will stay fresh and delicious for up to a week.
H3: Can I freeze this cake?
Yes, it freezes beautifully! Wrap the whole cake or individual slices tightly in plastic wrap and then foil. It will keep in the freezer for up to 2 months. Thaw in the fridge before serving.
H3: Can I use a different kind of pan?
For sure. An 8×8 inch square pan will give you thinner bars, or a 6-inch springform pan is great for a round cake that’s easy to release. Just make sure you line it with parchment paper.
H3: My cake seems a bit greasy. What happened?
This can sometimes happen if the butter mixture gets a little too hot and separates. Melt it gently and make sure everything is well combined. A little sheen on the outside is normal, though.
H3: Is this the same as a Tiffin or a Chocolate Fridge Cake?
Yes! It goes by many names around the world—Tiffin in Scotland, Chocolate Fridge Cake in England, and famously, it’s a simplified version of the Chocolate Biscuit Cake beloved by the British Royal Family.
H2: Final Thoughts: You’ve Mastered the Art of “Un-Baking”
Congratulations! You have successfully created a stunning, decadent, and deeply satisfying cake without ever having to preheat an oven. You’ve outsmarted the system and have been rewarded with a dessert that is perfect for any and every occasion. So go on, pour yourself a glass of milk, cut a thick slice of your creation, and bask in the glory of your clever, delicious work.

