The Ultimate Squishy Delight: A Foolproof Mochi Recipe for Modern Foodies
Have you ever walked into a trendy boutique bakery, seen a perfectly round, pastel-colored blob of dough, and thought, “I would give my left directed-energy-shield for that texture”? We’ve all been there. You poke it, it bounces back, and suddenly you’re in a deep emotional relationship with a rice cake. Today, we are ending the expensive bakery runs and mastering the mochi recipe right in your own kitchen, because paying five dollars for a single squishy ball is basically a crime.

Seriously, why do we treat mochi like it’s some sort of ancient sorcery? It’s basically rice flour and sugar having a very sticky party. I once tried to explain the concept of “chewy-soft” to my cousin who only eats crusty bread, and he looked at me like I was describing a different dimension. IMO, once you realize you can make this in a microwave, your life changes forever. Are you ready to become the master of the squish without actually having to swing a giant wooden mallet?
Why This Recipe is Awesome
This recipe functions as the ultimate culinary party trick. It looks incredibly sophisticated, tastes like a sweet cloud, and requires zero actual “cooking” skills if you own a microwave. If you can stir a bowl without creating a localized flour storm, you have already mastered the hard part.

The texture is truly elite. You get that iconic Japanese chew (the ‘mochi-mochi’ feel) that highlights whatever filling you choose. It’s the ultimate “look at me” dish for guests because they’ll assume you spent hours steaming and pounding rice. In reality, you just pressed a button and scrolled through TikTok for three minutes.
Our Top Pick

Papier Herb Garden Recipe Journal - Hardback Design
Capture your culinary ideas and favorite memories with this beautifully designed recipe journal. Organized sections for breakfast, lunch, dinner, and treats make it easy to record recipes, ratings, dietary notes, and cooking tips, along with measurement and conversion guides. Extra pages let you list favorite restaurants, shops, and places to try. Crafted with a premium hardback cover, luxurious 100gsm paper, and a gold foil accent, it’s both durable and stylish. Thoughtfully designed to suit any kitchen, it makes a practical, timeless gift for family, friends, or yourself.
Plus, it serves as a fantastic canvas for your weirdest flavor cravings. Want to stuff it with peanut butter? Go for it. Dark chocolate? Yes, please. A single, perfect strawberry? Now you’re just showing off. Who doesn’t love a high-reward, low-effort situation that makes you look like a pro? 🙂
Ingredients
Gather your supplies, but don’t try to wing it with regular flour. If you try to use All-Purpose flour for this, you won’t get mochi; you’ll get a very disappointing pancake.
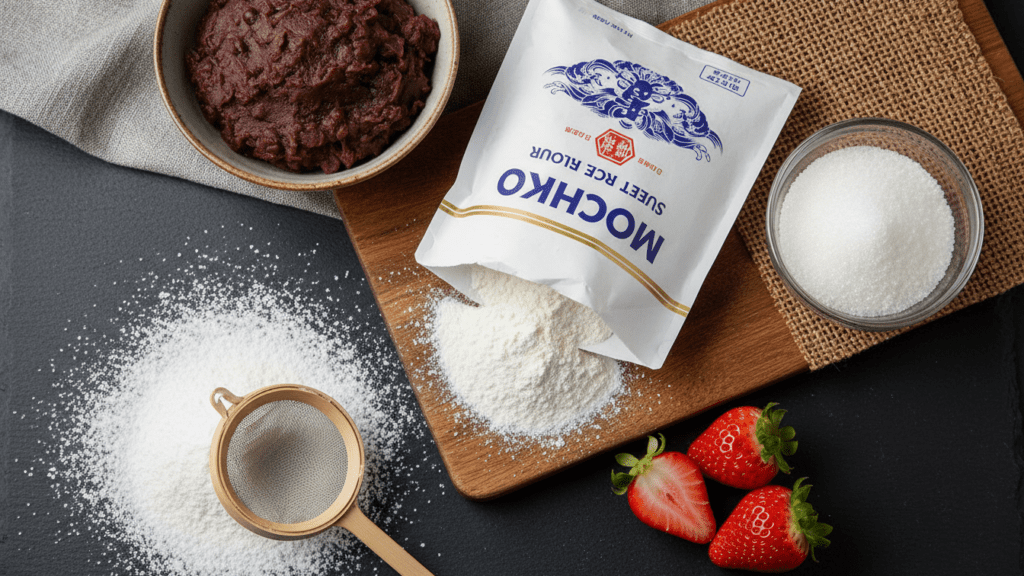
- 1 cup Mochiko (Sweet Glutinous Rice Flour—this is non-negotiable!)
- 1/4 cup Granulated Sugar (Because we like sweetness and joy)
- 1 cup Water (Filtered is best, but tap works if you’re living on the edge)
- Cornstarch or Potato Starch (For dusting—this prevents you from becoming permanently bonded to your countertop)
- 1/2 cup Sweetened Red Bean Paste (Traditional) or Small Strawberries (The cool-kid choice)
- Optional: A drop of Food Coloring (If you want that viral pastel aesthetic)
Tools & Kitchen Gadgets Used
You don’t need a lab, but a few specific tools make this process feel like a professional operation rather than a sticky disaster.
- Microwave-Safe Glass Bowl – You need something that won’t melt while the rice flour does its thing.
- Silicone Spatula – The MVP of this recipe. Wood and metal will stick; silicone is your only friend here.
- Plastic Wrap – To create that mini steam-chamber in the microwave.
- Adjustable Rolling Pin – If you want perfectly even mochi skins for your fillings.
- Fine Mesh Sieve – For dusting the starch evenly like a snowy mountain.
- Silicone Baking Mat – The only surface that won’t hold your mochi hostage.
Step-by-Step Instructions
Alright, let’s get sticky. Try to stay focused; the transition from liquid to dough happens faster than my motivation disappears on a Friday afternoon.
Step 1: The Initial Mix
In your microwave-safe glass bowl, whisk together the Mochiko and sugar. Slowly pour in the water and stir until it’s a smooth, milky liquid. If you’re adding food coloring, do it now. TBH, neon pink mochi tastes better—it’s science.
Step 2: The First Zap
Cover the bowl tightly with plastic wrap (leave a tiny vent!) and microwave on high for 2 minutes. When you take it out, it might look like a weird alien landscape with some liquid spots. Don’t panic. Use your silicone spatula to stir it aggressively.
Step 3: The Second Zap
Cover it again and microwave for another 1 minute. Now, the dough should be translucent and incredibly sticky. It should look like a giant, edible gummy bear. If it still looks milky/white, give it another 30 seconds.
Step 4: The Starch Station
Generously dust your silicone mat and your hands with cornstarch. Seriously, don’t be shy; if you see the mat, you need more starch. Plop the hot dough onto the mat. Warning: It’s hot! Don’t burn your fingerprints off; let it cool for 60 seconds.
Our Top Pick

LuBudingJoy Blank Recipe Book
B5 Blank Recipe Book – Create and organize your favorite recipes in one beautiful place. This hardcover recipe book (10" × 7.3") features 150 blank pages and includes DIY category stickers. Designed with conversion charts, content tables, and a back pocket for loose notes.
Step 5: Shaping the Clouds
Flatten the dough into a disc and cut it into 8-10 equal pieces. Use your rolling pin to flatten each piece into a circle. Place a dollop of red bean paste or a strawberry in the center. Pinch the edges together to seal the bottom.
Step 6: The Finishing Dust
Roll the finished ball in a bit more starch to make it silky to the touch. Tap off the excess. Congratulations, you’ve just created a masterpiece. Serve them within a few hours for the best “squish” factor.
Calories & Nutritional Info
For the folks who like to know exactly what’s happening in their bodies, here is the breakdown. It’s a treat, not a salad, but it’s surprisingly light.
- Calories: ~120-150 kcal per mochi (depending on your filling).
- Fats: < 1g (Virtually fat-free, assuming you didn’t stuff it with butter).
- Carbs: 30g (Pure, chewy energy for your brain).
- Notes: This is naturally gluten-free! FYI, Red bean paste adds a tiny bit of fiber, so you can tell yourself it’s a health snack.
Common Mistakes to Avoid
Don’t let your dessert become a tragedy. Avoid these classic slip-ups:
- Using Regular Rice Flour: If the bag doesn’t say “Glutinous” or “Mochiko,” put it back. You’ll end up with a gritty mess. Stick to Mochiko.
- Starch Scarcity: If you don’t use enough starch, the dough will attach itself to your soul and never let go. Dust everything.
- Overcooking: If you microwave it for five minutes straight, you’ll get a bouncy ball you can’t chew. Zap in intervals.
- Cold Dough Shaping: Once the mochi gets cold, it loses its elasticity. Shape it while it’s still warm to the touch.
- Wet Fillings: If your strawberries are soaking wet, they will make the dough slimy. Pat your fruit dry before wrapping.
Variations & Customizations
Once you master the classic, feel free to branch out. Here are three ways to change the game.
- The Ice Cream Hero: Scoop tiny balls of ice cream and freeze them until rock hard. Wrap them in the mochi skins and freeze again. You just saved ten bucks on a box of store-bought mochi ice cream.
- The Matcha Twist: Sift a tablespoon of matcha powder into the flour mix before adding water. It creates a beautiful green color and an earthy flavor that balances the sugar.
- The PB&J Swap: Skip the red bean paste and use a frozen dollop of peanut butter and jam. It’s the ultimate childhood nostalgia in a squishy Japanese form.
FAQ Section
Can I make mochi without a microwave? Yes! You can steam the mixture in a bowl for about 20 minutes, stirring halfway through. It’s the more traditional way, but IMO, the microwave is a gift from the gods of convenience. 🙂
How do I store leftovers? Mochi gets hard in the fridge. Keep them in an airtight container at room temperature for up to 2 days. If you must keep them longer, freeze them and thaw for 30 minutes.
Is Mochiko the same as sweet rice flour? Essentially, yes. Just look for the blue star Koda Farms brand; it’s the gold standard for this mochi recipe.
Why is my mochi so sticky? It’s supposed to be! That’s the “glutinous” part of the rice. If it’s sticking to you, you just haven’t used enough cornstarch.
Can I use sugar substitutes? You can, but the texture might be slightly less glossy. If you use a liquid sweetener, reduce the water amount slightly to compensate.
Is mochi vegan? The dough itself is 100% vegan and dairy-free. Just make sure your fillings don’t contain any animal products!
Can children eat mochi? Mochi is very chewy and can be a choking hazard. Cut it into small pieces for kids and make sure they chew thoroughly!
Final Thoughts
There you have it—the mochi recipe that will make your Instagram followers weep with envy. It’s sweet, it’s squishy, and it takes less time to make than it does to find a parking spot at a fancy bakery. Just try not to get too smug when your friends ask which high-end shop you “imported” them from. Ready to ruin store-bought treats for yourself forever? Happy squishing!