

Your Ultimate Comfort Fix: The Creamiest, Cheesiest Mac and Cheese Recipe Ever
Let’s face it. Some days just scream for a hug in a bowl. You know the kind of day: rain is pouring, your boss is being a… well, your boss, and your sweatpants are calling your name. What’s the only logical solution? A giant, glorious helping of mac and cheese. Forget the boxed stuff with its questionable orange powder. We’re talking about real, homemade, utterly decadent mac and cheese that will make you question every life choice that didn’t involve this dish. Get ready to experience true culinary comfort that’s so good, you might just shed a tear. (Of joy, obviously.)
Why This Mac and Cheese Is Your New Best Friend

Why bother making mac and cheese from scratch when there are a bazillion boxed options? Because you deserve better, that’s why! This recipe delivers on all fronts:
First, the flavor is mind-blowing. We’re using a blend of cheeses that melt into a velvety smooth, rich, and incredibly savory sauce. It coats every single noodle, creating a harmonious symphony of cheesy goodness in every bite. It’s comforting, it’s nostalgic, and it’s genuinely satisfying.

Second, it’s surprisingly easy to make. Yes, you’re making a béchamel (fancy word for a simple white sauce), but trust me, it’s far less intimidating than it sounds. You’ll be whipping this up faster than you can decide what movie to binge-watch. Plus, who doesn’t love a dish that screams “I tried hard, but also, I just love cheese”? It’s impressive enough for a potluck but easy enough for a Tuesday night.
Finally, the satisfaction factor is off the charts. This isn’t just food; it’s a warm hug for your soul. It’s the ultimate comfort food, guaranteed to chase away any bad day. And honestly, isn’t that what we all need sometimes? IMO, a good batch of mac and cheese is basically therapy.
Ingredients: The Holy Trinity of Cheese (and More!)
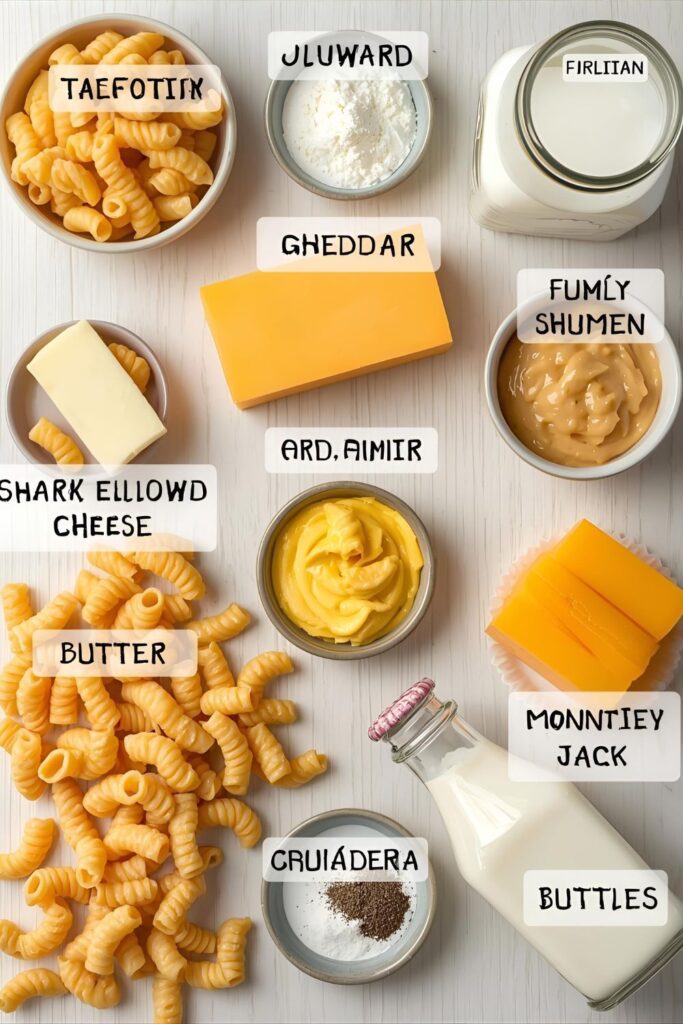
To achieve ultimate creamy, dreamy mac and cheese, you need the right players. This blend is my personal favorite, but feel free to tweak!
- For the Pasta:
- 1 pound elbow macaroni (or your favorite short pasta like cavatappi or shells)
- 1 tablespoon olive oil (prevents sticking)
- 1 teaspoon salt (for pasta water)
- For the Glorious Cheese Sauce:
- 1/2 cup (1 stick) unsalted butter
- 1/2 cup all-purpose flour
- 4 cups whole milk, warmed (Important! It helps prevent lumps)
- 1 teaspoon dry mustard powder (Enhances cheese flavor—trust me!)
- 1/2 teaspoon garlic powder
- 1/4 teaspoon cayenne pepper (for a subtle kick, not heat)
- 1 teaspoon salt
- 1/2 teaspoon black pepper
- 2 cups (8 oz) sharp cheddar cheese, freshly shredded
- 1 cup (4 oz) Gruyère or Fontina cheese, freshly shredded (for meltiness and depth)
- 1 cup (4 oz) Monterey Jack cheese, freshly shredded (for extra creaminess)
- Optional Crumb Topping (if baking):
- 1 cup panko breadcrumbs
- 2 tablespoons melted butter
- 1/4 cup grated Parmesan cheese
Key Substitutions: If you don’t have Gruyère, Colby Jack, mild cheddar, or even mozzarella can work in a pinch. For a gluten-free version, use GF pasta and GF all-purpose flour for the roux. You can swap whole milk for 2%, but the sauce won’t be quite as rich.
Tools & Kitchen Gadgets Used
You don’t need a professional kitchen, but a few essential tools make this cheesy adventure smooth sailing.
- Large Pot: For boiling the pasta (obviously!).
- Large Heavy-Bottomed Saucepan or Dutch Oven: Crucial for making the béchamel without scorching.
- Whisk: Your best friend for smooth sauces!
- Wooden Spoon or Rubber Spatula: For stirring.
- Measuring Cups and Spoons: For precision, because nobody wants a soupy or dry sauce.
- Cheese Grater: Freshly shredded cheese melts better! Don’t use pre-shredded if you can avoid it.
- Colander: For draining pasta (duh).
- 9×13 inch Baking Dish (Optional): If you’re going for the baked version.
Step-by-Step Instructions: Cheesy Bliss Awaits!
Follow these steps precisely for a truly glorious, lump-free, and incredibly cheesy mac and cheese. Don’t worry, I’ll hold your hand.
H3: Step 1: Pasta Perfection (Al Dente, Please!)
Bring a large pot of salted water to a rolling boil. Add the 1 pound of macaroni and a tablespoon of olive oil. Cook according to package directions, but aim for al dente (slightly firm to the bite). You want it cooked but still with a bit of chew, as it will finish cooking in the sauce. Drain the pasta thoroughly and set it aside. Don’t rinse it! We need that starchy goodness.
H3: Step 2: The Mighty Roux (Don’t Be Scared!)
In your large, heavy-bottomed saucepan or Dutch oven, melt the 1/2 cup of unsalted butter over medium heat. Once melted, sprinkle in the 1/2 cup of all-purpose flour. Whisk continuously for 1-2 minutes until the mixture (the “roux”) forms a smooth paste and smells slightly nutty. It will look like wet sand. This is your thickener, so no lumps allowed!
H3: Step 3: Whisk in the Warm Milk
Gradually whisk in the 4 cups of warmed whole milk, a little at a time, ensuring each addition is fully incorporated before adding more. Keep whisking! This prevents lumps and creates a beautifully smooth base. Bring the mixture to a gentle simmer, still whisking, until it thickens enough to coat the back of a spoon. This should take about 5-7 minutes. Don’t let it boil rapidly.
H3: Step 4: Spice It Up and Melt That Cheese
Remove the saucepan from the heat. Now, stir in the dry mustard powder, garlic powder, cayenne pepper, 1 teaspoon salt, and 1/2 teaspoon black pepper. Stir well. Begin adding your shredded cheeses (cheddar, Gruyère, Monterey Jack) a handful at a time, stirring until each addition is completely melted and smooth before adding more. This prevents the cheese from clumping and ensures a silky sauce. Resist the urge to dump it all in at once!
H3: Step 5: Combine and Conquer
Once your cheese sauce is perfectly smooth and glorious, add the drained, cooked macaroni to the saucepan. Stir gently until every single noodle is completely coated in that irresistible, velvety cheese sauce. Taste and adjust seasoning if needed. This is the moment of truth!
H3: Step 6: Bake It (Optional, but Recommended for Crispness!)
If you want a baked mac and cheese with a crispy topping (and why wouldn’t you?), pour the mixture into a 9×13 inch baking dish. In a small bowl, combine the panko breadcrumbs, 2 tablespoons melted butter, and 1/4 cup grated Parmesan cheese. Sprinkle this mixture evenly over the top of the mac and cheese. Bake at 375°F (190°C) for 20-25 minutes, or until the topping is golden brown and the cheese sauce is bubbly. If you’re not baking, simply serve it hot right from the pot!
H3: Step 7: Serve Immediately (Don’t Wait!)
Serve your masterpiece immediately. Mac and cheese is best when hot and gooey. Garnish with a little fresh parsley if you’re feeling fancy. Prepare for compliments and requests for seconds!
Calories & Nutritional Info (Estimated Per Serving – 1 cup baked)

This is an estimate for one cup of baked mac and cheese with the breadcrumb topping. Your specific ingredients and portion sizes will vary.
- Calories: ~500-650 kcal
- Protein: ~20-28g (Thanks, cheese and milk!)
- Healthy Fats: ~30-40g (From butter and cheese)
- Carbohydrates: ~45-55g
- Fiber: ~2-4g
- Sodium: ~800-1200mg (Cheese is salty, so be mindful if watching sodium!)
- Nutritional Notes: A hearty comfort meal. Rich in calcium and Vitamin D.
Common Mistakes to Avoid (Unless You Like Lumpy, Bland Mac)
You’re making a masterpiece! Don’t let these common slip-ups derail your cheesy dreams.
- Using Cold Milk: Adding cold milk to a hot roux can shock the flour, causing it to clump and make your sauce lumpy. Always warm your milk gently before whisking it in!
- Dumping All the Cheese at Once: Patience, grasshopper! Adding all the shredded cheese at once can make it seize up and clump, leading to a grainy sauce. Add it gradually, stirring until each batch is melted.
- Overcooking the Pasta: Remember, the pasta continues to cook in the hot sauce. If you cook it to mush beforehand, you’ll end up with a soggy, unappealing texture. Aim for al dente!
- Skipping the Dry Mustard: Don’t worry, your mac and cheese won’t taste like mustard. Dry mustard powder is a secret ingredient that doesn’t add a distinct flavor but enhances the natural cheesiness. It’s magic!
- Using Pre-Shredded Cheese: Pre-shredded cheese often contains anti-caking agents (like cellulose) that prevent it from melting smoothly. Shred your own cheese for the ultimate creamy sauce. It’s worth the extra minute, promise.
Variations & Customizations: Your Mac, Your Rules
This classic recipe is fantastic, but it’s also a perfect canvas for your culinary whims. Here are three fun ways to tweak your mac and cheese:
H3: The Spicy Bacon Bomb
Add some heat and crunch! Before making the roux, cook 6-8 slices of bacon until crispy. Crumble it and set aside. Use 2 tablespoons of the bacon fat instead of some butter for the roux (reduce butter accordingly!). Add 1/2 teaspoon smoked paprika and a generous pinch of red pepper flakes to the sauce. Stir in most of the bacon bits with the pasta, and sprinkle the rest on top before serving (or baking!). Pure indulgence.
H3: The Roasted Veggie Wonder
Want to sneak in some veggies? Roast 1 cup of chopped broccoli florets, diced butternut squash, or sliced bell peppers until tender-crisp. Stir them into the mac and cheese along with the pasta. This adds a fantastic texture, extra nutrients, and a pop of color. Who said comfort food can’t be wholesome?
H3: The Grown-Up Garlic Herb
For a more sophisticated flavor, add 2 cloves of minced garlic to the butter before you add the flour for the roux (cook for about 30 seconds). Stir in 1 tablespoon of fresh chopped thyme or rosemary with the cheese. Use a combination of sharp white cheddar, Parmesan, and a touch of goat cheese for a truly gourmet experience. FYI, this version pairs perfectly with a glass of wine.
FAQ Section: All Your Cheesy Queries Answered
H3: What’s the best type of pasta for mac and cheese?
Elbow macaroni is the classic choice because its small shape holds the sauce well. However, cavatappi, shells, penne, or rotini also work wonderfully, providing plenty of nooks and crannies for that glorious cheese sauce.
H3: Can I make this mac and cheese gluten-free?
Yes! Use your favorite gluten-free pasta (ensure it’s certified GF) and substitute the all-purpose flour with a gluten-free all-purpose flour blend for the roux. The rest of the ingredients are naturally GF.
H3: How do I prevent a grainy cheese sauce?
A grainy sauce usually happens from overheating the cheese or adding it too quickly. Remove the sauce from heat before adding cheese, add it gradually, and stir constantly until fully melted. Don’t let it boil after adding the cheese.
H3: Can I make this mac and cheese ahead of time?
You can assemble the unbaked mac and cheese up to a day ahead. Cover it tightly and refrigerate. When ready to bake, add 1/4 cup extra milk and bake as directed, possibly adding 5-10 minutes to the baking time to ensure it’s heated through. For best results, it’s always freshest when made on the spot.
H3: What is the secret to super creamy mac and cheese?
The secrets are: a proper roux, warmed milk, gradually adding freshly shredded cheese off the heat, and using a blend of good melting cheeses (like Gruyère, Monterey Jack, or Fontina) along with your sharp cheddar.
H3: Can I use different kinds of cheese?
Absolutely! Experiment! Good melting cheeses like Fontina, Colby Jack, mild cheddar, smoked Gouda, or even cream cheese can create amazing variations. Just ensure you have a good “sharp” cheese (like cheddar) for flavor and a good “melty” cheese for texture.
H3: How do I store and reheat leftovers?
Store leftovers in an airtight container in the refrigerator for up to 3-4 days. To reheat, add a splash of milk (1-2 tablespoons) and microwave slowly, stirring occasionally, or reheat in a saucepan over low heat, stirring until creamy again.
Final Thoughts: Welcome to Cheesy Paradise!
You did it! You successfully navigated the mystical world of roux and cheese blends to create the most incredible, creamy, and utterly comforting mac and cheese imaginable. No more sad, boxed dinners for you, my friend! You’re officially a mac and cheese master. Go forth, devour your creation, and bask in the warm, cheesy glow. And hey, don’t be shy—share a pic of your masterpiece with me! You’ll never look at that orange powder again. You’re welcome.

