Your New Obsession: The Best Zesty Lemon Cheesecake Recipe (No Cracks, I Swear!)
Let’s talk cheesecake. Specifically, that moment you crave something ridiculously creamy, perfectly sweet, yet zingy enough to make your taste buds do a happy dance. That’s when the Lemon cheesecake siren calls. You could buy one, sure, but then you’d miss out on the pure bliss of baking a gorgeous, crack-free masterpiece right in your own kitchen. This isn’t just a recipe; it’s a journey to cheesecake nirvana, proving you can bake a showstopper without losing your sanity (or cursing at a water bath).
Why This Lemon Cheesecake Is Your New Signature Dessert

Why go through the effort of baking a cheesecake? Because this recipe is awesome, that’s why. It delivers a velvety smooth texture, an irresistible tangy-sweet balance, and a gorgeous golden-brown top that screams “I know what I’m doing in the kitchen.”
First, the flavor is unparalleled. The fresh lemon zest and juice cut through the richness of the cream cheese, creating a bright, refreshing dessert that’s perfect year-round. Second, the texture is pure perfection—no cracks, no dry spots, just melt-in-your-mouth creamy goodness. Third, it impresses guests every single time. You bring this to a potluck, and people will forget about everything else. Seriously, it’s that good. Get ready for compliments, FYI.
Ingredients: The Foundation of Zesty Dreams


We’re building this cheesecake from the ground up, starting with a buttery crust and ending with a silky smooth, lemon-kissed filling.
H3: For the Perfect Graham Cracker Crust
- 1 ½ cups Graham Cracker Crumbs: You can buy them pre-crushed or crush your own!
- ¼ cup Granulated Sugar: Just a touch of sweetness.
- 6 tablespoons Unsalted Butter: Melted, for binding.
H3: For the Silky Lemon Cheesecake Filling
- 3 (8-ounce) blocks Full-Fat Cream Cheese: Softened to room temperature. This is non-negotiable for a smooth batter!
- 1 cup Granulated Sugar: Sweetens the deal.
- 3 large Eggs: Room temperature. They bind the cheesecake.
- ½ cup Sour Cream: Room temperature. Adds moisture and a slight tang, preventing cracks.
- 2 tablespoons All-Purpose Flour: A secret weapon against cracks!
- Zest of 2 large Lemons: Don’t skimp! This is where the intense lemon flavor comes from.
- ¼ cup Fresh Lemon Juice: About 2-3 lemons. Use fresh, not bottled, for superior taste.
- 1 teaspoon Vanilla Extract: Complements the lemon beautifully.
H3: Optional: Lemon Curd Topping & Garnish
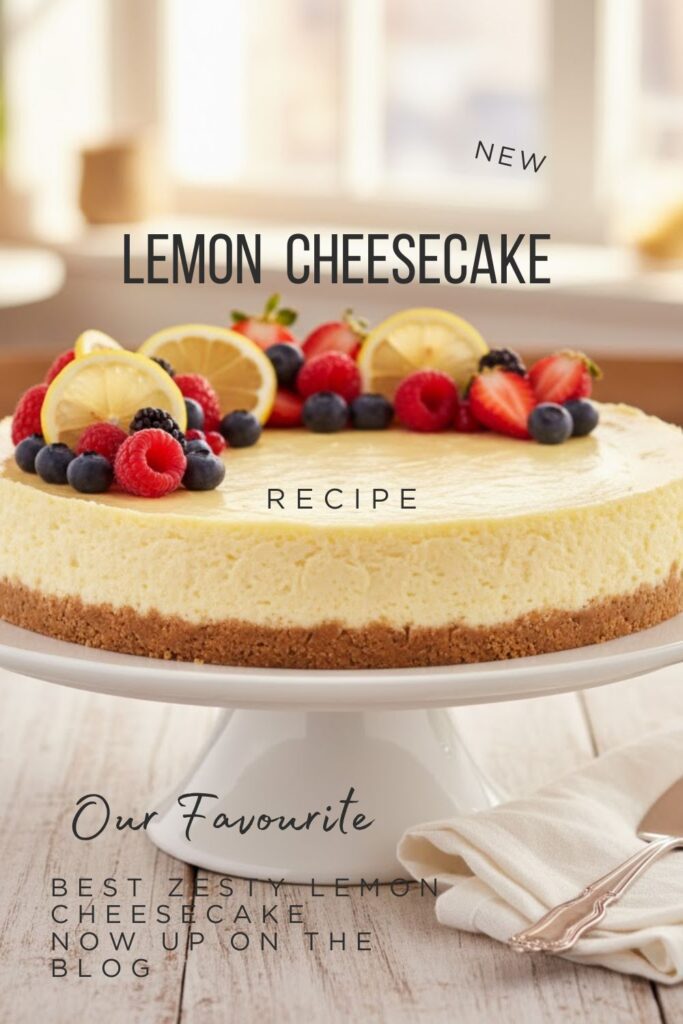
- ½ cup store-bought or homemade Lemon Curd: For an extra layer of lemon perfection.
- Fresh Berries (raspberries, blueberries): For a pop of color and freshness.
- Thinly sliced Lemon Rounds or Zest Curls: For an elegant finish.
Key Substitutions:
- Crust Swap: Use vanilla wafer crumbs, shortbread cookie crumbs, or even ginger snap crumbs for a different flavor profile.
- Sour Cream Swap: Full-fat plain Greek yogurt works well in a pinch, but sour cream is superior for texture.
- Gluten-Free Swap: Use gluten-free graham crackers for the crust. The filling is naturally gluten-free!
- Dairy-Free Swap: Use vegan cream cheese, vegan butter, and vegan sour cream alternatives.
Tools & Kitchen Gadgets Used: Your Cheesecake Arsenal
You don’t need a fancy pastry kitchen, but a few key items make all the difference.
- 9-inch Springform Pan: Essential for cheesecake! It allows you to release the sides easily.
- Aluminum Foil (Heavy Duty): For wrapping the pan in a water bath (we’ll explain).
- Large Roasting Pan: For the water bath.
- Electric Mixer (Stand or Handheld): Highly recommended! For achieving a super smooth, lump-free filling.
- Mixing Bowls (various sizes): For crust, filling, and optional toppings.
- Measuring Cups and Spoons: Precision is key in baking.
- Rubber Spatula: For scraping down bowls and folding.
- Zester/Microplane: For getting that beautiful lemon zest.
- Citrus Juicer: For fresh lemon juice.
Step-by-Step Instructions: Conquering the Cheesecake
Patience, my friend. Cheesecake is a marathon, not a sprint. But the finish line is pure bliss!
H3: Step 1: Prep the Crust & Pan (The Foundation)
Preheat your oven to $350^{\circ}\text{F}$ ($175^{\circ}\text{C}$). In a medium bowl, combine the graham cracker crumbs, granulated sugar, and melted butter. Mix well until the crumbs are evenly moistened. Press the mixture firmly and evenly into the bottom of the 9-inch springform pan. You can use the bottom of a glass to help flatten it. Bake the crust for 8-10 minutes until lightly golden. Remove from oven and let cool slightly. Reduce oven temperature to $325^{\circ}\text{F}$ ($160^{\circ}\text{C}$).
H3: Step 2: Assemble the Water Bath (No Cracks Allowed!)
Wrap the outside bottom and sides of your springform pan tightly with 2-3 layers of heavy-duty aluminum foil. This creates a watertight seal. Place the foil-wrapped pan inside a large roasting pan. This is your water bath setup. Don’t fill with water yet!
H3: Step 3: Cream Cheese, Fluffy & Smooth
In a large mixing bowl (or your stand mixer bowl), beat the softened cream cheese on medium speed until it’s super smooth and creamy, with no lumps. This is crucial for a lump-free cheesecake.
H3: Step 4: Sweeten & Incorporate
Gradually add the granulated sugar to the cream cheese, beating on medium speed until well combined. Scrape down the sides of the bowl often. Beat in the sour cream and vanilla extract until just blended.
H3: Step 5: The Lemon & The Flour (Crack Prevention Squad)
Add the all-purpose flour, lemon zest, and fresh lemon juice to the cream cheese mixture. Beat on low speed until just combined. Do not overmix at this stage! Overmixing adds too much air, which leads to cracks.
H3: Step 6: Eggs, One by One
Add the eggs, one at a time, beating on low speed just until each egg is incorporated. Again, avoid overmixing! You want to keep the batter as dense as possible.
H3: Step 7: Pour & Bathe
Pour the smooth cheesecake batter over the cooled crust in the prepared springform pan. Place the roasting pan (with your cheesecake inside) into the preheated oven. Carefully pour hot water into the roasting pan until it comes about 1 inch up the sides of the springform pan. This water bath creates a moist, even baking environment, preventing cracks and ensuring a creamy texture.
H3: Step 8: Bake & Chill (Patience, Padawan)
Bake for 60-75 minutes. The cheesecake is done when the edges are set, but the center 2-3 inches still jiggles slightly when you gently tap the pan. It will continue to cook as it cools. Turn off the oven, crack the oven door open slightly, and let the cheesecake cool in the oven for 1 hour. This slow cool-down is another crack-prevention tactic.
H3: Step 9: The Grand Finale (The Long Chill)
Remove the cheesecake from the water bath (carefully!), remove the foil, and let it cool completely on a wire rack at room temperature. Once cool, cover and refrigerate for at least 6-8 hours, or preferably overnight. The long chill firms it up and fully develops the flavors. Slice, garnish, and bask in the glory!
Calories & Nutritional Info: The Tangy Truth

Cheesecake is an indulgence, but hey, it’s homemade, so it’s practically health food, right? 😉 These estimates are approximate per 1/12th slice.
- Estimated Calories per serving (1 slice): 350-450 calories
- Fat: 25-35g (mostly from cream cheese and butter)
- Carbohydrates: 25-35g (sugar, graham crackers)
- Protein: 8-12g (thanks, cream cheese and eggs!)
- Note on Indulgence: This is a rich dessert! Enjoy in moderation, or don’t, I’m not your mom.
Common Mistakes to Avoid: Stop Making Sad, Cracked Cheesecakes!
Baking cheesecake can feel daunting, but these tips will save you from common woes.
- Using Cold Ingredients: If your cream cheese, eggs, and sour cream are cold, your batter will be lumpy, and you’ll overmix trying to smooth it out. Room temperature ingredients are a MUST.
- Overmixing the Batter: Beat the cream cheese until smooth, but once you add the eggs, mix only until just combined. Too much air incorporated into the batter expands in the oven and then collapses, causing cracks.
- Skipping the Water Bath: This is the #1 reason for dry, cracked cheesecakes. The water bath creates a moist, even heat, preventing the outside from baking faster than the inside. Don’t be lazy; wrap that pan!
- Opening the Oven Door Too Soon: A sudden temperature change is a crack’s best friend. Let the cheesecake cool slowly in the oven with the door propped open for at least an hour.
- Not Chilling Long Enough: The cheesecake needs ample time to set and firm up completely in the fridge. A minimum of 6-8 hours (overnight is better!) ensures perfect slices and a dense, creamy texture.
Variations & Customizations: Your Cheesecake, Your Rules
The lemon classic is perfect, but don’t let that stop your creative juices from flowing!
- Blueberry Lemon Bliss: Swirl blueberry compote or fresh blueberries into the batter before baking. Top the finished cheesecake with more blueberry compote and fresh lemon zest.
- Ginger Snap Crust: Swap out the graham crackers for crushed ginger snap cookies in the crust. The spicy ginger pairs wonderfully with the bright lemon.
- Keto-Friendly Lemon Cheesecake: Replace graham cracker crumbs with almond flour crust (mixed with butter and a sugar substitute). Use erythritol or monk fruit sweetener in the filling, and opt for a sugar-free lemon curd. Deliciously low-carb!
FAQ Section: Solving Your Cheesecake Conundrums
You’ve got questions, I’ve got answers to help you achieve cheesecake perfection.
H3: Q1: How do I know when my lemon cheesecake is done baking?
A1: The edges should be set, but the center 2-3 inches should still have a slight jiggle when you gently shake the pan. It will continue to set as it cools.
H3: Q2: Why did my cheesecake crack on top?
A2: Common culprits include overmixing the batter, baking at too high a temperature, or a too-rapid temperature change during cooling. Using room-temperature ingredients, a water bath, and a slow cool-down prevents most cracks.
H3: Q3: Do I really need a water bath for cheesecake?
A3: Yes, you absolutely do! The water bath is crucial for ensuring even baking, preventing cracks, and achieving that signature smooth, creamy texture. It’s not optional, TBH.
H3: Q4: How long does lemon cheesecake last in the refrigerator?
A4: Properly stored in an airtight container, your lemon cheesecake will last for 5-7 days in the refrigerator.
H3: Q5: Can I freeze lemon cheesecake?
A5: Yes! Freeze whole or sliced cheesecake (without toppings), wrapped tightly in plastic wrap and then foil, for up to 2-3 months. Thaw in the refrigerator overnight before serving.
H3: Q6: Why is my cheesecake lumpy?
A6: Your cream cheese was not softened enough. Beat softened cream cheese by itself until perfectly smooth before adding other ingredients to avoid lumps.
H3: Q7: Can I use bottled lemon juice?
A7: You can, but for the best, brightest, and most authentic lemon flavor, always use fresh lemon juice and zest. It makes a huge difference in this recipe.
Final Thoughts: You Are Now a Cheesecake Legend!
You’ve done it! You made a gorgeous, perfectly creamy, crack-free Lemon cheesecake that will make everyone swoon. Go ahead, take a well-deserved bow (and a generous slice). You’ve proven you’re a baking wizard. Are you ever going back to those sad, store-bought slices again? I highly doubt it. Now, enjoy your lemony masterpiece!