
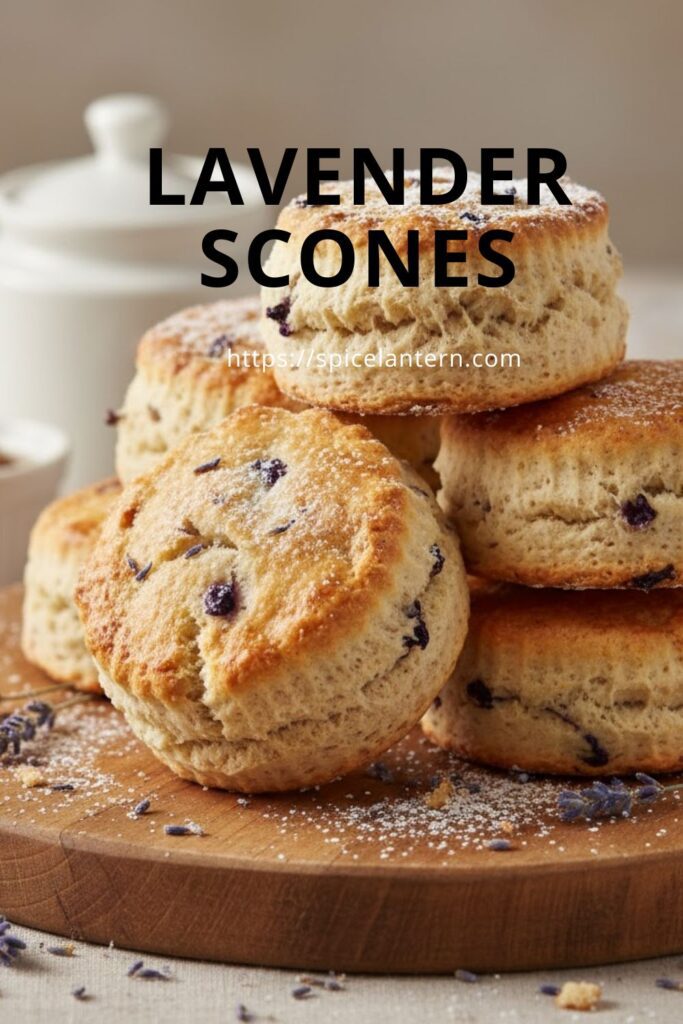
Tea Time Glow Up: The Ultimate Recipe for Fluffy, Floral Lavender Scones
Let’s be honest, regular scones are basically just edible beige rocks. They taste fine, but they lack pizzazz. They look sad next to your perfectly brewed Earl Grey. But what if I told you we could take that classic British bake and infuse it with the delicate, soothing magic of Provence? Say hello to Lavender scones.

This is not some weird, soapy floral experiment, I promise. Done right, the lavender adds a subtle, fragrant, citrusy note that transforms the scone from a dull accompaniment into the star of the show. You’ll feel instantly sophisticated, like you should be wearing a large sunhat and lounging on a terrace. Ready to upgrade your breakfast (and your life)? Of course, you are.
Why This Recipe Is Awesome (Fancy, But Not Hard)
The best thing about lavender scones is the instant mood change they induce. The fragrant aroma filling your kitchen instantly calms you down—it’s like edible aromatherapy. Plus, they look stunning. The tiny specks of purple floral contrast beautifully with the golden-brown crust, making them look incredibly gourmet without requiring any advanced baking degrees.

They boast the perfect texture: a crisp, slightly crackly exterior giving way to a soft, fluffy interior. We use a classic method, but the floral infusion makes these seem like an expensive bakery treat. Want to impress guests, win over a potential date, or just treat yourself to something truly lovely? This is your recipe.
🌸 The Core Ingredients You Need
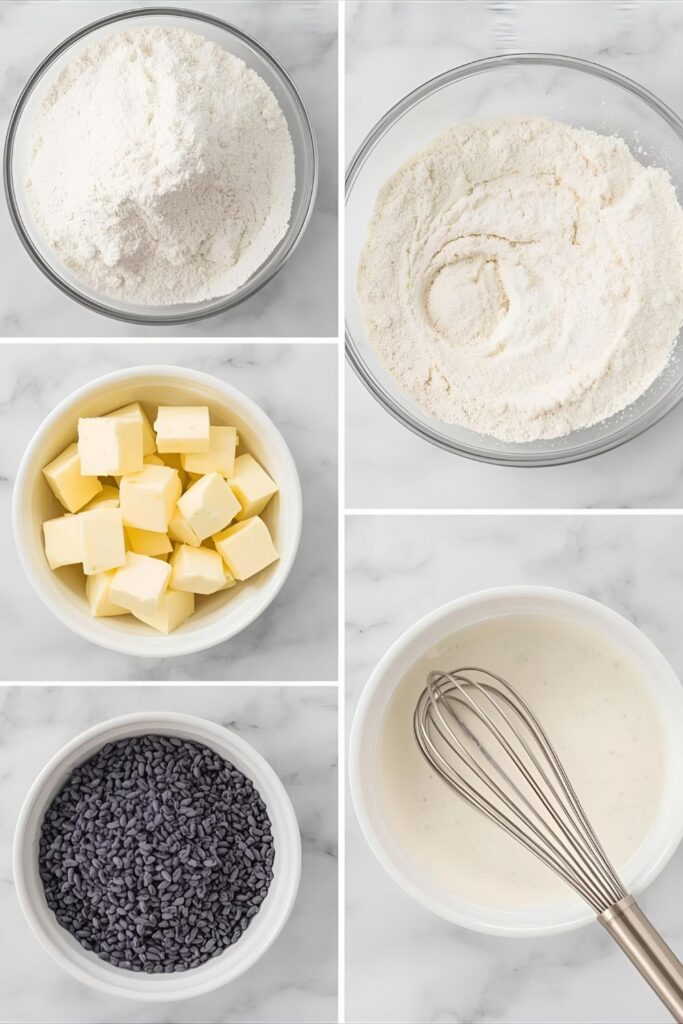
Baking is chemistry, so follow these measurements, okay? Precision is key to avoiding edible bricks.
- 2 cups All-Purpose Flour: Use good quality flour for the fluffiest results.
- 1/4 cup Granulated Sugar: Just enough for sweetness, not so much that it turns into a cookie.
- 1 Tbsp. Baking Powder: Our essential lift agent.
- 1/2 tsp. Salt: Crucial for balancing the sweetness and enhancing the butter flavor.
- 1/2 cup (1 stick) Unsalted Butter, very cold and cubed: The colder the butter, the flakier the scone! This is non-negotiable.
- 1 Tbsp. Culinary Lavender Buds: Make sure they are CULINARY grade, not potpourri!
- 1 large Egg: Cold.
- 1/2 cup Cold Heavy Cream (plus extra for brushing): The richness and moisture your scones crave.
Key Substitutions:
- Dairy-Free Swap: Use solid coconut oil (make sure it’s very cold!) instead of butter, and use a thick, unsweetened oat or soy cream instead of heavy cream.
- Gluten-Free Flour: Use a quality 1:1 gluten-free baking blend. The texture will be slightly different but still delicious.
- No Heavy Cream? Use half-and-half, but reduce the amount slightly to maintain a shaggy dough consistency.
🛠️ Tools & Kitchen Gadgets Used
You don’t need a pastry degree, but a couple of tools make the butter incorporation much easier.
- Large Mixing Bowl: For combining the dry ingredients. You need room to work the butter.
- Pastry Cutter or Food Processor: A pastry cutter makes quick, clean work of incorporating the butter. If you use a food processor, pulse carefully!
- Rolling Pin: For gently shaping the dough (or just use your hands).
- Baking Sheet: Lined with parchment paper for easy cleanup.
- Round Cutter (2-3 inches): For perfect, professional-looking scones. A sharp knife works for triangles, too.
- Small Brush: For applying the egg/cream wash before baking.
📝 Step-by-Step Instructions: The Fluffiest Scones Ever
Remember the mantra: cold, fast, and gentle. That’s how you get height and flakiness, not dense hockey pucks.
Step 1: Chill Everything (The Scone Secret)
Place your cubed butter into the freezer for about 10 minutes. If your flour, sugar, and baking powder are warm, they’ll prematurely activate the butter. You want everything cold—even the bowl if you’re serious. Preheat your oven to 400°F (200°C).
Step 2: Combine the Dry and Fragrant
In your large mixing bowl, whisk together the flour, sugar, baking powder, salt, and, most importantly, the culinary lavender buds. Make sure those purple buds are evenly distributed so you don’t end up with one super-floral scone and five sad ones.
Step 3: Cut in the Butter (Fast!)
Add the frozen, cubed butter to the dry ingredients. Use your pastry cutter or your fingertips to quickly work the butter into the flour until the mixture resembles coarse crumbs or small peas. The key is to handle it minimally; don’t let the butter melt! We want pockets of cold butter for that coveted flaky texture.
Step 4: Add the Wet Ingredients Gently
In a separate small bowl, lightly whisk the cold egg and cold heavy cream. Pour this mixture into the center of the flour and butter mixture. Use a fork or spatula to gently mix until the dough just barely comes together. It should look a little shaggy and sticky. Stop mixing the second it combines! Overmixing develops gluten and gives you tough scones.
Step 5: Shape and Cut
Turn the dough out onto a lightly floured surface. Gently pat it into a round about 3/4-inch to 1-inch thick. Use your round cutter to cut out the shapes. Dip the cutter in flour between cuts to prevent sticking. Do not twist the cutter! Twisting seals the edges and prevents rising.
Step 6: Bake and Goldenize
Place the cut scones on the parchment-lined baking sheet. Brush the tops with a little extra heavy cream (or an egg wash for extra golden color). Bake for 15–18 minutes, or until the tops are golden brown and a toothpick comes out clean. Let them cool slightly on a wire rack before you devour them.
📊 Calories & Nutritional Info (A Little Indulgence)
These are scones, which means butter and cream are involved. But they are homemade and worth every single bite! (Note: Calculations based on 1/8 of the total recipe.)
- Estimated Calories Per Scone: Around 250–300 calories. (Varies based on size and glaze/clotted cream additions.)
- Healthy Fats: High in saturated fat from the butter and cream. Balance this out, people!
- Carbs: Primarily simple carbohydrates from the flour and sugar.
- The Lavender Perk: Lavender contains compounds that may promote relaxation and reduce stress. So, you are technically eating a calming food!
- The Bottom Line: A perfectly portioned treat. Enjoy it with zero guilt.
🛑 Common Mistakes to Avoid (Scone Sabotage)
Want fluffy, tall scones? Then avoid these three sins of scone-making. You’re welcome.
- Warm Butter/Warm Liquid: This is the ultimate mistake. If the butter melts before baking, you lose the steam pockets needed for rise. Keep all dairy COLD until it hits the hot oven.
- Overmixing the Dough: Once the wet and dry ingredients touch, mix minimally and gently. Overmixing creates gluten, leading to a chewy, tough scone instead of a tender, crumbly one.
- Twisting the Cutter: If you twist the cutter when separating the dough, you compress the edges. The compressed edges cannot rise properly, leaving you with squat, flat scones. Cut straight down and lift straight up!
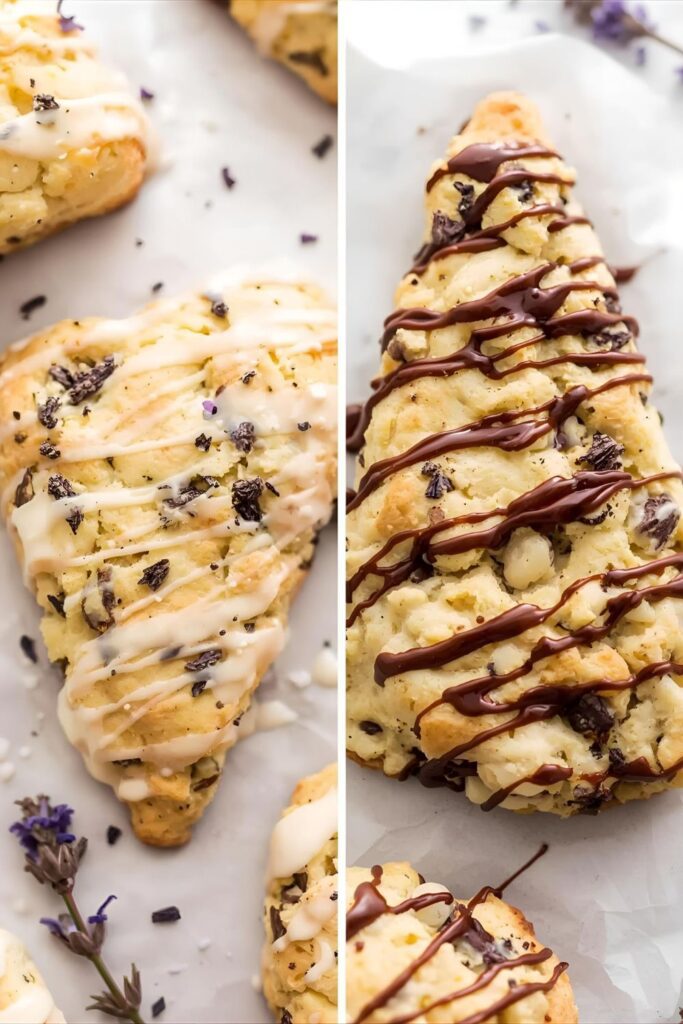
🍋 Variations & Customizations
Once you master the basic lavender scone, you can add some fun mix-ins to take it up a notch.
- Lemon and LavenderThe classic pairing! Zest one full lemon into the dry ingredients along with the lavender. You can also mix a little extra lemon juice into the cream glaze for a bright, tangy finish.
- White Chocolate Chip SconesFold in 1/4 cup of good quality white chocolate chips (or chopped white chocolate bar) just after you add the wet ingredients. The sweetness pairs beautifully with the floral notes.
- Savory Herb SconesDitch the sugar and swap the lavender for 1 tablespoon of fresh chopped rosemary and thyme. Cut the butter into small cubes, and mix in 1/4 cup of grated Parmesan cheese. Serve with soup or a hearty stew!
❓ FAQ Section: Your Scone Mysteries Solved
People always have questions about making the perfect scone. Let me drop some knowledge on you.
What is the difference between a scone and a biscuit?
Biscuits typically use butter cut into larger pieces and rely on buttermilk for tang. Scones are slightly sweeter, often include cream and egg, and have a more tender, cake-like crumb compared to the flaky layers of a biscuit.
How do I stop the lavender from tasting soapy?
You must use culinary-grade lavender and only use the amount specified. Too much lavender or using a non-culinary variety results in that unpleasant soapy flavor.
Can I make the dough ahead of time?
Yes! You can cut the scones and place them on the baking sheet, then freeze them solid. Once frozen, transfer them to an airtight bag. Bake the frozen scones directly from the freezer, adding about 5–10 minutes to the baking time.
Why didn’t my scones rise?
The most likely culprit is warm butter/liquid or overmixing the dough. Revisit Step 1 and 4, ensuring everything is cold and you handle the dough minimally.
Can I use milk instead of heavy cream?
You can, but heavy cream provides the necessary fat content for a tender, rich scone. Milk will result in a drier, tougher texture.
Should I knead the scone dough?
No! Never knead scone dough like bread. Only mix until it just comes together, and pat it gently into shape. Kneading develops gluten and makes them tough.
How do I store leftover lavender scones?
Store cooled scones in an airtight container at room temperature for up to 2 days. Reheat briefly in the oven or toaster oven for that fresh-baked feel.
Final Thoughts (You’re Basically Royalty Now)
You did it! You successfully conquered the delicate art of the lavender scone. You now possess the power to make any casual tea time feel like a grand affair on the English countryside. Go enjoy your perfectly risen, fragrant, and fluffy creation. You’ll never settle for a dry, boring scone again. Now, tell me, are you topping yours with clotted cream or lemon curd?

