

Genius Grazing: The Kids’ Snack Board That Finally Stops the “I’m Hungry” Demands
Remember when the afternoon snack routine involved yelling, “What do you want?” and the inevitable reply was a whiny, “I don’t know!”? And then you’d pull out the same sad, pre-packaged cracker that they’d instantly reject anyway? Yeah, me too. The endless cycle of tiny human food demands is enough to make any adult crave a large glass of wine. But here’s the secret weapon that stops the snack whining dead in its tracks: the Kids’ snack board. This isn’t just a pile of food; it’s a visual feast, a customizable grazing experience, and frankly, a genius hack that makes you look like a Pinterest parent without actually doing any cooking. Prepare for silence—sweet, glorious silence—while they meticulously choose their next bite.
Why This Board is Your New Parenting MVP
Why should you swap your single-serving bags for a full-blown snack platter? Because psychology! Kids love choice, and they love food that’s cut into fun shapes. A Kids’ snack board offers both. It encourages them to eat a wider variety of foods—hello, veggies!—because everything looks exciting and accessible. It’s also incredibly low-effort for you. You simply arrange food you already bought. Plus, the minimal cleanup is a gift from the heavens. No frantic search for seven different bowls; just one epic board. It’s the ultimate high-reward, low-effort move, TBH.
Ingredients: The Balanced Blend of Fun and Fuel

The key to a successful Kids’ snack board is hitting all the food groups while making everything look whimsical. You need protein, fiber, crunch, and a little something sweet.
- The Protein Punch (Building Blocks):
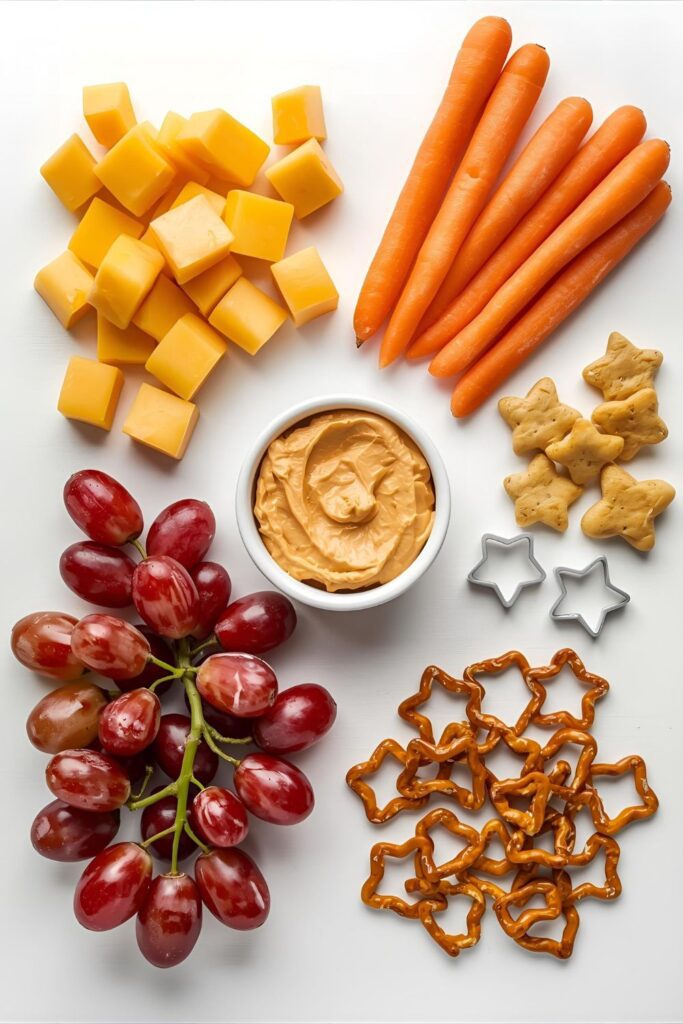
- Cubed Cheese: Cheddar, mozzarella, or Colby Jack. Cut into cubes or fun shapes using cookie cutters.
- Roll-Ups: Turkey, ham, or roast beef slices, rolled and skewered (if age-appropriate).
- Hard-Boiled Eggs: Peeled and halved.
- Substitution: Nut butter in a small ramekin for dipping, or hummus.
- The Rainbow Fruit:
- Grapes & Berries: Small, vibrant fruit like blueberries, raspberries, and sliced strawberries. Use cookie cutters on larger fruit!
- Mandarin Oranges or Apple Slices: For a quick, easy fruit option.
- Substitution: Dried cranberries or raisins for a chewy treat.
- The Crunchy Veggies (The Sneaky Wins):
- Sliced Cucumbers, Bell Pepper Strips, or Baby Carrots: The crunch factor.
- Grape or Cherry Tomatoes: Halved for younger kids to be safe.
- The Fun Dippers & Crunch:
- Mini Pretzels or Goldfish Crackers: The necessary salty crunch.
- Whole Wheat Crackers: Sturdy vehicles for cheese.
- Dips: Ranch dressing, hummus, or plain yogurt (for fruit dipping).
Tools & Kitchen Gadgets Used
No need for complicated gear. Your goal is simply presentation, and these simple tools help you nail the aesthetic.
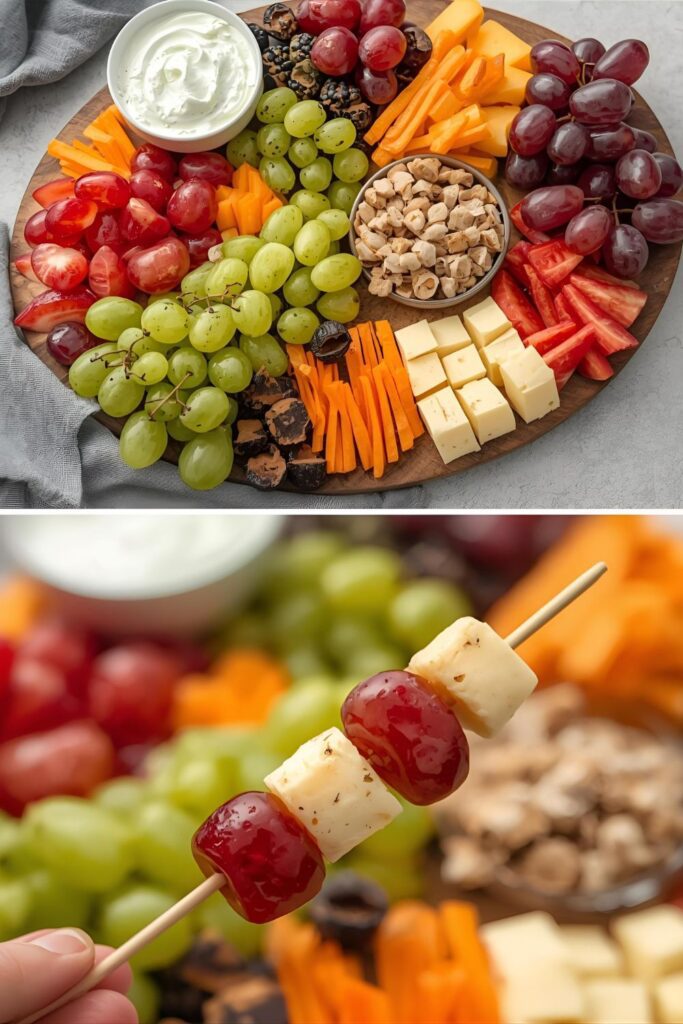
- Large Wooden or Plastic Board: The bigger, the better! A sturdy board gives you lots of space for the “abundant” look.
- Small Ramekins or Muffin Liners (4-5): Essential for holding dips, nuts, and small candies to keep the board clean.
- Small Cookie Cutters (Mini Stars/Hearts): Your secret weapon for turning cheese and fruit into cute shapes.
- Crinkle Cutter Knife (Optional): Makes carrots and cucumbers look instantly more fun.
- Small Tongs or Skewers (Age-appropriate): For little hands to grab items easily.
- Paring Knife: For safe, basic slicing.
Step-by-Step Instructions: The Art of the Scatter

Creating a killer Kids’ snack board follows the same rules as a fancy charcuterie board: anchor the big stuff, then cram everything else into the gaps.
Step 1: Anchor the Dips
Place your small ramekins (filled with ranch, hummus, or nut butter) on the board first. Position them around the center or scattered diagonally. Building around the dips makes the rest of the arrangement easier.
Step 2: Create the Main Food Groups
Place the largest clusters of protein and cheese next. Arrange the meat roll-ups and cheese cubes in small, distinct sections next to the dips they pair well with. Use your cookie cutters to punch out a few fun shapes from the cheese now!
Step 3: Insert the Veggie and Fruit Bridges
Next, arrange the sliced vegetables and fruit. Place the veggies near the ranch/hummus dip, and the fruit near the yogurt or nut butter dip. Lay the fruit and vegetable strips in curved lines to add visual movement and fill the main empty areas.
Step 4: Scatter the Small Fillers
Take your pretzels, crackers, and tiny candies and use them to fill the medium-sized gaps. Stack the crackers neatly. Create little trails of pretzels weaving between the fruit and protein. Remember, abundance is key—you want the board to look full and inviting.
Step 5: The Fun Factor Garnish
This is the magic touch! Use a tiny bit of the smallest fruit (like blueberries) or the Goldfish crackers to fill any tiny voids remaining. You can also place a few little marshmallows or mini chocolate chips in a small paper muffin liner and tuck it into a corner. Instant excitement! Serve immediately.
Calories & Nutritional Info (A Surprisingly Balanced Feast)
Since this is a grazing board, calorie estimates are purely for fun (and monitoring yourself, wink). We’ll estimate for a generous “serving” equal to a small handful of items from each category.
- Estimated Calories Per Serving (Grazing Size): Approximately 250-350 calories. (Varies wildly based on how much cheese vs. cucumber they consume!)
- Protein: Good source, around 10-15g (thanks, cheese and meat!).
- Fiber: Excellent source, around 5-8g (thanks, fruit and veggies!).
- Vitamins & Minerals: High in Vitamin A and C (bell peppers and berries are MVPs).
- Nutritional Note: Focus on protein and fiber to keep them full longer and prevent the inevitable sugar crash.
Common Mistakes to Avoid (The Board Blunders)
Even the simplest board can become a sticky mess if you make these rookie errors. Don’t say I didn’t warn you!
- Slicing Produce Too Thick: Kids prefer things cut into small, manageable, bite-sized pieces. Big chunks of apple or cheese are harder to manage and look less appealing. Use the small cutters!
- Forgetting Food Safety: Don’t leave the board out at room temperature for more than 2 hours, especially if you use meat, dairy, or yogurt. Keep it chilled until just before serving.
- Placing Dips Directly on the Board: Sticky mess alert! Always use ramekins or small paper liners for dips like yogurt, hummus, or peanut butter. This keeps the board clean and prevents sogginess.
- Ignoring Texture: A board with just soft grapes and soft cheese is boring. Ensure you have plenty of crunch (crackers, carrots, pretzels) for sensory appeal.
- Over-Serving Sugary Items: A few marshmallows are fine, but don’t let the sweets take up more than 10% of the board space. Keep the focus on colorful, healthy options.
Variations & Customizations: Theme Your Snacking
A themed Kids’ snack board is a brilliant way to make basic foods feel like an event.
- Dinosaur Fossil Dig Board: Use bone-shaped cookie cutters on cheese and ham. Use pretzel sticks as “twigs” and arrange cubed melon as “dino eggs.” Cover the board in shredded lettuce (dino grass) and serve hummus as “mud.”
- Color-Themed Board (e.g., Rainbow): Focus on one color per section: red strawberries/pepper, orange carrots/cheese, green cucumber/grapes, blue blueberries/crackers. It’s aesthetically pleasing and a fun way to teach colors.
- Breakfast for Snack Board: Turn snack time into brunch! Include mini pancakes or waffles, hard-boiled eggs, small bowls of yogurt, sliced bananas, and a tiny ramekin of maple syrup. It’s unexpected and delightful!
- Allergy-Friendly (Nut-Free/Gluten-Free): Focus on foods naturally free of major allergens. Use sunflower seed butter instead of peanut butter, gluten-free pretzels/crackers, and lots of fresh fruit, veggies, and safe cheeses.
FAQ Section: The Burning Snack Questions
You’ve got tiny dictators to feed. Let’s answer the most common anxieties about the Kids’ snack board.
- How long does it take to assemble a kids’ snack board? If you’ve done your cutting beforehand, assembly should take no more than 10-15 minutes. It’s literally just arranging pre-cut, ready-to-eat items.
- Can I prep a kids’ snack board the day before? Yes! You can slice most of the veggies and hard cheese the day before. Keep them in airtight containers. Assemble the full board no more than 2 hours before serving for optimal freshness.
- What’s the best way to handle toddlers and choking hazards? Slice all round foods (grapes, cherry tomatoes) in half or quarters. Avoid whole nuts, popcorn, and hard candies for children under four. Keep small skewers/toothpicks away from the little ones.
- Do I need a special wooden board? Nope! Any large, clean cutting board, a flat platter, or a plastic serving tray works perfectly. Just make sure it’s food-safe.
- How many items should I put on the board? Aim for at least 8-10 different items that span all the food groups (protein, fruit, veg, crunch/carb, dip). Variety encourages grazing and satisfies selective eaters.
- How do I clean the snack board quickly? Remove all the ramekins/liners first. Use a damp paper towel to wipe up any smears before washing the whole board. Using parchment paper underneath helps immensely!
- Do I need to warm up any of the food? Generally, no. The beauty of this board is that everything is served at room temperature (or slightly chilled for the cheese/meat). Cold items can be brought out 10 minutes before serving.
Final Thoughts: You Are a Snack Hero
Congratulations! You have mastered the art of the Kids’ snack board. You created a balanced, beautiful, and engaging snack experience that is ridiculously low-effort. You conquered the whining and achieved snack time victory. Now go enjoy a few moments of peace while those adorable little humans graze contentedly. Seriously, snap a photo and share your masterpiece—we need to celebrate this genius parenting hack!

