
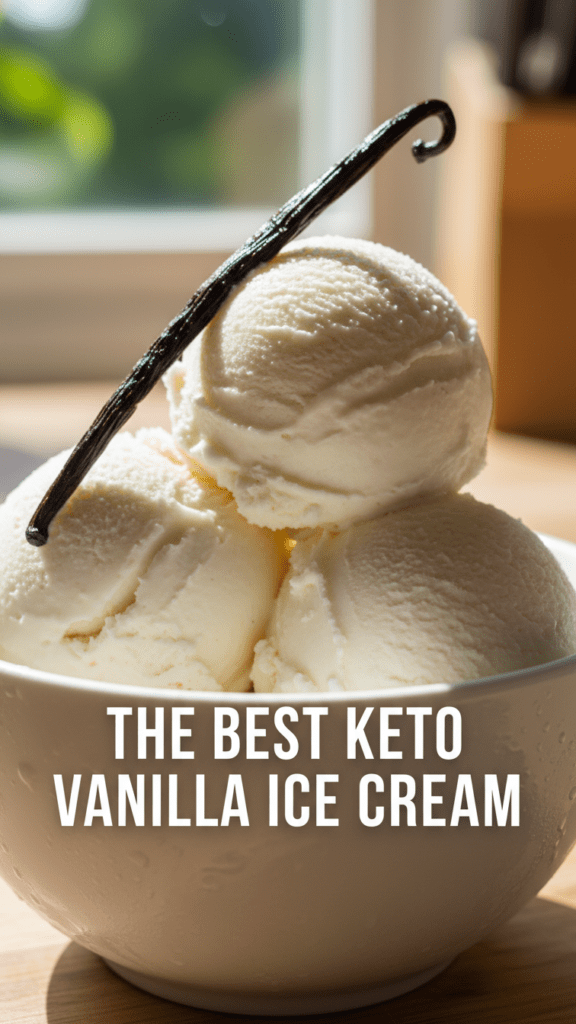
The Ultimate Creamy Keto Vanilla Ice Cream: Guilt-Free Bliss That Won’t Break Your Diet
Let’s be brutally honest for a second: we’ve all been there. It’s a scorching summer day, your soul yearns for the icy embrace of a giant scoop of vanilla ice cream, but your keto tracker is screaming at you like a drill sergeant. You could give in and face the dreaded “carb flu” tomorrow, or you could take the high road. Enter this keto vanilla ice cream—the culinary equivalent of having your cake and eating it too, without the “cake” part. It’s rich, it’s creamy, and it actually exists without sending your blood sugar into orbit.
I first mastered this recipe after a disastrous attempt at a “sugar-free” sorbet that tasted suspiciously like frozen flavored water (don’t ask, the trauma is real). After a few tears and a lot of heavy cream, I cracked the code to the perfect “churn-and-freeze” magic. This isn’t just “good for being keto”; it’s objectively superior to most store-bought versions. Ready to reclaim your dessert glory without the bloat? Let’s get to the churning.
Why This Recipe is the Absolute G.O.A.T. of Low-Carb Desserts

Why should you bother making your own ice cream when you could just buy a pint of “keto-friendly” something that tastes vaguely of sadness? Because your taste buds deserve a party, not a bland apology. First off, this recipe achieves the “holy grail” of texture: a smooth, luscious mouthfeel that rivals traditional ice cream, thanks to the dynamic duo of heavy cream and full-fat coconut milk. We aren’t making icy shards here; we’re crafting a velvety, dreamy masterpiece.
Secondly, it is ridiculously easy. You don’t need a PhD in dairy science or a commercial ice cream truck. It’s a straightforward “mix, chill, churn” situation that makes you look like a Michelin-star dessert wizard while your kitchen stays relatively intact. Plus, it impresses guests every single time—especially when they realize it’s sugar-free. IMO, it’s the most empowering tool in any low-carb dessert arsenal. Ready to become the neighborhood ice cream legend?
The Grocery List: No Alien Ingredients Required
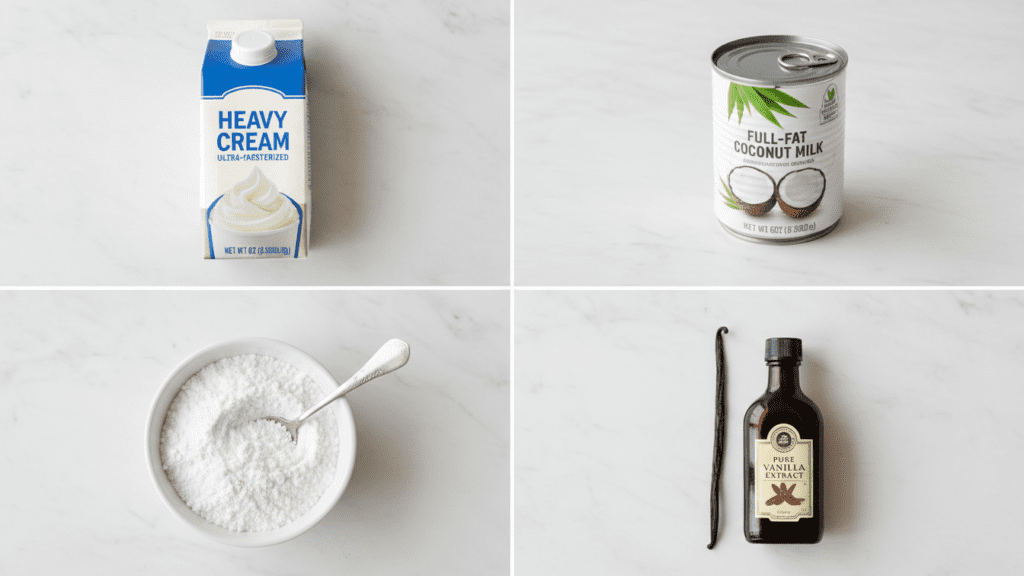
Don’t overcomplicate your life by searching for rare starches harvested under a blue moon. We are using powerhouse pantry staples that actually work together to create magic.
- Heavy Cream: 2 cups. This is the bedrock of our creamy empire.
- Full-Fat Coconut Milk: 1 can (13.5 oz). Look for one with minimal stabilizers; it adds an extra layer of richness and helps with texture.
- Powdered Erythritol or Monk Fruit Blend: 1/2 cup. Powdered versions dissolve better, preventing that grainy texture nobody wants.
- Vanilla Extract: 1 tablespoon. Yes, a whole tablespoon. We want it fragrant, not subtle!
- Xanthan Gum: 1/4 teaspoon. Don’t skip this. It’s the secret weapon against ice crystals and gives that amazing scoopable texture.
- Pinch of Salt: Just a tiny bit to enhance all those sweet flavors.
Tools & Kitchen Gadgets You’ll Actually Use
To make this the smoothest process of your life, snag these basics. I’ve linked my favorites so you can treat your kitchen to some upgrades!
- Ice Cream Maker: Essential for that truly creamy texture. Check out this Cuisinart model on Amazon.
- Large Mixing Bowl: For combining all your liquid gold. Grab this sturdy Pyrex set here.
- Whisk: For making sure that sweetener dissolves completely. Try this silicone whisk set.
- Airtight Freezer Container: Crucial for storing your masterpiece. Get these specific ice cream containers.
- Rubber Spatula: For scraping every last drop of goodness. Grab a high-heat silicone spatula.
Step-by-Step Instructions: The Path to Sweet, Icy Glory
Follow these steps precisely. TBH, the chilling time is almost as important as the churning itself. Patience, young Jedi.
1. The Creamy Concoction
In your large mixing bowl, combine the heavy cream, full-fat coconut milk, powdered sweetener, vanilla extract, and salt. Whisk it all together until the sweetener completely dissolves. You want a smooth, homogenous mixture—no grainy bits allowed.
2. The Xanthan Secret
Sprinkle the xanthan gum over the mixture while whisking continuously. Keep whisking for another minute or two until it’s fully incorporated and the mixture thickens slightly. This is where the magic happens for that incredible, non-icy texture. Don’t go crazy with the xanthan, though; too much makes it gummy.
3. The Chill Factor
Cover the bowl and refrigerate the mixture for at least 2 hours, or ideally, overnight. This step is non-negotiable. A thoroughly chilled base churns into smoother, creamier ice cream. If you rush it, your ice cream will be icy and sad. And nobody wants sad ice cream.
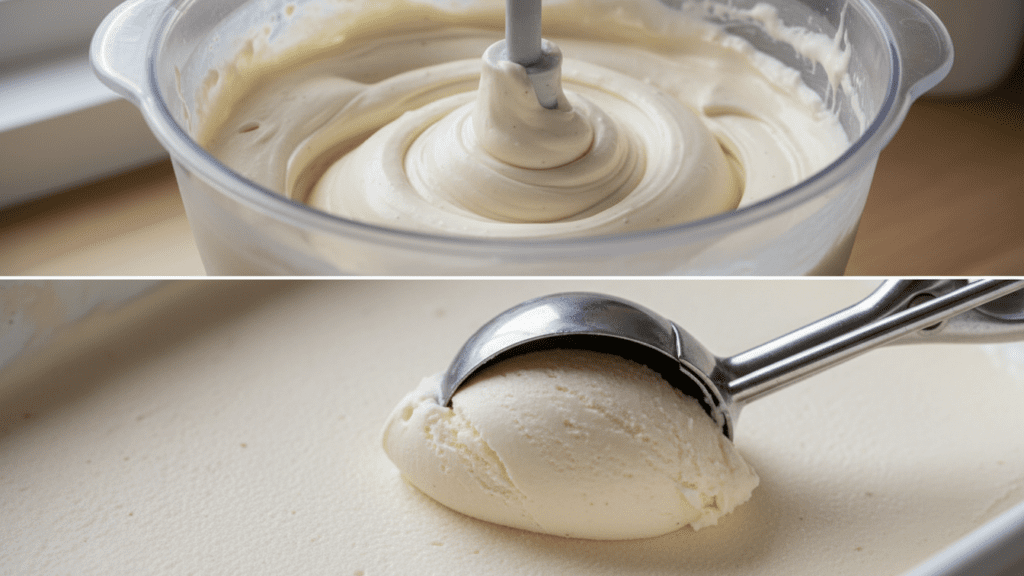
4. The Churn Ritual
Pour the chilled mixture into your pre-frozen ice cream maker bowl. Churn according to your machine’s instructions. This usually takes 20-30 minutes. The mixture will thicken to the consistency of soft-serve ice cream. It’ll look like fluffy, delicious snow.
5. The Freeze Fest
Transfer the soft-serve ice cream to your airtight freezer container. Press a piece of parchment paper or plastic wrap directly onto the surface of the ice cream to prevent ice crystals from forming. Cover the container tightly.
6. The Patience Test (Again!)
Freeze for at least 4-6 hours, or overnight, until it’s firm enough to scoop. If it’s too hard, let it sit on the counter for 10-15 minutes before attempting to scoop. TBH, waiting is the hardest part, but it’s worth every single minute.
Calories & Nutritional Info
For those of you who track your macros like a part-time job, here is the lowdown per serving (based on 6 servings per batch):
- Calories: ~350 kcal
- Net Carbs: ~3g (The holy grail of keto dessert!)
- Protein: ~3g
- Fat: ~37g (Mostly glorious, creamy fat!)
- Fiber: ~0g (It’s ice cream, not a vegetable. Relax!)
Common Mistakes to Avoid: Don’t Be That Person
Even a recipe this simple can go sideways if you get cocky. Avoid these blunders to keep your kitchen dignity.
- Not Chilling the Base Enough: If your base isn’t ice-cold, your ice cream will be icy, not creamy. Chill it overnight.
- Skipping Xanthan Gum: It’s the secret weapon against rock-hard keto ice cream. Don’t omit it.
- Using Granulated Sweetener: It might leave a grainy texture. Powdered sweetener is key.
- Over-Churning: You can over-churn, which can make it too dense. Stop when it reaches soft-serve consistency.
- Opening the Freezer Too Often: Every time you open the freezer, you invite warm air, which causes ice crystals. Resist the urge to peek.
Variations & Customizations
Feeling adventurous? Here are three fun ways to tweak this keto vanilla ice cream recipe:
The Mocha Madness
Add 2 tablespoons of unsweetened cocoa powder and 1 teaspoon of instant espresso powder to the base mixture before chilling. Hello, mocha heaven!
The Berry Swirl
Swirl in 1/2 cup of sugar-free berry compote (made with your favorite keto-friendly berries and sweetener) during the last few minutes of churning.
The Nutty Crunch
Fold in 1/2 cup of chopped pecans or walnuts (or even sugar-free chocolate chunks!) during the last 5 minutes of churning for a delightful crunch.
FAQ Section: You Asked, I Answered
Why is my keto ice cream so hard? This is a common issue with low-sugar ice creams. The xanthan gum helps, but also let it soften on the counter for 10-15 minutes before scooping.
Can I make this without an ice cream maker? You can, but it requires more effort. Freeze the base in a shallow pan, then scrape and stir every 30 minutes for a few hours to break up ice crystals. It won’t be as smooth, but it works.
What’s the best sweetener for keto ice cream? IMO, powdered erythritol or a monk fruit blend works best. They dissolve well and have minimal aftertaste.
Does this ice cream have a coconut flavor? It has a very subtle hint of coconut, but the strong vanilla usually masks it. If you hate coconut, use extra heavy cream instead of coconut milk (though the texture might be slightly less creamy).
How long does homemade keto ice cream last? Stored in an airtight container, it’s best within 1-2 weeks. After that, ice crystals can start to form.
Can I make this dairy-free? Yes! Use full-fat coconut cream instead of heavy cream (use 2 cans) for a delicious dairy-free version.
Why did my ice cream separate? This usually happens if your base isn’t fully emulsified before churning or if you’ve used a low-fat coconut milk. Whisk thoroughly and use full-fat ingredients.
Final Thoughts
There you have it. A keto vanilla ice cream recipe that actually respects your taste buds and your macros. It’s rich, it’s creamy, and it’s the only reason I’m not crying into a pint of regular ice cream right now. Once you master this batch, you’ll realize that store-bought “keto” ice creams are often just an overpriced disappointment. Go forth, churn some bliss, and enjoy the fat. Just don’t be surprised when your “carb-eating” friends suddenly want to “try” your healthy dessert. 🙂