Homemade Kimchi 101: How to Ferment Cabbage Like a Boss
We have all been there. You walk into a trendy Korean BBQ joint, smell that intoxicating mix of garlic and funky spice, and suddenly find yourself inhaling three bowls of the “free” fermented cabbage. You think to yourself, “I could totally do this at home,” before realizing you have no idea how to actually rot vegetables safely. Don’t panic—learning how to make kimchi step by step is basically the adult version of a middle school science project, but with much tastier results.
Honestly, if you aren’t currently keeping a jar of bubbling, spicy cabbage in your fridge, are you even living? It is the ultimate kitchen flex that says, “I am sophisticated, I care about my gut health, and I don’t mind if my kitchen smells slightly like a spicy gym locker for 24 hours.” Ready to stop paying ten dollars for a tiny jar of “artisanal” kraut and start your own fermentation empire? Let’s dive in. 🙂
Why This Recipe is Actually Awesome
Why should you bother making your own when the grocery store has a whole shelf of the stuff? First off, customization is king. Store-bought kimchi often tastes like one-note vinegar, but your homemade batch will have layers of umami, sweetness, and a crunch that doesn’t quit. You control the fire; whether you want a mild tingle or a “call the fire department” level of spice, it’s your call.
TBH, the ease of cooking is the best part—mostly because there is no actual “cooking” involved. You are essentially delegating all the hard work to billions of tiny bacteria while you sit on the couch and watch Netflix. It impresses guests like crazy, too. Pulling a jar of your own fermented creation out of the fridge makes you look like a culinary wizard who has mastered the ancient arts of preservation.
Our Top Pick

Papier Herb Garden Recipe Journal - Hardback Design
Capture your culinary ideas and favorite memories with this beautifully designed recipe journal. Organized sections for breakfast, lunch, dinner, and treats make it easy to record recipes, ratings, dietary notes, and cooking tips, along with measurement and conversion guides. Extra pages let you list favorite restaurants, shops, and places to try. Crafted with a premium hardback cover, luxurious 100gsm paper, and a gold foil accent, it’s both durable and stylish. Thoughtfully designed to suit any kitchen, it makes a practical, timeless gift for family, friends, or yourself.
Finally, let’s talk about the health perks. One forkful of this stuff packs more probiotics than an entire pallet of expensive yogurt. It’s high-volume, low-calorie, and makes literally everything—from ramen to avocado toast—taste better. It’s the Swiss Army knife of condiments.
The Fermentation Squad: Ingredients
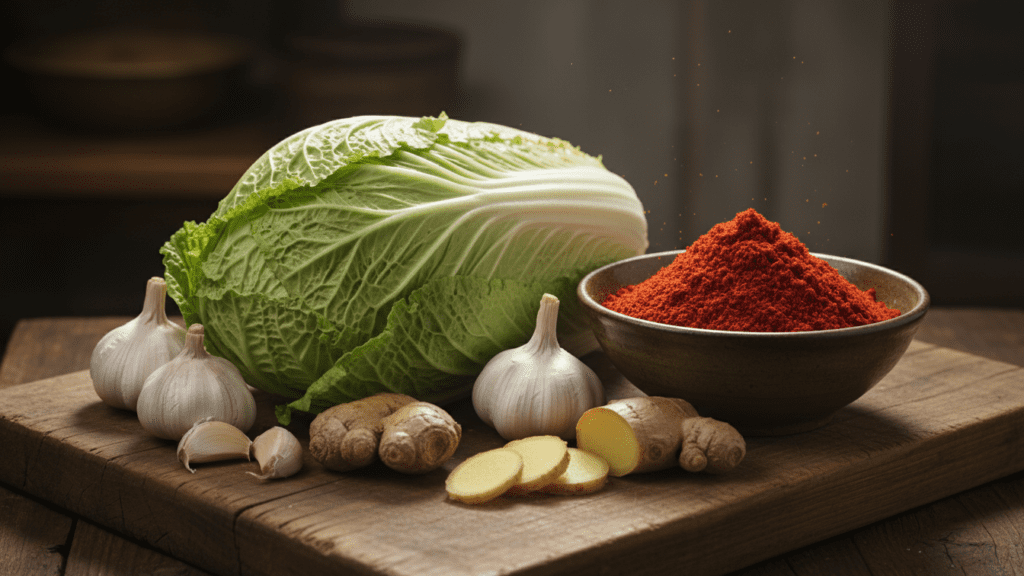
Don’t go trying to make this with a standard head of green cabbage from the local supermarket. You need the right soldiers for this spicy war.
- Napa Cabbage: Grab two large heads. We want those crinkly, soft leaves that hold onto the paste.
- Sea Salt: Use non-iodized coarse salt. Iodine can turn your ferment a weird color, and nobody wants “neon bruise” kimchi.
- Gochugaru (Korean Chili Flakes): This is non-negotiable. Regular chili flakes are too spicy and smoky; you need the sun-dried Korean stuff for that bright red glow.
- Fish Sauce: This provides the deep umami funk. (Veggie friends: swap for soy sauce or kelp powder).
- Ginger and Garlic: Use a lot. Like, more than you think is socially acceptable.
- Green Onions and Carrots: For a bit of sweetness and crunch.
- Daikon Radish: These little white cubes turn into juicy flavor bombs.
- Rice Flour and Sugar: We use these to make a “porridge” that helps the chili paste stick to the cabbage like glue.
Tools & Kitchen Gadgets You’ll Need
To master how to make kimchi step by step, you need the right gear to keep things sanitary and efficient.
- Extra-Large Mixing Bowls: You need way more space than you think. Cabbage is bulky!
- Glass Mason Jars or Fermentation Crocks: Glass is best because it won’t absorb the garlic smell (unlike your plastic Tupperware).
- Kitchen Gloves: Unless you want your hands to smell like spicy garlic for three business days, wear disposable gloves.
- Colander: For the endless rinsing of the salty cabbage.
- Food Processor: To turn your aromatics into a smooth, deadly paste.
- Small Saucepan: For cooking the rice flour porridge.
Step-by-Step Instructions
Step 1: The Great Salting
Cut your cabbage into bite-sized squares or leave them in halves if you’re feeling traditional. Toss them in a massive bowl with a generous amount of salt. Let them sit for 2 to 3 hours. This draws out the water so the cabbage stays crunchy later. You’ll know it’s ready when the leaves feel bendy like a rubber band rather than snapping.
Step 2: The Rinse Cycle
Rinse that cabbage. No, really. Rinse it at least three times in cold water to get the excess salt off. If you skip this, your kimchi will taste like a salt lick, and your blood pressure will skyrocket just by looking at the jar. Drain it well in a colander.
Step 3: Making the Glue

In a small saucepan, whisk your rice flour and water over medium heat until it becomes a thick, translucent paste. Stir in some sugar. This “porridge” acts as the vehicle for our chili flakes. Let it cool completely! If you add hot paste to the cabbage, you’ll just have a sad, wilted salad.
Step 4: The Paste of Power
Throw your garlic, ginger, and onion into a food processor. Pulse until smooth. Mix this with the cooled rice porridge, the fish sauce, and a mountain of Gochugaru. Add your sliced carrots, radish, and green onions. It should look like a thick, vibrant red sludge of destiny.
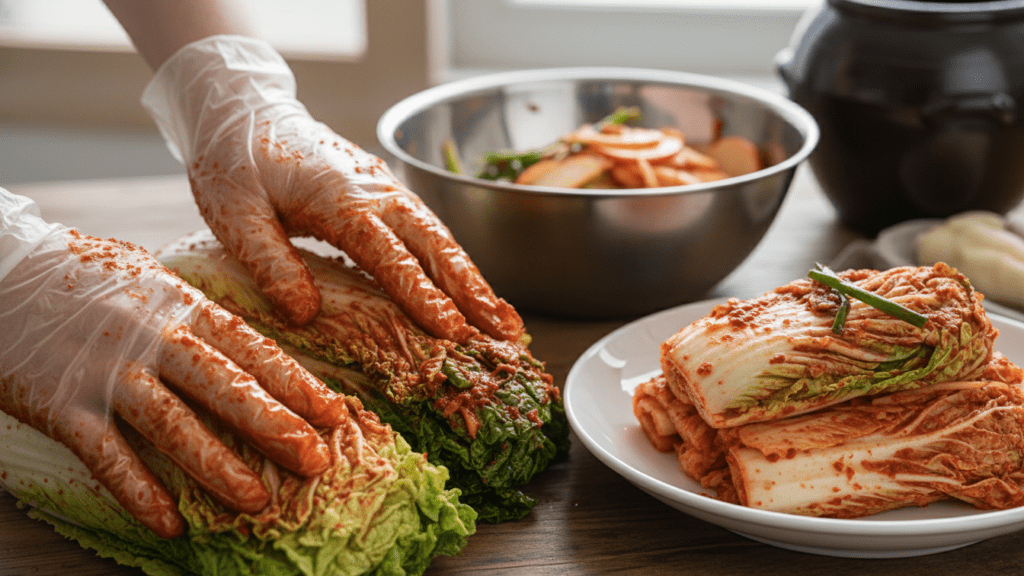
Step 5: The Massage
Put on your gloves! Smear that red paste over every single square inch of the cabbage. Use your hands to really work the flavor into the fibers. This is where the magic happens. IMO, this is the most therapeutic part of the whole process. 🙂
Our Top Pick

LuBudingJoy Blank Recipe Book
B5 Blank Recipe Book – Create and organize your favorite recipes in one beautiful place. This hardcover recipe book (10" × 7.3") features 150 blank pages and includes DIY category stickers. Designed with conversion charts, content tables, and a back pocket for loose notes.
Step 6: The Pack and Wait
Cram the cabbage into your glass jars. Press down firmly to remove any air pockets. Leave at least an inch of space at the top because this stuff is going to bubble and expand like a science fair volcano. Leave it on your counter for 1 to 5 days (tasting daily), then move it to the fridge.
Calories & Nutritional Info
Kimchi is basically the ultimate “free food” in terms of calories, provided you don’t eat an entire gallon in one sitting.
- Calories: Approximately 15-25 kcal per serving.
- Probiotics: Billions of Lactobacillus bacteria to make your gut happy.
- Vitamin K and C: Essential for bone health and your immune system.
- Sodium: A bit on the high side (it’s a ferment, after all), so enjoy in moderation if you’re watching your salt.
- Fiber: High levels to keep things… moving.
Common Mistakes to Avoid
- Not Rinsing Enough: If you don’t wash the salt off, you’re basically making a brine-bomb. Rinse three times, then taste a piece. It should be seasoned, not oceanic.
- Using the Wrong Salt: Table salt with iodine can kill the good bacteria. Use sea salt or kosher salt.
- The “Air Gap” Disaster: If the cabbage isn’t submerged in its own juices, it can grow mold. Press it down daily with a clean spoon.
- Closing the Lid Too Tight: Fermentation releases gas. If you seal the jar completely, it might explode. Burp your jars daily to release the pressure.
- Patience Failure: Don’t put it in the fridge on day one. It needs the warmth of the counter to start the “party.” TBH, the best flavor takes time. 🙂
Variations & Customizations
Want to branch out from the classic? Try these three fun twists:
The Vegan Warrior
Swap the fish sauce for miso paste or liquid aminos. You still get that deep, savory “funk” without the fish. Add a little extra salt to compensate.
The White Kimchi (Baek-kimchi)
Skip the chili flakes entirely! Use lots of garlic, ginger, and even sliced pears or apples for sweetness. It’s refreshing, crunchy, and perfect for those who can’t handle the heat.
The Cucumber Quick-Fix (Oi-sobagi)
Use the same paste but stuff it into thick cucumber spears. These don’t need to ferment for weeks; you can eat them after just a few hours for a crisp, spicy snack.
FAQ Section
Is homemade kimchi safe to eat? Yes! The salt and the lactic acid produced during fermentation create an environment where bad bacteria cannot survive. As long as it smells sour and tangy (not like rotten trash), you’re good to go.

How do I know when my kimchi is done? Taste it! When it has a tangy, slightly fizzy bite, it’s ready for the fridge. If it just tastes like salty cabbage, let it sit on the counter another day.
Why does my kimchi smell so strong? That’s the garlic and fermentation gases! It’s totally normal. FYI, the smell mellows out significantly once it’s chilled in the fridge.
Does kimchi have to be refrigerated? Eventually, yes. Refrigeration slows down the fermentation process so it doesn’t get too sour too fast. It will stay fresh in the fridge for months!
Can I use regular cabbage? You can use Savoy or even green cabbage, but the texture will be much tougher. Napa cabbage is the gold standard for a reason.
Why is my kimchi not bubbling? If your house is cold, the bacteria might be “sleeping.” Move the jar to a warmer spot like the top of the fridge to kickstart the process.
Can I make it less spicy? Absolutely. Just reduce the amount of Gochugaru. Even a small amount will give it that classic flavor without the intense burn.
Final Thoughts
There you have it—you are now officially a fermentation expert. You learned how to make kimchi step by step without causing a kitchen explosion or accidentally summoning a demon. It’s spicy, it’s funky, and it’s a heck of a lot better for you than that bag of chips you were eyeballing.
Go ahead, give it a shot. And hey, if your first batch smells so strong that your neighbors ask if there’s a gas leak, just tell them you’re an “artisan.” Tag me in your spicy jar photos—I want to see those bubbles! Happy fermenting!