The Ultimate Authentic Hot Cross Buns Recipe: Better Than a High-Street Bakery
We have all walked that dark path in late March. You are standing in the supermarket aisle, staring at a plastic-wrapped six-pack of hot cross buns that look more like tanned hockey pucks than festive treats. You buy them anyway, toast them until they are slightly less depressed, and then wonder why the world feels so hollow. Why do we settle for store-bought cardboard when we can fill our kitchens with the scent of orange zest and cinnamon?

I remember the first time I tried to bake these without a plan; I accidentally created buns so hard they could have survived a direct meteor impact. My cat used one as a scratching post, and I’m pretty sure the neighbor’s kid still has a bruise from the “soft” roll I threw at him. But after years of perfecting the hydration and the spice blend, I’ve found the secret. Ready to bake something so fluffy and aromatic that your neighbors will actually start liking you again?
Why This Recipe Is the Undisputed GOAT
Why should you bother waiting for dough to rise when a machine can do it for fifty cents? Because this recipe produces a crumb so tender it practically melts the second it hits your tongue. We aren’t making dry, sad bread here; we are making a buttery, spiced masterpiece that commands respect at the brunch table.
Beyond the ego boost of showing off those perfect flour crosses, the flavor profile is a total game-changer. We use real citrus zest, high-quality spices, and a secret glazing technique that makes these shine like crown jewels. It’s festive, it’s nostalgic, and IMO, it’s the best thing you can do with a bag of flour this spring. Ready to ruin grocery store bread for your entire social circle?
The Cleanest Ingredient List Ever
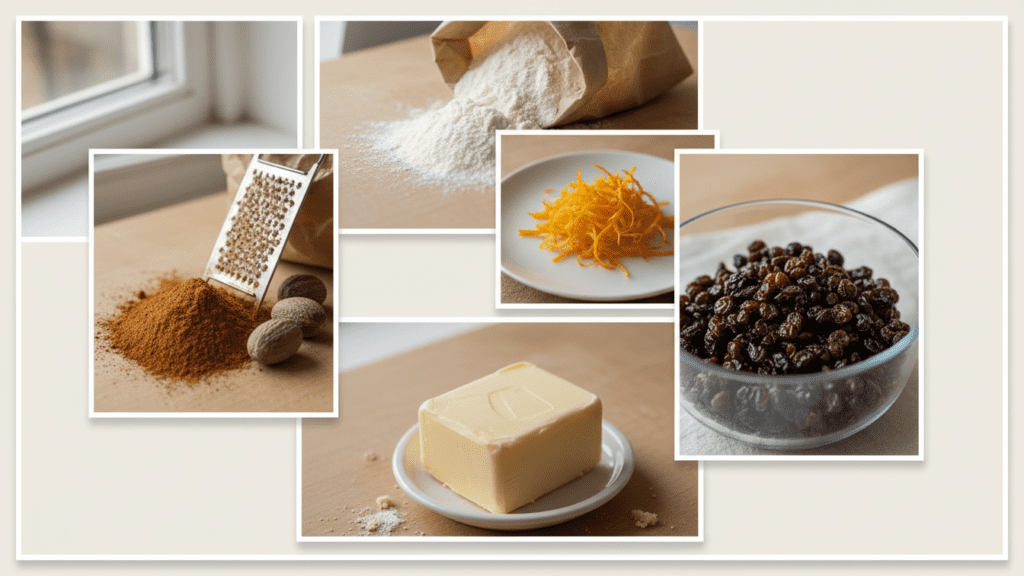
Don’t let the list intimidate you; most of this is already lurking in the back of your pantry. If you don’t have currants, don’t panic—sultanas or even chocolate chips are valid lifestyle choices.
- 4 cups Bread Flour: You need that gluten strength for the skyscraper rise.
- 1/4 cup Granulated Sugar: Just enough sweetness to keep things interesting.
- 2 tsp Active Dry Yeast: Check the date; dead yeast is a real holiday buzzkill.
- 1.5 tsp Ground Cinnamon & 1/2 tsp Ground Nutmeg: The “smells like happiness” duo.
- 1 cup Whole Milk: Warm it up, but don’t boil the life out of it.
- 1/4 cup Unsalted Butter: Make sure it’s softened, or it won’t join the party properly.
- 1 Large Egg: To give the dough that rich, golden soul.
- 1 cup Currants or Sultanas: Soak them in warm water first so they don’t steal moisture from the bread.
- Zest of 1 Orange: Fresh only! The bottled stuff tastes like sadness.
- For the Crosses: 1/2 cup flour mixed with 5 tbsp water.
- For the Glaze: 2 tbsp apricot jam or honey melted with a splash of water.
The Arsenal: Tools & Kitchen Gadgets
You don’t need a professional bakery, but a few specific tools make this process less of a workout and more of a craft. Check your cupboards; I bet you have these hiding somewhere.
- Stand Mixer with Dough Hook: Your arms will literally fall off if you try to knead this much butter and sugar by hand.
- Large Mixing Bowl: For the “nap time” rise.
- Digital Kitchen Scale: Baking is a science, not a suggestion. Stop “eyeballing” the flour.
- Digital Meat Thermometer: To ensure the center is fluffy bread, not raw dough.
- Piping Bag or Ziploc: To draw those iconic crosses without looking like a toddler did it.
- Wire Cooling Rack: Essential! If they cool in the pan, the bottoms get soggy.
Step-by-Step Instructions: The Path to Glory
Step 1: The Spice Infusion
Start by warming your milk and butter together until the butter melts. Stir in your cinnamon, nutmeg, and orange zest. TBH, the smell at this stage is worth the entire effort. Let it cool until it’s just lukewarm—if it’s too hot, you will murder your yeast, and your buns will never see the light of day.
Step 2: The Dough Build
In your stand mixer bowl, combine the flour, sugar, and yeast. Pour in that fragrant milk mixture and the egg. Turn the mixer on low and let the dough hook work its magic. Once the dough starts looking smooth and elastic, add your soaked (and drained!) fruit. Bold move: don’t overmix the fruit, or you’ll have purple bread.
Step 3: The First Nap
Move the dough to a greased bowl, cover it with a damp cloth, and find it a warm, draft-free home. Let it rise for about 1.5 to 2 hours or until it doubles in size. This is the perfect time to catch up on those emails you’ve been ignoring or to research why you didn’t start a bakery years ago.
Step 4: The Shaping Ritual
Gently deflate the dough and divide it into 12 even pieces. Roll them into smooth balls and place them in a greased 9×13 baking dish. They should be close but not touching yet. Cover them up again for a second rise of about 45 minutes. They need to look plump and ready for their close-up.
Step 5: X Marks the Spot
Mix your flour and water into a thick, pipeable paste. Snip the corner off a Ziploc bag and pipe a long line across each row of buns, then another line perpendicular to create the crosses. Pro tip: pipe slowly to ensure the paste sits in the crevices.
Step 6: The Bake and Shine
Slide the dish into a preheated 375°F oven. Bake for 20-25 minutes until they are deep golden brown and sound hollow when tapped. While they are still screaming hot, brush them with your melted apricot jam or honey. The glaze will soak in and leave a brilliant, sticky shine. Let them cool on a wire rack for at least 20 minutes before slathering with far too much butter.
Calories & Nutritional Info

I’m going to be honest with you: this is a buttery holiday treat. It’s high in protein from the flour and eggs, but we aren’t counting the sugar.
- Calories: ~290 kcal per bun.
- Protein: 7g (Thanks, bread flour!).
- Total Fat: 8g (The butter is the hero here).
- Carbohydrates: 48g.
- Fiber: 2g (Currants count as fruit, right?).
Common Mistakes to Avoid (The Cheeky Guide)
- Murdering the Yeast: If your milk is hotter than a hot tub, you will kill the yeast. Always use lukewarm liquid.
- The Flour Trap: If the dough is sticky, don’t just dump in more flour! You’ll end up with a brick. Keep kneading; the gluten will find its way.
- Skipping the Soak: If you use dry fruit straight from the bag, they will suck the moisture out of your dough. Soak your raisins!
- Glazing Too Late: If the buns cool down before you apply the glaze, it won’t set properly and will just be a sticky mess. Glaze them while they are hot!
Variations & Customizations
Feeling a bit adventurous with your dough? Try these three spins:
- The Chocoholic Version: Swap the fruit for 1 cup of dark chocolate chips and add 2 tbsp of cocoa powder to the flour. It’s basically dessert for breakfast.
- The Tropical Twist: Use dried mango and coconut flakes instead of currants. Swap the milk for coconut milk for a “vacation in a bun” vibe.
- The Savory Pivot: Skip the sugar and fruit. Add 1 cup of sharp cheddar and some chopped rosemary. FYI, this is the ultimate dinner roll upgrade.
FAQ: Everything You’re Dying to Know
Why is it called a Hot Cross Bun?
Historically, they were eaten on Good Friday, and the cross represents the crucifixion. The “hot” part comes from the fact that they were traditionally sold fresh and steaming from the oven.
Can I make these ahead of time?
Absolutely. You can do the first rise in the fridge overnight. This actually develops a deeper flavor. Just let the dough come to room temperature before shaping.
Why are my buns heavy?
You likely didn’t let them rise long enough or your yeast was a bit tired. Patience is a virtue, especially when bread is involved!
Can I use all-purpose flour?
You could, but the buns won’t have that iconic chewy, bouncy texture. Bread flour has more protein, which is what gives the bun its “muscles.”
What is the best way to eat them?
Sliced in half, toasted until the edges are brown, and spread with a thick layer of salted butter. Some people like jam, but IMO, butter is the only way.
How do I store leftovers?
Keep them in an airtight container for up to 3 days. If they get a bit firm, a 10-second zap in the microwave or a trip to the toaster will bring them back to life.
Can I freeze them?
Yes! They freeze beautifully. Just wrap them individually in plastic wrap. Toast them straight from frozen for a quick breakfast win.
Final Thoughts
There you have it—a hot cross buns recipe that will make you the star of the season. It’s a bit of a process, sure, but the smell of those spiced rolls baking in your oven is worth every minute of kneading.
Go ahead, invite your friends over, put the kettle on, and enjoy the best buns of your life. Just don’t blame me when you can never go back to the store-bought version again. Happy baking! 🙂