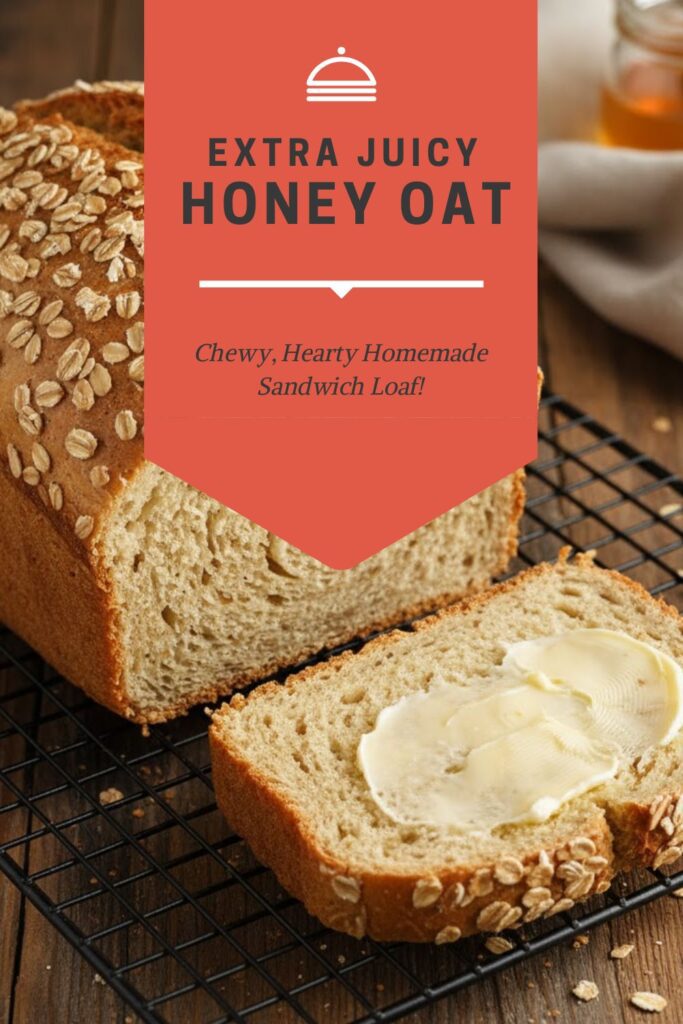
Forget Bland Bread: Your Guide to Soft, Chewy, Ultimate Honey Oat Loaf
Let’s be honest, most sandwich bread is boring. It’s either flavorless air or a dry, dense brick you buy shrink-wrapped in plastic. You deserve better! You deserve a slice of Honey Oat bread—the perfect blend of sweet, tender, and chewy that smells like pure comfort food baking in your oven. This recipe delivers a soft crumb, a beautiful golden crust, and a subtle sweetness that makes every sandwich, piece of toast, or morning slice absolutely irresistible. Why buy sad bread when you can bake this beautiful, hearty loaf that stays soft for days?
Why This Recipe Is Awesome (It’s Soft, Hearty, and Healthy-ish)
This bread is a game-changer because it balances wholesome ingredients with incredible texture.
- The Chewy Crumb: We use cooked old-fashioned oats mixed directly into the dough. This isn’t just for appearance! The cooked oats hydrate fully and keep the interior incredibly moist and tender, giving the bread that satisfying, chewy bite.
- Natural Sweetness: We rely on honey for sweetness and flavor. Honey not only feeds the yeast like a champ but also retains moisture better than sugar, ensuring your loaf stays softer, longer.
- Beginner-Friendly: This is a straightforward, yeast-based loaf that requires standard kneading and rises. You don’t need fancy equipment, and the dough is very forgiving. If you can boil water, you can make this bread.
Ingredients: The Wholesome Essentials

Gather your grains and your gold (the honey!). Precision with warm liquids is key.
- 1 cup (240ml) Water (for the oats): Used to cook the oats.
- ½ cup Old-Fashioned Rolled Oats (plus 1 tbsp for topping): Crucial for texture and moisture. Do not use instant oats!
- ½ cup (120ml) Milk (Room Temperature): Adds richness and encourages browning.
- 3 tablespoons Honey: The primary sweetener and moisture retainer.
- 2 ¼ teaspoons (1 packet) Instant Yeast: Our reliable riser.
- 3 ½ cups All-Purpose Flour (or Bread Flour): Bread flour gives a chewier texture; AP flour yields a softer crumb.
- 1 ½ teaspoons Salt: Essential for flavor and controlling the yeast.
- 2 tablespoons Unsalted Butter (Melted and Cooled): For tenderness in the dough.
- 1 large Egg (Whisked): For the egg wash (optional, but gives a beautiful golden crust).

Key Substitutions:
- Milk: Substitute with non-dairy milk (oat, soy, or almond) for a dairy-free loaf.
- Honey: Use maple syrup for a vegan loaf.
- All-Purpose Flour: Use Bread Flour for a higher rise and chewier texture.
Tools & Kitchen Gadgets Used: Your Baking Essentials
You can do this by hand, but a stand mixer makes the kneading phase much easier.
- Small Saucepan: For cooking the oats.
- Large Mixing Bowl or Stand Mixer: For kneading the dough. A Dough Hook is a beautiful time-saver.
- Kitchen Thermometer: MANDATORY for the warm liquid.
- 9×5-inch Loaf Pan: The classic sandwich loaf shape.
- Parchment Paper: Recommended for lining the pan for easy removal.
- Wire Cooling Rack: To prevent the soggy bottom.
- Pastry Brush: For applying the egg wash (if using).
Step-by-Step Instructions: The Oat Hydration Hack
The key is ensuring the oats are cooked and cooled before they touch the yeast.
Step 1: Cook and Cool the Oats (15 Minutes)
- In your saucepan, combine 1 cup water and ½ cup oats. Bring to a simmer and cook for 1-2 minutes until the oats are thick and creamy.
- Remove from heat. Stir in the melted butter and honey.
- CRITICAL STEP: Let the mixture cool completely to lukewarm (under 115°F / 46°C). Hot oats will kill the yeast! Go read a short book or check your email.
Step 2: Mix the Dough (10 Minutes)
- In your large mixing bowl, whisk together the flour, salt, and instant yeast.
- Add the lukewarm oat mixture and the milk to the dry ingredients.
- Mix until a shaggy dough forms. Knead with the dough hook (medium-low speed) or by hand for 6-8 minutes until the dough is smooth, elastic, and slightly tacky, but not overly sticky. You’ll see the oats beautifully suspended in the dough.
Step 3: First Rise (The Volume Check) (60 Minutes)
- Place the dough in a lightly oiled bowl, turn it once to coat, and cover it tightly.
- Let it rise in a warm, draft-free place for 60 minutes, or until the dough has doubled in size.
Step 4: Shape and Final Proof (45 Minutes)
- Gently punch down the dough to release the air. Turn it out onto a lightly floured surface.
- Shape the dough into a tight log by gently flattening it, folding the long sides to the center, and rolling it up like an envelope. Tuck the ends underneath to create surface tension.
- Place the loaf, seam-side down, in your parchment-lined 9×5-inch loaf pan.
- Cover and let it rise for the final proof for 30-45 minutes, or until the dough crests about 1 inch above the rim of the pan.
Step 5: Egg Wash and Bake (35 Minutes)
- Preheat your oven to 375°F (190°C).
- Brush the top of the loaf with the whisked egg (the egg wash).
- Sprinkle with the reserved 1 tablespoon of oats.
- Bake for 35-40 minutes, or until the crust is deep golden brown and the loaf sounds hollow when tapped. The internal temperature should read 200-210°F (93-99°C).
Step 6: The Agonizing Cool (60 Minutes)
- Immediately remove the loaf from the pan and transfer it to a wire cooling rack.
- DO NOT CUT IT! Cutting warm bread leads to a gummy texture. Wait at least 60 minutes for the starches to set. I know the smell is pure torture, but you must resist!
Calories & Nutritional Info: The Wholesome Facts (Estimated)

These are estimates for one average slice (1/12th of the loaf).
- Calories per serving (1 slice): ~180-220 calories
- Carbohydrates: ~35-40g
- Dietary Fiber: ~3g (Good source of soluble fiber from the oats.)
- Notes: Oats contain beta-glucan, which is beneficial for heart health. This bread provides sustained energy and is higher in fiber than plain white bread.
Common Mistakes to Avoid: The Grain Gang
Protect your dough from these classic bread-baking blunders.
- Hot Oats Homicide: The number one mistake! Adding yeast to warm milk/water is fine, but adding it to warm oats (above 115°F) is instant death for the yeast. Cool the oats completely!
- Too Much Flour: Oat dough can look sticky, but resist the urge to add cup after cup of flour during kneading. Too much flour creates a dry, dense crumb.
- Skipping the Cooked Oats: Adding dry oats directly to the dough means the oats will steal moisture from the bread as it bakes, leading to a dry loaf. Cook the oats first to hydrate them fully.
- Improper Proofing: Not letting the dough rise enough (under-proofed) results in a dense, tight crumb. Watch the volume (double in size), not the clock!
- Slicing Too Soon: Cutting this soft, moist bread before it’s cooled creates jagged, messy slices and a gummy interior. Wait the hour!
Variations & Customizations: Your Loaf, Reimagined
The honey oat base is perfect for savory or sweet additions.
- Cranberry Orange Zest: Add ½ cup dried cranberries and 1 tablespoon of orange zest to the dough during the final minutes of kneading. The bright citrus pairs beautifully with the sweet honey.
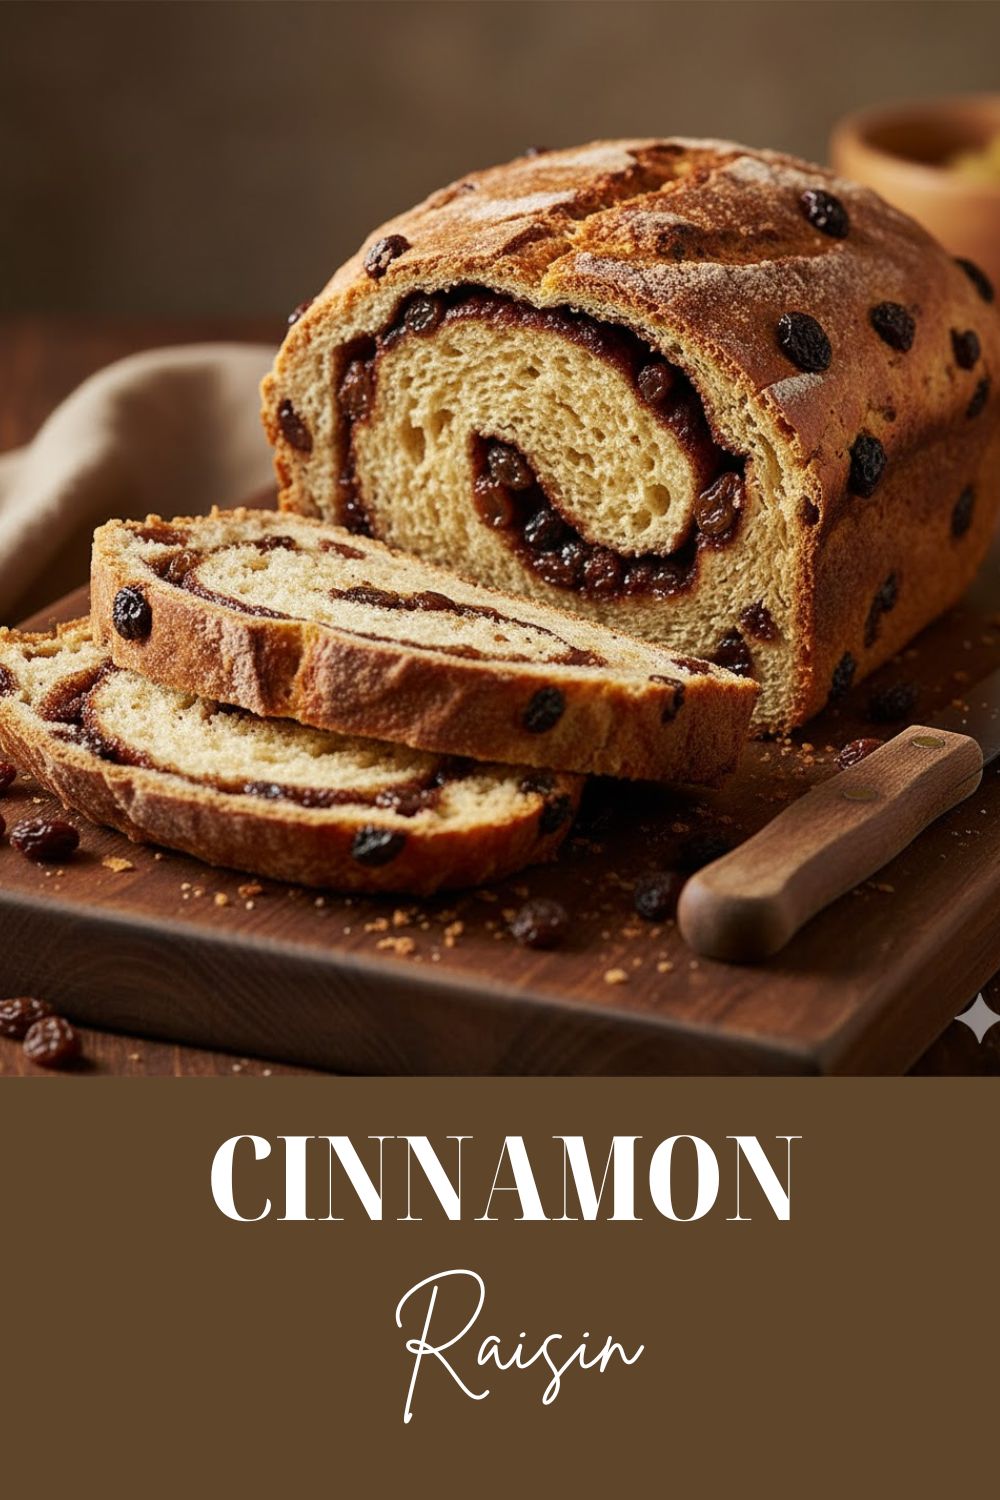
- Cinnamon Swirl Breakfast Loaf: After the first rise, roll the dough into a rectangle. Brush with melted butter, sprinkle with a mixture of 2 tablespoons cinnamon and ¼ cup brown sugar. Roll tightly into a log before the second proof.
- Savory Herb & Cheese (Dinner Roll Style): Replace the honey with brown sugar. Add ½ cup shredded white cheddar cheese and 1 tablespoon of fresh chopped thyme during the final minutes of kneading.
FAQ Section: The Honest Truth About Oats
You’re taking on a staple. Let’s cover the common questions.
Q1: Can I use quick oats instead of old-fashioned oats?
A: You can, but it’s not ideal. Quick oats break down much more, which can make the texture of the bread slightly gluey or mushy. Old-fashioned rolled oats maintain their shape better and provide superior chewiness.
Q2: Why did my bread collapse in the oven?
A: This usually means the dough was over-proofed during the second rise. The yeast ran out of gas before the heat could set the structure, and the entire thing collapsed. Next time, move it to the oven sooner!
Q3: How do I store homemade honey oat bread?
A: Store the cooled loaf in an airtight bread bag or container at room temperature for up to 3-4 days. It keeps wonderfully due to the honey and oat moisture.
Q4: What is the benefit of adding milk instead of just water?
A: Milk contains fat and sugar (lactose). The fat adds richness and tenderness, while the lactose doesn’t fully ferment, contributing to a darker, golden-brown crust.
Q5: Can I substitute whole wheat flour for some of the AP flour?
A: Yes! Substitute up to 1 cup of the all-purpose flour with whole wheat flour for a heartier, higher-fiber loaf. You may need to add a tablespoon or two of extra water, as whole wheat is thirstier.
Q6: How do I know when the dough is kneaded enough?
A: The dough should look smooth, uniform, and slightly elastic. If you poke it gently with your finger, it should spring back slowly. It should be tacky, but not stick to your hands.
Q7: Should I use a liquid measuring cup or a scale for the honey?
A: Use a kitchen scale! It’s the most accurate way to measure sticky ingredients. If using a liquid measuring cup, spray it with cooking oil first; the honey slides right out.
Final Thoughts: The New Sandwich Staple
You just baked a fantastic, hearty, and impossibly soft loaf of Honey Oat bread. You tamed the yeast and harnessed the power of cooked oats. Go ahead, slice that beauty (finally!), spread it with butter, and acknowledge that your bread game just went pro.