

The Ultimate Gluten-Free Pizza Crust That Doesn’t Taste Like Cardboard
Let’s be brutally honest for a second: most gluten-free bread products have the structural integrity of a wet paper towel and the flavor profile of a dusty attic. You’ve probably spent a small fortune on store-bought frozen discs that shatter like glass the moment you take a bite. It’s a tragedy, really. But what if I told you that a gluten-free pizza crust actually exists that bends, chews, and—dare I say it—tastes like actual pizza?
I first whipped this up for a “gluten-is-my-personality” friend who claimed they’d never eat a decent slice again. One bite later, they were literally checking the flour bag to make sure I hadn’t poisoned them with wheat. This isn’t just “good for being gluten-free”; it’s just plain good. If you’re ready to reclaim your Friday nights without the bloating or the heartbreak, you’re in the right place. Ready to make a crust that actually has a soul? Let’s get into it.
Why This Recipe is the G.O.A.T. of Gluten-Free Living
Why should you bother mixing your own dough when the grocery store sells “pizza-flavored” shingles? Because your taste buds have standards, that’s why. First off, this crust achieves the “holy grail” of GF baking: the crispy-yet-chewy balance. We aren’t making a giant cracker here; we’re making a dough that actually rises and bubbles.
Secondly, it is ridiculously easy. You don’t need a PhD in chemistry or a 48-hour fermentation window. It’s a straightforward mix-and-bake situation that makes you look like a Michelin-star chef while your kitchen stays relatively intact. Plus, it impresses guests every single time—even the ones who think gluten-free is a myth. IMO, it’s the most empowering recipe in any Celiac-friendly arsenal.
The Grocery List: Clean, Simple, and Impactful
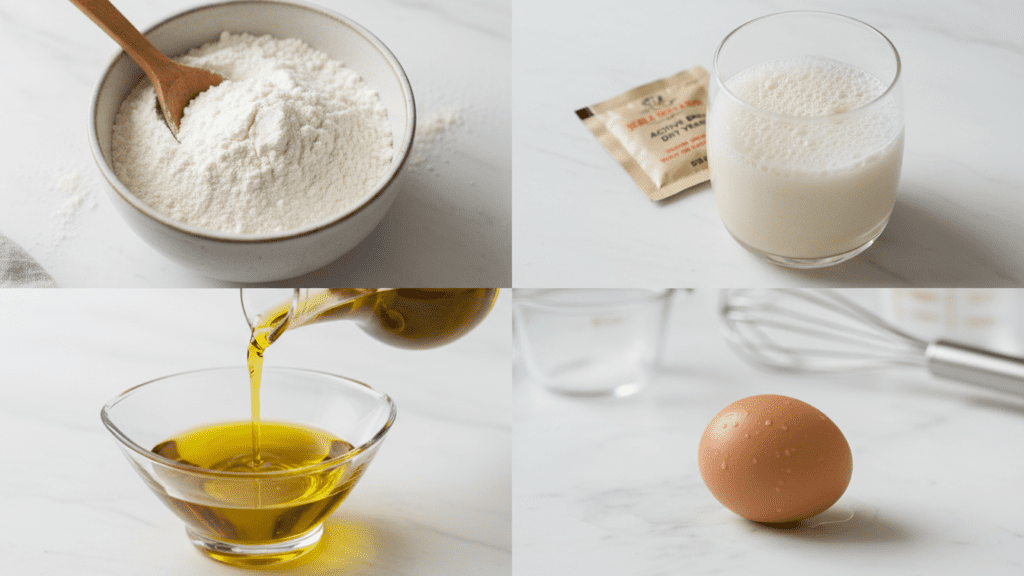
Don’t overcomplicate your life by searching for rare starches harvested under a blue moon. We are using powerhouse pantry staples that actually work.
- Gluten-Free All-Purpose Flour Blend: Look for one that includes Xanthan Gum. If it doesn’t, you’ll need to add a teaspoon yourself unless you want a pile of sand.
- Instant Yeast: One packet. We need those bubbles to do the heavy lifting.
- Warm Water: Not boiling, not cold. Think “baby bathwater” temperature.
- Honey or Sugar: Just a teaspoon to wake up the yeast and help with browning.
- Olive Oil: For that authentic Italian fat and a crispy finish.
- Egg: One large egg at room temp. This provides the structure that gluten usually handles.
- Apple Cider Vinegar: One teaspoon. This is the secret hack to help the dough rise and improve the texture.
- Salt: Because flavorless dough is a culinary felony.
Tools & Kitchen Gadgets Used
To make this the smoothest cooking experience of your life, snag these basics. I’ve linked my favorites so you can treat your kitchen to the upgrades it deserves!
- A Stand Mixer: Gluten-free dough is sticky—save your hands the trouble. Check out this classic KitchenAid on Amazon.
- Pizza Stone or Baking Steel: The secret to a crispy bottom. Grab a high-quality stone here.
- Parchment Paper: Your best friend for transferring sticky dough. Stock up on precut sheets.
- Pizza Peel: For that professional “shove” into the oven. Try this bamboo peel.
- A Solid Rolling Pin: To get that even thickness. This French rolling pin is a game-changer.
Step-by-Step Instructions: The Path to Pizza Glory
Follow these steps precisely. TBH, the order matters more than you think.
1. Wake Up the Yeast
In your stand mixer bowl, combine the warm water, honey, and yeast. Let it sit for about 5-10 minutes until it gets nice and foamy. FYI: if it doesn’t foam, your yeast is dead and your pizza will be a sad flatbread. Throw it out and start over.
2. The Great Integration
Add the olive oil, egg, and apple cider vinegar to the yeast mixture. Give it a quick whisk. Now, slowly add your gluten-free flour blend and salt while the mixer runs on low. Increase to medium speed for about 3-5 minutes. The dough will look more like thick cake batter than traditional dough—don’t panic, that’s normal for GF!
3. The First Rise
Lightly oil a bowl, toss the dough in, and cover it with a warm, damp cloth. Let it rise in a draft-free spot for about 45-60 minutes. It won’t double in size like wheat dough, but it will puff up and look much lighter.
4. Shaping the Masterpiece
Preheat your oven (and your pizza stone) to 450°F (230°C). Place the dough onto a large sheet of parchment paper dusted with a bit of flour. Using a rolling pin (or oiled hands), spread the dough into a 12-inch circle. Keep it about 1/4 inch thick.
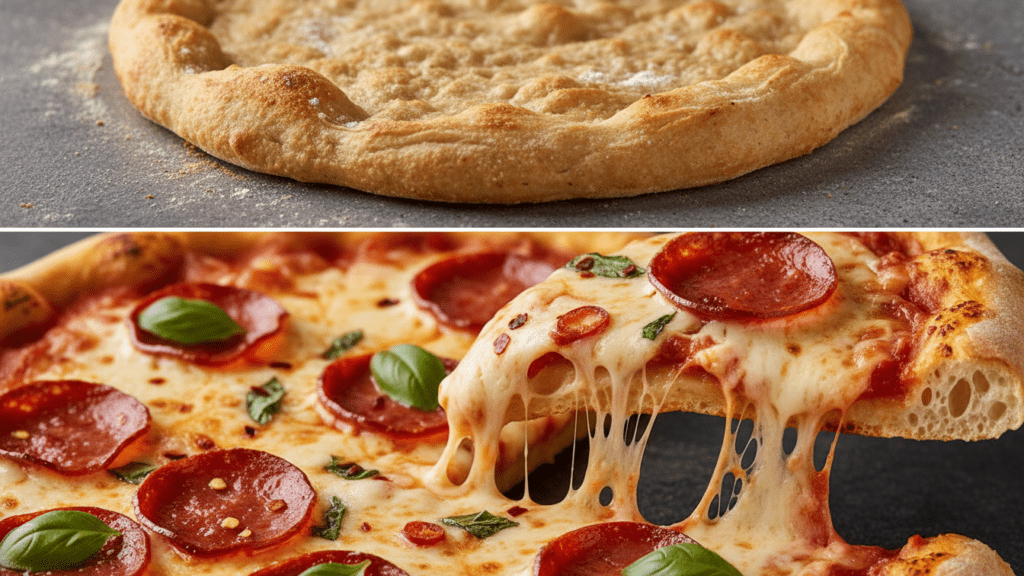
5. The Par-Bake Secret
Slide the parchment and dough onto the hot stone. Bake the “naked” crust for 8-10 minutes. This step ensures the center doesn’t get soggy once you pile on the sauce. Remove it from the oven once it looks set and slightly golden.
6. The Final Countdown
Add your sauce, cheese, and toppings. Slide it back into the oven for another 10-12 minutes until the cheese is bubbly and the edges are beautifully browned. Let it rest for 5 minutes before slicing, or you’ll just have a cheese slide.
Calories & Nutritional Info
For those of you who track your stats like a part-time job, here is the lowdown per slice (based on an 8-slice pie):
- Calories: ~180 kcal (crust only).
- Carbs: ~32g (mostly from the rice/potato starches in the flour).
- Protein: ~3g (thanks, egg!).
- Fat: ~5g (the olive oil does the work here).
- Fiber: ~2g (depends on your specific flour blend).
Common Mistakes to Avoid: Don’t Be That Person
Even a recipe this simple can go sideways if you get cocky. Avoid these blunders to keep your dignity.
- Using Cold Eggs: Cold eggs will shock the yeast and slow down your rise. Warm them in a bowl of water for 5 minutes before using.
- Skipping the Par-Bake: If you put sauce on raw GF dough, you’re basically making a savory pudding. Bake the crust first.
- Adding Too Much Flour: If the dough is too dry, it will turn into a crumbly mess. Trust the stickiness. It should be tacky, not a dry ball.
- Using Boiling Water: You want to wake the yeast up, not commit a massacre. Keep it under 110°F.
- Forgetting the Xanthan Gum: If your flour blend is missing this, your pizza will literally fall apart in your hands. Double-check the label.
Variations & Customizations
Feeling adventurous? Here are three ways to flip the script on this gluten-free pizza crust:
The Garlic-Herb Twist
Add 1 tablespoon of dried Italian seasoning and 1 teaspoon of garlic powder directly into the flour. It gives the crust a “pizzeria” aroma that is absolutely addictive.
The Keto-Ish Swap
If you want to lower the carb count, swap 1/2 cup of the flour for super-fine almond flour. It adds a nutty richness and makes the edges even crispier.
The Spicy Siren
Add a teaspoon of red pepper flakes to the dough and brush the edges with chili-infused olive oil before the final bake. Keep a glass of water nearby. 🙂
FAQ Section: You Asked, I Answered
Why is my gluten-free pizza crust soggy? You probably skipped the par-bake or used a sauce that was too watery. Always pre-bake the crust before adding toppings and simmer your sauce to thicken it up first.
Can I make this dough in a bread machine? Yes! Use the “Dough” setting and check it halfway through. Since there’s no gluten to develop, it doesn’t need a long knead, but the warm environment is great for rising.
Is gluten-free dough supposed to be sticky? Yes, absolutely. Do not keep adding flour until it feels like “normal” dough, or you’ll end up with a brick. Use oiled hands or parchment paper to handle it.
Can I freeze this pizza dough? It’s better to freeze the par-baked crust. Wrap it tightly in plastic wrap and foil. When you’re ready for pizza, just add toppings and bake from frozen.
Which flour blend is the best? I’ve had the best luck with Cup4Cup or King Arthur Measure for Measure. Just ensure it says “1-to-1” or “Measure for Measure” on the bag.
Do I have to use a pizza stone? You don’t have to, but an upside-down baking sheet is a poor substitute. A stone holds heat and sucks moisture out of the crust for that perfect crunch.
Can I make this vegan? You can swap the egg for a flax egg (1 tbsp flax meal + 3 tbsp water), but the crust will be a bit denser. Use maple syrup instead of honey.
Final Thoughts
There you have it. A gluten-free pizza crust that actually respects your time and your taste buds. It’s crunchy, it’s chewy, and it’s the only recipe that makes me feel like I’m winning at adulthood on a Friday night. Once you make this, you’ll realize that the frozen section has been lying to you for years. Go forth, roll some dough, and enjoy the crunch. Just don’t be surprised when your gluten-eating friends start stealing your slices. 🙂