
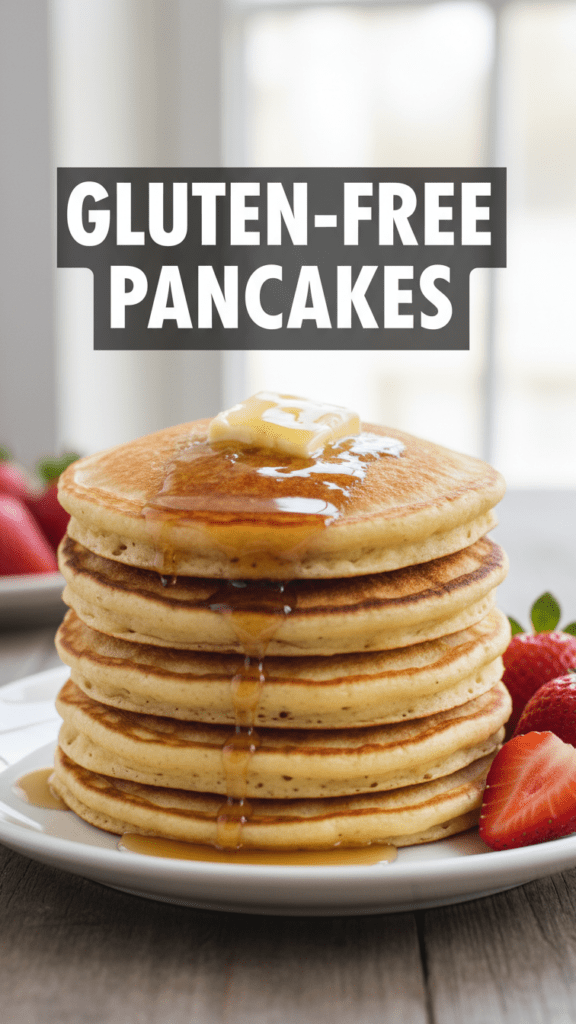
Fluffy AF: The Only Gluten-Free Pancakes Recipe That Doesn’t Taste Like Sadness
We’ve all been there: you wake up on a Saturday with visions of a golden stack of flapjacks dancing in your head, only to remember your gut has declared war on wheat. You reach for that box of “health store” mix, follow the instructions, and end up with something that has the texture of a wet sponge and the flavor of a dusty attic. It’s a breakfast betrayal of the highest order. But what if I told you that gluten-free pancakes could actually be fluffy, light, and—dare I say—better than the “real” thing?
I first mastered this recipe after a disastrous brunch where I served my gluten-eating friends a batch of pancakes so dense they could have been used as doorstops. After a few tears and a lot of flour-dusted research, I cracked the code. This isn’t just a compromise; it’s a revelation. Ready to reclaim your weekend morning glory? Let’s dive into the batter.
Why This Recipe Is the G.O.A.T. of Breakfast

Why should you clear your pantry for these gluten-free pancakes? Because they defy the laws of GF physics. Usually, without gluten, you get a sad, flat disc. This recipe uses a specific ratio of leavening agents and moisture to create those iconic air bubbles we all crave.
First off, the flavor is elite. We use real butter and a hint of vanilla to ensure they don’t taste like “diet food.” Secondly, the ease of cooking is unbeatable. You don’t need a degree in chemistry or a 48-hour fermentation window. It’s a simple one-bowl situation that makes you look like a brunch god while you’re still in your pajamas. Plus, they freeze like a dream. IMO, there is nothing more empowering than having a stash of gourmet pancakes ready to pop in the toaster on a gloomy Tuesday.
The Grocery List: Clean, Simple, and Impactful
Don’t panic—you don’t need to hunt down rare starches harvested under a blue moon. Most of these are likely hiding in your kitchen right now.
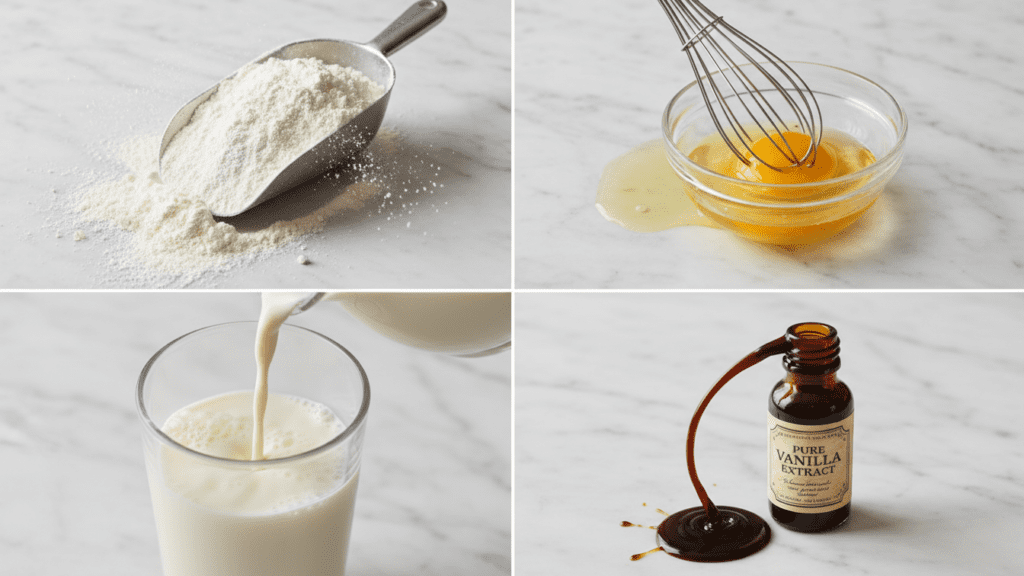
- Gluten-Free All-Purpose Flour Blend: Look for a blend that includes Xanthan Gum. If yours doesn’t have it, add 1/2 teaspoon yourself unless you want your pancakes to crumble like my resolve in a shoe sale.
- Baking Powder: Use a generous amount. This is our heavy lifter for the fluff factor.
- Sugar: Just a tablespoon. We want golden edges, not a sugar crash by 10 AM.
- Salt: A pinch to make all the other flavors actually show up for work.
- Milk: Dairy or your favorite plant-based alternative (Almond or Oat milk works perfectly here).
- Egg: One large egg at room temp. This provides the structure gluten usually handles.
- Butter: Melted and slightly cooled. Oil works, but butter is flavor.
- Vanilla Extract: Use the real stuff, not the imitation liquid that smells like a candle factory.
Tools & Kitchen Gadgets You’ll Need
To reach pancake nirvana, you need the right tools. I’ve listed the essentials below so you can treat your kitchen to some upgrades (affiliate links incoming, go wild!):
- A Non-Stick Griddle or Large Skillet: Essential for that even, golden-brown finish. This ceramic griddle is a total game-changer.
- A Solid Whisk: For getting that batter perfectly smooth without a bicep workout. Grab this ergonomic whisk on Amazon.
- Wide Silicone Turner: Because flipping a pancake with a tiny fork is a recipe for heartbreak. Try this extra-wide spatula.
- Mixing Bowls: You need a bowl with enough room to whisk with enthusiasm. These nesting bowls are elite.
- Batter Scoop or Measuring Cup: For uniform pancakes that don’t look like an inkblot test. Get a perfect-pour scoop here.
Step-by-Step Instructions: The Path to Fluffy Glory
Follow these steps precisely. TBH, the order matters more than you think.
1. Whisk the Dry Goods
In your large mixing bowl, combine the gluten-free flour, baking powder, sugar, and salt. Whisk them together until they are well acquainted. FYI: Sifting the flour isn’t mandatory, but it does help if your flour blend is looking a bit clumpy.
2. The Wet Marriage
In a separate smaller bowl (or just a large measuring cup), whisk the milk, egg, melted butter, and vanilla. Make sure your egg is at room temperature so it doesn’t accidentally re-solidify your melted butter into weird little yellow chunks. Nobody wants “butter-bead” pancakes.
3. The Big Combine
Pour the wet ingredients into the dry. Whisk until just combined. If you see a few small lumps, leave them alone! Over-mixing is the enemy of fluffiness. Let the batter rest for 5-10 minutes. This allows the rice flour in the GF blend to hydrate, preventing that “gritty” texture common in bad GF baking.
4. Heat and Grease
Preheat your non-stick griddle over medium-low heat. You’ll know it’s ready when a drop of water flicked onto the surface dances and sizzles. Lightly grease the surface with a tiny bit of butter or cooking spray.
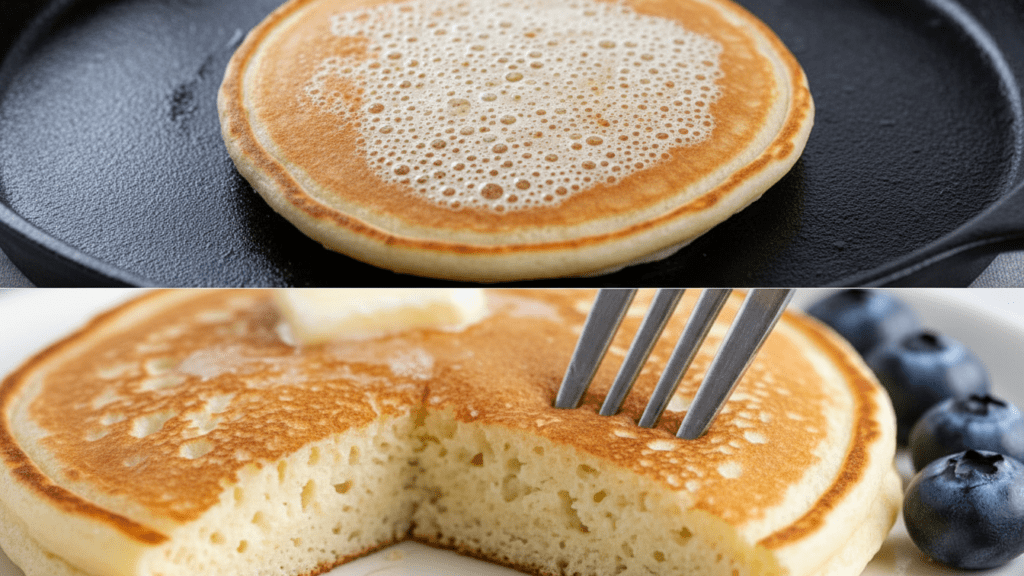
5. The Pour and The Wait
Scoop about 1/4 cup of batter per pancake onto the griddle. Now, stay patient. Wait for bubbles to form on the surface and the edges to look set and matte. This usually takes about 2-3 minutes. If you flip too early, you’ll end up with a raw, gooey mess.
6. The Flip and Finish
Slide your wide turner under the pancake and flip it in one confident motion. Cook for another 1-2 minutes until the other side is golden. Stack them high, drown them in maple syrup, and prepare for the best breakfast of your life.
Calories & Nutritional Info
For those of you tracking stats like it’s your part-time job, here is the lowdown per serving (approx. 3 pancakes):
- Calories: ~310 kcal (before the lake of syrup).
- Carbs: ~42g (pure weekend energy).
- Protein: ~7g (thanks, egg and milk!).
- Fat: ~12g (the price of deliciousness).
- Fiber: ~2g (depends on your flour blend).
Common Mistakes to Avoid: Don’t Be That Person
Even a recipe this simple can go sideways if you get cocky. Avoid these blunders to keep your dignity.
- Using Cold Ingredients: Cold milk and eggs will make your melted butter clump up. Warm your milk slightly and leave the egg out for 20 minutes.
- Flipping Too Soon: If the bubbles haven’t popped and stayed open, do not flip. You will regret it.
- High Heat: Pancakes are a marathon, not a sprint. Medium-low heat ensures the middle cooks before the outside turns into charcoal.
- Old Baking Powder: If your baking powder has been in the pantry since the last eclipse, buy a new one. Fresh leavening is the secret to height.
- Over-mixing: Whisking the life out of the batter will result in rubbery discs. Keep it gentle.
Variations & Customizations
Feeling adventurous? Here are three ways to flip the script on these gluten-free pancakes:
The Blue-Blooded Berry Stack
Gently fold 1/2 cup of fresh blueberries into the batter after it has rested. Add a pinch of lemon zest to the dry mix for a bright, summery vibe that feels like a $25 brunch at a fancy cafe.
The Protein Powerhouse
Swap 1/4 cup of the flour for your favorite vanilla protein powder. You might need an extra tablespoon of milk to keep the consistency right, but it’s a great way to justify eating dessert for breakfast.
The Savory Vegetarian Twist
Omit the sugar and vanilla. Add 1/4 cup of shredded cheddar cheese and some chopped chives to the batter. Top with a fried egg and a dash of hot sauce. It’s a total flavor bomb. 🙂
FAQ Section: You Asked, I Answered
Why are my gluten-free pancakes gummy? This usually happens because the batter didn’t rest. The rice flour needs time to absorb the liquid. If you skip the 10-minute rest, you get gumminess. Also, make sure they are fully cooked in the center!
Can I make these dairy-free? Absolutely. Swap the milk for unflavored almond, soy, or oat milk and use melted coconut oil or vegan butter. They still turn out incredibly fluffy.
Which GF flour is best? I prefer King Arthur Measure for Measure or Bob’s Red Mill 1-to-1. Just make sure it’s a “blend” and not just straight almond or coconut flour, or the ratios won’t work.
How do I keep them warm while cooking the rest? Set your oven to its lowest setting (usually ~170°F) and place a baking sheet inside. Put the finished pancakes on the sheet as you go. Do not stack them in the oven or they’ll steam and get soggy.
Can I freeze the leftovers? Yes! Let them cool completely, then stack them with parchment paper in between. Pop them in a freezer bag. To reheat, just throw them in the toaster like a frozen waffle.
Why aren’t my pancakes browning? You might need a tiny bit more sugar or a slightly higher heat. Sugar helps with the Maillard reaction (that golden color). Also, make sure you use enough butter on the griddle!
Can I make the batter the night before? I wouldn’t recommend it. The baking powder starts reacting as soon as it hits the liquid. If it sits overnight, your pancakes will be flat as a pancake (literally).
Final Thoughts
There you have it. A gluten-free pancakes recipe that actually respects your time and your taste buds. They’re light, they’re golden, and they’re the only reason I’m willing to interact with people before noon on a Sunday. Once you master this stack, you’ll realize that the store-bought mixes have been lying to you for years. Go forth, flip with confidence, and enjoy the fluff. Just don’t be surprised when your gluten-eating friends start stealing from your plate. 🙂
