
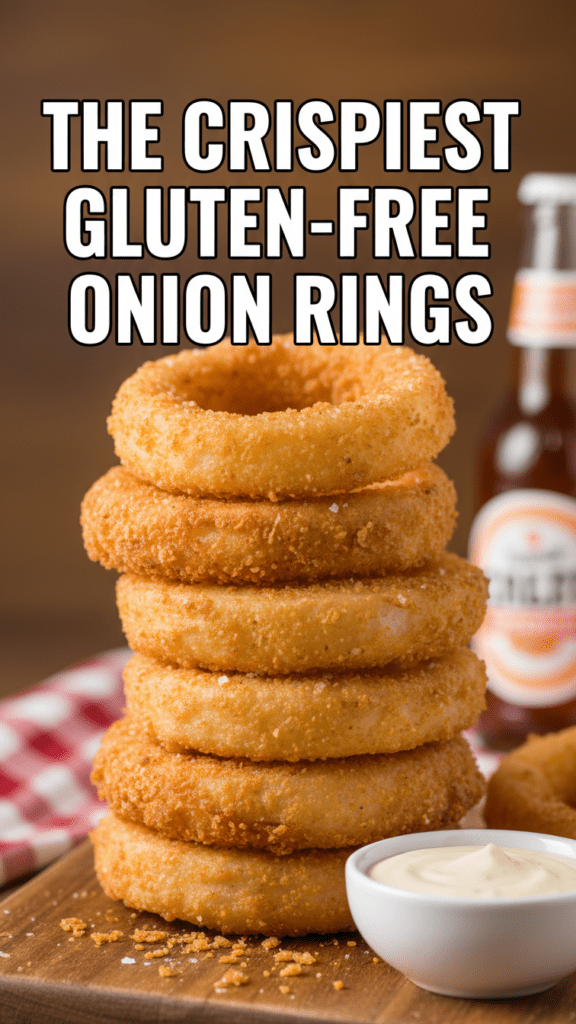
The Ultimate Crispy Gluten-Free Onion Rings That Don’t Taste Like Sadness
We’ve all been there. You’re at a restaurant, someone orders a mountain of golden, crispy rings, and you’re stuck staring at your salad like it’s a personal betrayal. Why does the universe insist that flour is the only way to achieve crunch? Well, I’ve got news for you: these gluten-free onion rings are about to change your life, or at least your Friday night.
I once tried a GF onion ring at a local fair that had the structural integrity of wet cardboard. It was a dark day for snack lovers everywhere. I made it my mission to create a version so crunchy and flavorful that your gluten-eating friends will actually try to steal them. Honestly, isn’t that the ultimate goal of any “alternative” recipe?

You don’t need a culinary degree or a secret laboratory to make this happen. You just need a massive onion, a few pantry staples, and the burning desire to eat something fried. Ready to ruin your diet in the best way possible?
Why This Recipe Is Awesome
First of all, the crunch factor is off the charts. We aren’t just using any old flour blend; we’re using a combination that ensures the coating actually sticks to the onion instead of sliding off like a cheap suit. Who wants a naked onion ring? Nobody, that’s who.

This recipe also makes you look like a kitchen wizard. When you pull these out of the pan, the golden-brown crust looks professional. You’ll feel like a gourmet chef, even if you’re currently wearing sweatpants with a mysterious stain on them.
Plus, it’s incredibly versatile. You can bake them, air fry them, or go the traditional route and deep fry them in oil. TBH, the deep-fried version wins every time for flavor, but I won’t judge your healthy lifestyle choices if you pick the air fryer. 🙂
The Ingredients You’ll Need
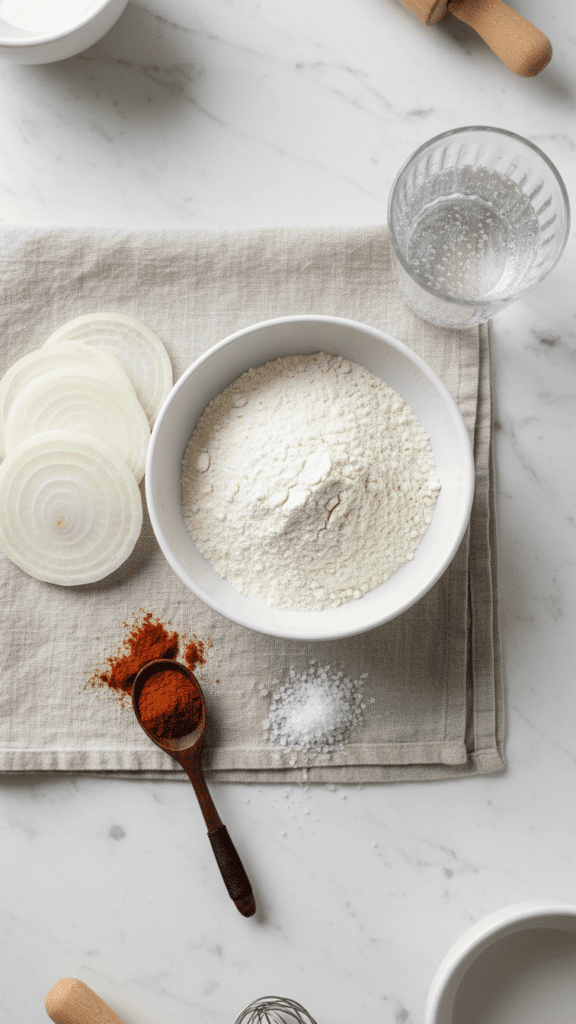
Keep it simple, keep it fresh. You probably have half of this in your cupboard already.
- 2 Large Sweet Onions: Think Vidalia or Walla Walla. We want big, juicy rings, not tiny little loops.
- 1 Cup Gluten-Free All-Purpose Flour: Make sure it has Xanthan Gum in the blend for better sticking power.
- 1/2 Cup Cornstarch: This is the secret to that “glass-like” crunch.
- 1 Teaspoon Baking Powder: For a bit of puff and lightness.
- 1 Cup Cold Sparkling Water or GF Beer: The bubbles create tiny air pockets in the batter for maximum crispiness.
- 1 Teaspoon Smoked Paprika: Gives it a subtle kick and a beautiful color.
- 1/2 Teaspoon Garlic Powder: Because everything is better with garlic.
- Salt and Black Pepper: Be generous here; onions need seasoning.
- High-Heat Oil: Canola, vegetable, or avocado oil works best for frying.
Tools & Kitchen Gadgets Used
You don’t need a fancy industrial fryer, but a few key tools make the process much smoother. You can find all of these easily on Amazon if your kitchen is looking a bit bare.
- Deep Fry Thermometer: Critical for making sure your oil doesn’t burn the rings or soak them in grease.
- Large Heavy-Bottomed Pot or Dutch Oven: Helps maintain a steady oil temperature.
- Stainless Steel Spider Strainer: The best tool for fishing those golden rings out of the hot oil safely.
- Wire Cooling Rack: Never put fried food on paper towels! Use a rack so the air circulates and keeps them crispy.
- Large Mixing Bowls: You’ll need one for the dry mix and one for the batter.
- Sharp Chef’s Knife: To get those perfect, even onion slices.
Step-by-Step Instructions
Step 1: Prep Your Onions
Peel your onions and slice them into half-inch thick rings. Don’t go too thin, or they’ll just vanish under the batter. Separate the rings and put the tiny middle bits aside for a stir-fry later. We only want the majestic outer rings for this.
Step 2: The Dry Dredge
In a small bowl, toss your onion rings with a little bit of gluten-free flour. This is the “primer” for our batter. If the onion is dry, the batter will just slide off. We want the batter to have something to grip onto.
Step 3: Mix the Magic Batter
In a separate large bowl, whisk together the GF flour, cornstarch, baking powder, paprika, garlic powder, salt, and pepper. Slowly pour in your cold sparkling water or GF beer. Whisk until it’s smooth but don’t overwork it. It should be thick enough to coat a finger but thin enough to drip slowly.
Step 4: Heat the Oil
Fill your pot with about two inches of oil. Heat it up to 350°F (175°C). Use that thermometer! If the oil is too cold, you’ll get greasy rings. If it’s too hot, you’ll get burnt outsides and raw onions. We aren’t aiming for “blackened” onions today.
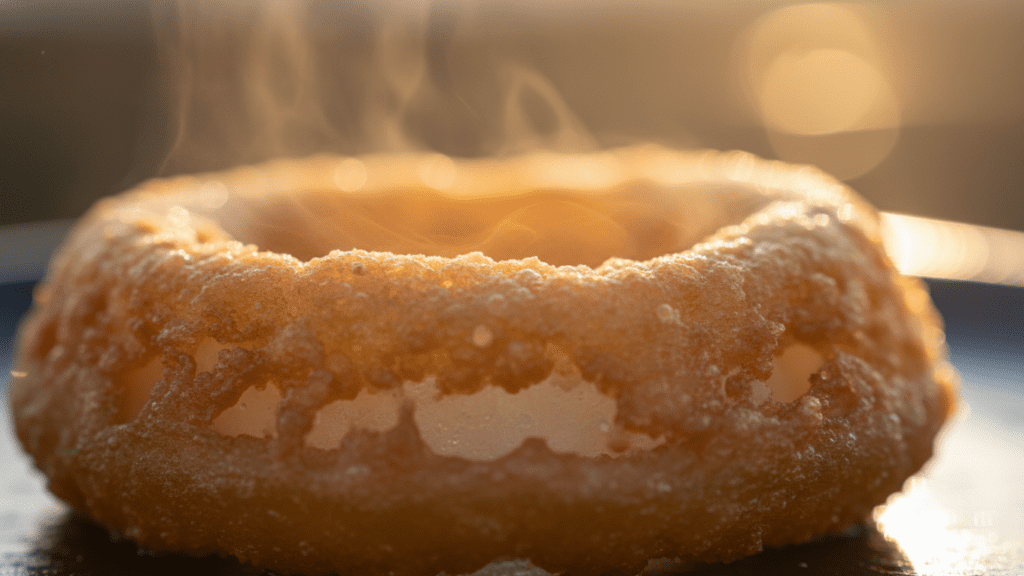
Step 5: The Dip and Fry
Dip a floured ring into the batter, let the excess drip off for a second, and carefully drop it into the oil. Do not overcrowd the pot! Fry them in small batches for about 2–3 minutes per side until they are a glorious golden brown.
Step 6: Drain and Season
Lift them out with your spider strainer and place them immediately onto the wire cooling rack. While they are still hot and glistening, hit them with an extra pinch of salt. Trust me, it makes a difference.
Calories & Nutritional Info
I’m going to be real with you—these are fried onions. We aren’t claiming this is a kale smoothie. However, here is the breakdown per serving (about 5-6 large rings):
- Calories: 280 kcal
- Total Fat: 14g (mostly from the frying oil)
- Carbohydrates: 36g
- Fiber: 2g
- Protein: 3g
- Sodium: 450mg
Common Mistakes to Avoid
Using warm liquid for the batter is a huge no-no. You want that liquid ice-cold. The temperature shock between the cold batter and the hot oil is what creates the crispy texture. If it’s room temp, you’ll end up with a soggy mess.
Crowding the pan is another classic blunder. If you put too many rings in at once, the oil temperature drops instantly. Instead of frying, the onions just boil in oil. Gross. Give your rings some personal space!
Skipping the cornstarch will result in a bread-like coating rather than a crunchy one. If you want that satisfying “snap” when you bite in, do not omit the starch.
Variations & Customizations
Want to spice things up? Try these tweaks:
- The Spicy Ring: Add a teaspoon of cayenne pepper and a dash of hot sauce to the batter. Serve with spicy mayo.
- The Keto Swap: Use almond flour and crushed pork rinds for the coating, and heavy cream instead of sparkling water. It’s a bit denser but very low-carb.
- The Herb Crust: Mix dried oregano, thyme, and parsley into the flour for a savory, Mediterranean vibe.
FAQ Section
Can I make these vegan? Yes! This recipe is naturally vegan as long as you use sparkling water or a vegan-friendly GF beer for the liquid.
What is the best onion for onion rings? Sweet onions like Vidalia or Walla Walla are the gold standard. They have a high sugar content that caramelizes beautifully when fried.
Why is my batter falling off? Usually, this happens because the onions were too wet or you skipped the initial flour dredge. Make sure the rings are patted dry before starting.
Can I use a different flour? Rice flour is a great alternative if you don’t have a GF blend, but it might be a bit more “shatter-crisp” and less substantial.
How do I reheat leftovers? Whatever you do, stay away from the microwave. Use an oven or air fryer at 350°F for about 5 minutes to bring back the crunch.
Can I air fry these? Absolutely. Spray them generously with oil and air fry at 375°F for 10-12 minutes, flipping halfway through. They won’t be as indulgent, but they’ll still be tasty.
Is cornstarch gluten-free? In its pure form, yes. Just double-check the label to ensure it wasn’t processed in a facility that handles wheat.
Final Thoughts
There you have it—gluten-free onion rings that actually hold their own against the “real” thing. You no longer have to live a life devoid of crispy, oniony goodness just because your gut hates wheat. IMO, these are better than most restaurant versions anyway because you can eat them in your pajamas.
Try them out, experiment with the spices, and let me know if you managed to save any for your family or if you ate the whole batch over the sink. No judgment here!

