
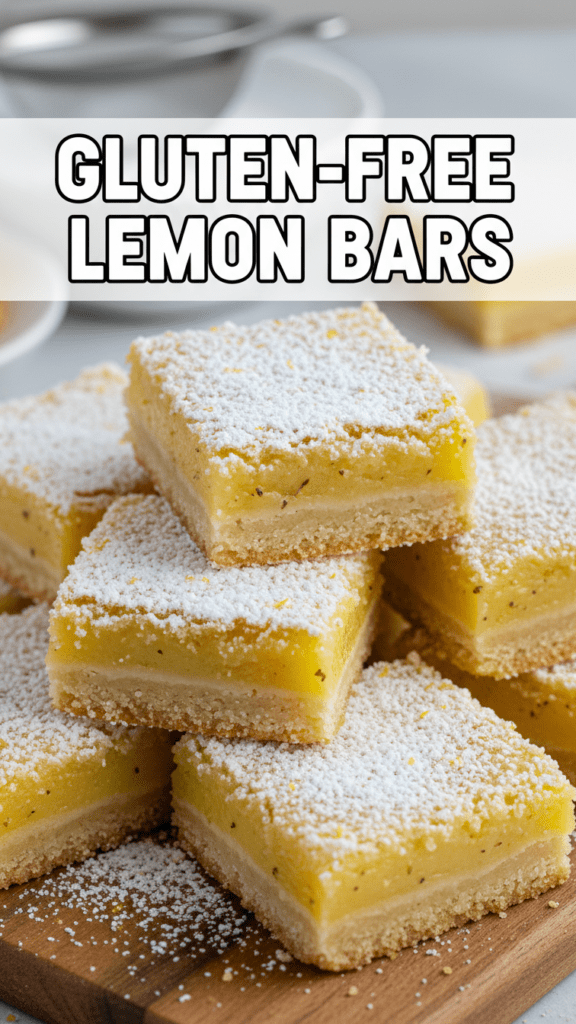
🍋 The “Pucker Up” Perfection: Mastering Ultimate Gluten-Free Lemon Bars
Let’s be brutally honest: most gluten-free desserts have the structural integrity of a sandcastle in a monsoon and the flavor profile of a dusty attic. It’s a culinary tragedy! You take one bite and suddenly you’re picking grit out of your teeth for three to five business days. But then, you stumble upon a gluten-free lemon bars recipe that actually works—a treat so zesty, so buttery, and so robust that you’ll want to write a formal apology to every lemon you’ve ever doubted.
I once served a batch of these to my most “anti-wellness” friend who thinks “gluten-free” is just a fancy way of saying “tastes like sadness.” He inhaled three of them before I told him the truth. The look of pure betrayal on his face—followed by him reaching for a fourth bar—was the highest form of praise I’ve ever received. Are you ready to stop settling for gritty, sad squares and start baking a legendary citrus masterpiece?
🏆 Why These Gluten-Free Lemon Bars Are the Actual GOAT

Why should you bother whisking eggs and zesting fruit when you could just buy a pre-made box of “lemon-flavored” cardboard at the health food store? Because these gluten-free lemon bars offer a depth of flavor that a factory simply cannot compute. We are talking about a shortbread crust that actually snaps and a curd so bright it makes the sun look dim.
This recipe is awesome because it uses the “double-bake hack” to ensure your crust stays crisp under the weight of that luscious lemon sea. It impresses guests because it looks incredibly sophisticated, yet most of the work is just meditative stirring. Plus, it’s the best excuse to use that microplane you bought three years ago and never touched. It’s basically a hug in citrus form, IMO.
🧂 The “Citrus-Elite” Ingredient List
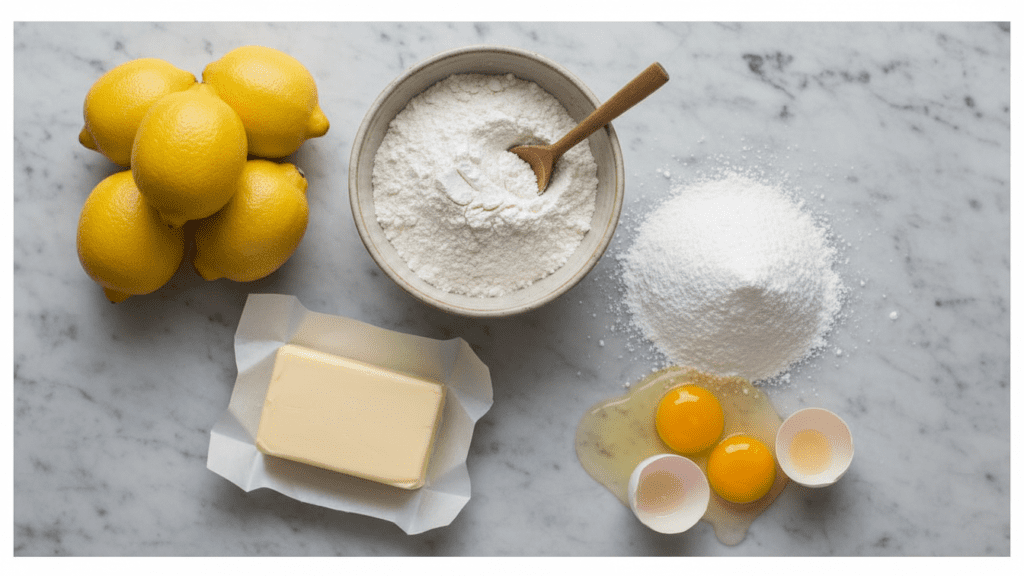

Success depends entirely on the quality of your lemons and the fineness of your flour. Don’t go cheap here, or your bars will taste like lemon-scented floor cleaner and industrial filler.
The Buttery Crust
- 1 ½ Cups Gluten-Free 1-to-1 Flour Blend: Look for one with Xanthan Gum included. It’s the “glue” wheat usually provides.
- ½ Cup Confectioners’ Sugar: For a delicate, melt-in-your-mouth texture.
- ¾ Cup Unsalted Butter: Cold and cubed. TBH, use high-fat European butter if you want to reach nirvana.
- ¼ Teaspoon Sea Salt: To make the butter flavor actually wake up.
The Zesty Filling
- 1 ½ Cups Granulated Sugar: To balance the massive amount of acid we’re about to add.
- ¼ Cup Gluten-Free 1-to-1 Flour Blend: To stabilize the curd.
- 4 Large Eggs: Room temperature, please. Cold eggs are grumpy and don’t mix well.
- ¾ Cup Freshly Squeezed Lemon Juice: (About 4-5 large lemons). No bottled juice allowed!
- 1 Tablespoon Lemon Zest: For that “hit you in the face” aromatic punch.
Key Substitutions
- Butter Swap: Use vegan butter sticks (not the tub stuff!) for a dairy-free miracle.
- Sugar Swap: You can use honey for the filling, but the texture will be stickier and less “clean.”
- Citrus Swap: Try Meyer lemons for a sweeter, floral vibe, or limes for a neon-green party trick.
🔪 Tools & Kitchen Gadgets Used
You don’t need a professional laboratory, but a few basics will keep you from having a kitchen-induced breakdown.
- 8×8 Inch Square Baking Pan: The traditional home for your bars. Check out non-stick pans here!
- Parchment Paper: CRUCIAL. To prevent “stuck bar syndrome.” Grab pre-cut sheets here!
- Electric Hand Mixer: Unless you want a forearm workout from the 1800s. Get a reliable one here!
- Microplane Zester: For that fine, fluffy zest. Check out top-rated zesters!
- Citrus Squeezer: Because manually squeezing lemons is for people with too much free time. Grab a sturdy squeezer!
👩🍳 Step-by-Step Instructions: The Path to Zesty Glory
Follow these steps precisely. Lemon bars are about the “chill,” not the rush. Patience is your most important ingredient.
1. The Crust Architecture
Preheat your oven to 350°F (175°C). Line your pan with parchment paper, leaving an overhang like a little handle. In a bowl, combine the flour, confectioners’ sugar, and salt. Cut in the cold butter with a fork or your fingers until it looks like coarse crumbs. Press this firmly into the bottom of the pan. FYI, a flat-bottomed measuring cup is the secret to a perfectly even crust.
2. The First Bake
Slide the crust into the oven for 18–20 minutes. You want it to be a pale, sophisticated gold. While that’s baking, we prepare the lemon explosion.
3. The Curd Marriage
In a large bowl, whisk the granulated sugar and ¼ cup flour together. Add the eggs one by one, whisking like your life depends on it. Pour in the lemon juice and zest. Whisk until smooth and bubbly. TBH, the smell at this stage is better than any candle you own.
4. The Pour
Remove the hot crust from the oven. Lower the heat to 325°F (160°C). Give your lemon mixture one last whisk and pour it directly over the hot crust. Why hot? Because it seals the two layers together so they don’t slide apart like a bad Tinder date.
5. The Big Bake
Slide the pan back in for 20–25 minutes. They are done when the center only has a slight jiggle (like Jell-O) and the edges are set. Do not overbake! We want silk, not scrambled eggs.
6. The Zen Chill (Crucial!)
Let the bars cool to room temperature on the counter. Then—and this is the hard part—put them in the fridge for at least 2 hours. If you cut them early, you’ll have a lemon puddle. Use this time to contemplate your life choices or clean the mountain of zest off your floor. 🙂
7. The Final Flourish
Lift the bars out using the parchment handles. Dust aggressively with extra confectioners’ sugar. Use a sharp knife (cleaned with hot water between cuts) to create perfect, Instagram-ready squares.
📊 Calories & Nutritional Info (The Justification)
Since lemons are a fruit, we can legally pretend these are health-conscious. Right?
- Estimated Calories Per Bar (1/16th): $\approx$ 190–210 kcal.
- Vitamin C: A nice little boost from the fresh juice.
- Carbohydrates: Pure energy for your next Netflix marathon.
- Healthy Fats: If using grass-fed butter (let’s just pretend we all do).
- Mood: Scientifically proven to improve by 1,000% after the first bite.
🚨 Common Mistakes to Avoid (The Citrus Crimes)
Avoid these if you want people to actually keep talking to you at the party.
- Using Bottled Juice: That stuff tastes like plastic and sadness. Fresh lemons only!
- Skipping the Fridge: Warm lemon bars have the texture of snot. LET THEM CHILL.
- Not Enough Zest: The zest is where the essential oils live. Don’t be a coward with the microplane.
- Using Grainy Flour: If your GF blend feels like sand, your crust will too. Use a superfine blend. 🙂
✨ Variations & Customizations
Make it yours, you kitchen rebel.
1. The Keto-Friendly Swap
Replace the flour with Almond Flour, the sugar with Erythritol, and the crust sugar with a splash of liquid Stevia. It’s a low-carb miracle that still hits the spot.
2. The “Fire-Breather” Version
Add ½ teaspoon of ground ginger to the crust and a pinch of cayenne to the filling. It’s a warming kick that balances the acid beautifully.
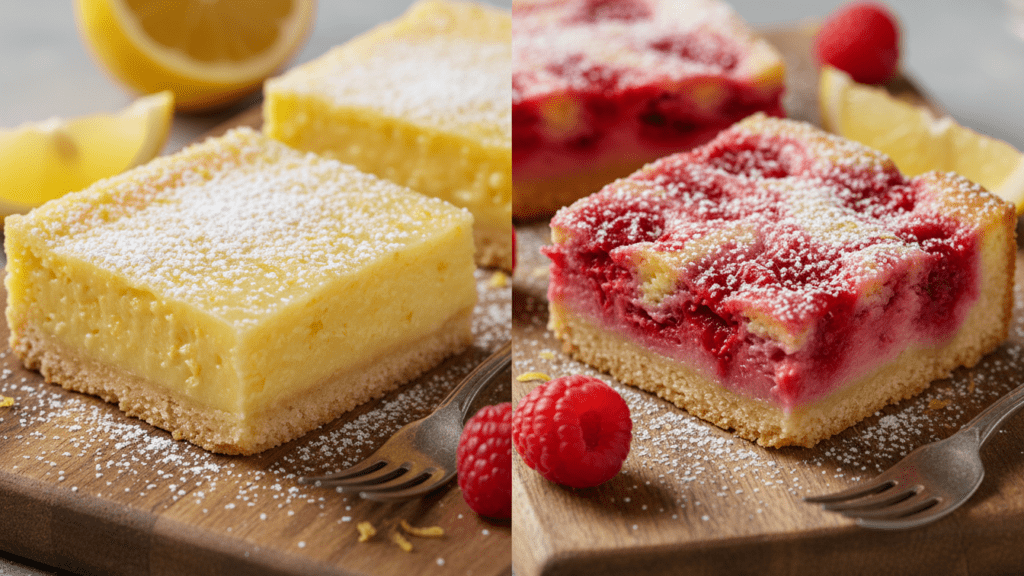
3. The Berry Blush (Vegetarian Swap)
Add 2 tablespoons of raspberry puree to the lemon filling. It turns the bars a beautiful pink and adds a sophisticated berry layer.
❓ FAQ Section: Your Lemon Bar Queries Answered
Why are my gluten-free lemon bars runny?
You likely didn’t bake them long enough or you didn’t let them chill in the fridge. The cooling process is when the eggs and starch fully set the structure!
Can I make these without an electric mixer?
You can, but you’ll need a strong arm and a lot of determination to get that sugar and eggs fully emulsified. Good luck!
How do I store gluten-free lemon bars?
Keep them in an airtight container in the fridge for up to 5 days. They actually taste even better on day two as the lemon flavor deepens!
Can I freeze lemon bars?
Absolutely. Freeze them on a tray first, then wrap them individually. They stay good for up to 3 months. Thaw in the fridge for 20 minutes before eating.
Why is there a white crust on top of my bars?
Those are just air bubbles from whisking the eggs that rose to the top. It’s totally normal and easily hidden with a heavy layer of powdered sugar!
What is the best gluten-free flour for this?
IMO, King Arthur Measure for Measure or Cup4Cup are the gold standards. They behave the most like wheat flour in high-sugar bakes.
Why did my crust crumble?
You might have used too much flour or not enough butter. Make sure you press the crust down firmly into the pan to help it bond!
🥂 Final Thoughts: Go Forth and Squeeze!
You’ve done it. You’ve successfully navigated the world of gluten-free citrus baking without ending up with a tray of sweet sand. You are now a titan of the tart and a hero of the wheat-free world. Go ahead, have that third square—it’s mostly fruit, right? Just don’t tell me if you used a microwave to melt the butter; I have a reputation to maintain. 🙂

