
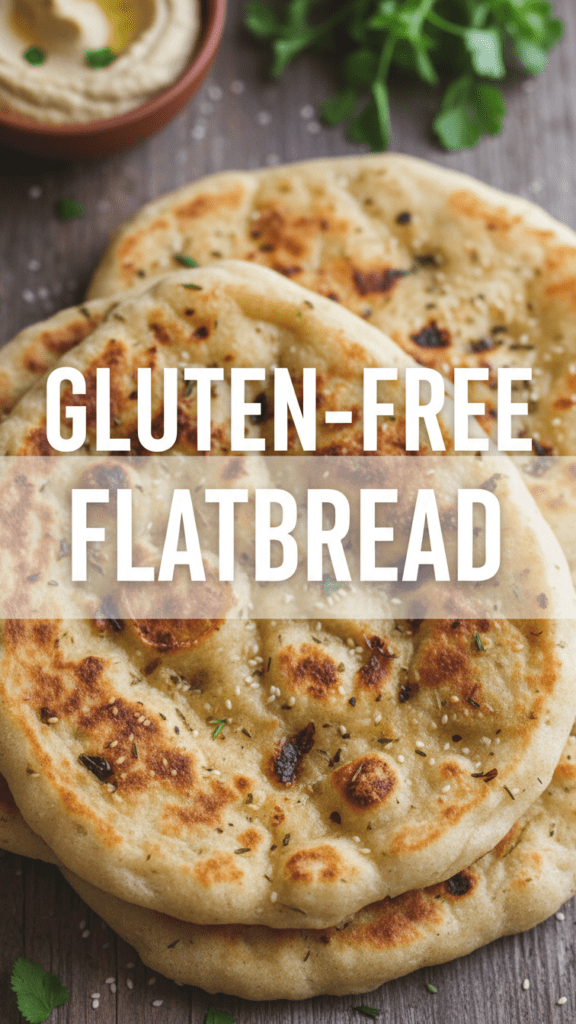
The Ultimate Soft & Foldable Gluten-Free Flatbread: No More Cardboard Cracks!
Have you ever tried to roll a delicious wrap only to have it shatter into a million dry pieces like your dreams on a Monday morning? We’ve all been there, standing in the kitchen clutching a handful of loose falafel and a pile of gluten-free flatbread dust, wondering why the universe hates our digestive systems. Honestly, finding a store-bought version that doesn’t taste like a dusty shingle is a quest more difficult than finding a decent apartment in a big city. But what if I told you that you could make a flatbread so soft, so bendy, and so pillowy that your wheat-eating friends will actually try to steal it? Put down that brittle cracker and let’s get into the kitchen.
Why This Flatbread Is the Actual G.O.A.T.

Most gluten-free bread substitutes rely on a prayer and a lot of industrial chemicals to stay together. This recipe changes the game because we use high-fat yogurt and specific binders to mimic that elusive gluten “stretch.” Why settle for a wrap that snaps when you can have one that hugs your fillings with love?
You’ll love this version because it requires zero yeast and zero waiting around for a “rise” that may or may not happen. It’s the ultimate “impress your guests” move for brunch or Mediterranean dinner parties. When you toss a fresh, steaming flatbread onto a plate, people don’t see a “special diet” food; they see an artisan craft. TBH, once you taste the difference between fresh dough and that vacuum-sealed rubber from the grocery store, you’ll realize your taco nights were previously just a series of missed opportunities 🙂
The Grocery List: The “Bendy” Essentials

Grab your shopping bags, because we are building a masterpiece. We need ingredients that play nice together to create that elusive chew. Don’t skip the specifics!
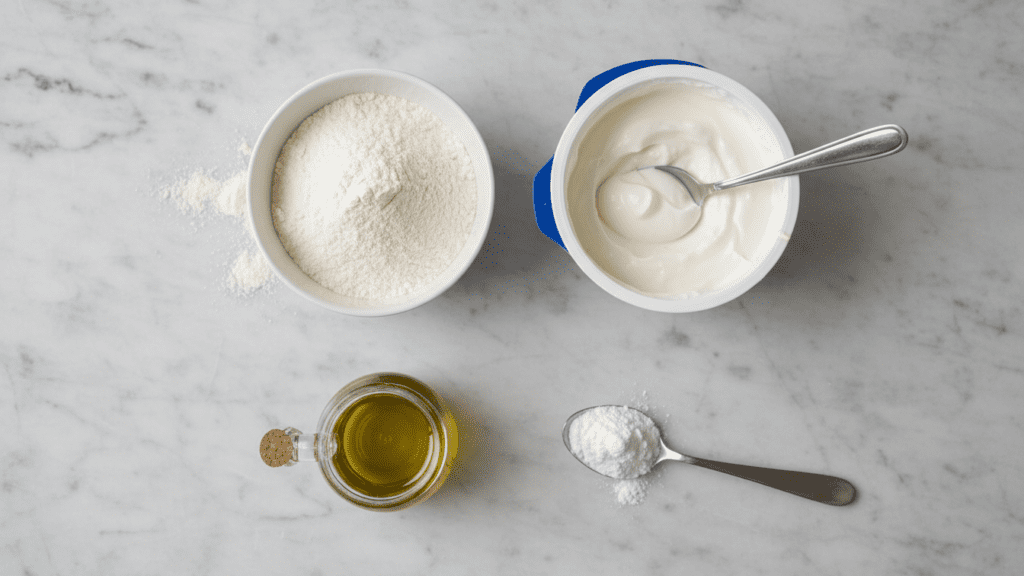
- 2 cups High-Quality Gluten-Free All-Purpose Flour (Must contain Xanthan gum; King Arthur or Bob’s Red Mill 1-to-1 are the MVPs here).
- 1 ½ cups Greek Yogurt (Full-fat is non-negotiable; we need that fat for moisture).
- 2 tsp Baking Powder (This gives us those beautiful, puffy air pockets).
- ½ tsp Salt (Because bland bread is a crime against humanity).
- 2 tbsp Olive Oil (For the pan and for a finishing brush of glory).
- 1 tsp Apple Cider Vinegar (The secret weapon for a softer crumb).
Key Substitution: If you’re dairy-free, you can swap the Greek yogurt for a thick, plain coconut or soy yogurt. Just make sure it isn’t watery, or your dough will turn into a swamp.
Tools & Gear: Your Flatbread Command Center
You can’t make silk out of a sow’s ear, and you can’t make soft bread with a blunt rock. Assemble these gadgets to ensure your kitchen doesn’t turn into a sticky disaster zone.
- Large mixing bowl (To house the doughy goodness).
- Cast iron skillet (Heat retention is everything for that perfect char).
- Rolling pin (Or a wine bottle, we aren’t judging).
- Silicone spatula (Essential for scraping the bowl clean).
- Parchment paper (The only way to move sticky dough without a meltdown).
- Pastry brush (To paint on that extra olive oil).
Step-by-Step: The Path to Pliable Perfection
Follow these steps closely. Gluten-free dough is like a sensitive ego—it needs the right amount of attention and heat.
Step 1: The Great Convergence
In your large bowl, whisk together the gluten-free flour, baking powder, and salt. Ensure there are no lumps of baking powder lurking in the shadows. You want an even distribution so your flatbread doesn’t have “salty surprises.”
Step 2: Introduce the Yogurt
Add the Greek yogurt and apple cider vinegar to the dry mix. Use your spatula to fold it all together until a shaggy dough forms. Now, get in there with your hands! Knead it for about 2 minutes until it feels like Play-Doh. If it’s too sticky, add a tablespoon of flour; if it’s cracking, add a teaspoon of yogurt.
Step 3: The Rest Phase
Divide the dough into 6 equal balls. Cover them with a clean kitchen towel and let them rest for 15 minutes. Do not skip this! The starches need time to absorb the moisture. If you try to roll them now, they’ll snap like my patience in a traffic jam.
Step 4: The Roll Out
Place a dough ball between two sheets of parchment paper. Use your rolling pin to flatten it into an 8-inch circle. Aim for about 1/4 inch thickness. If you go too thin, it becomes a cracker; too thick, and it’s a pancake. Finding the middle ground is the goal!
Step 5: The Hot Sizzle
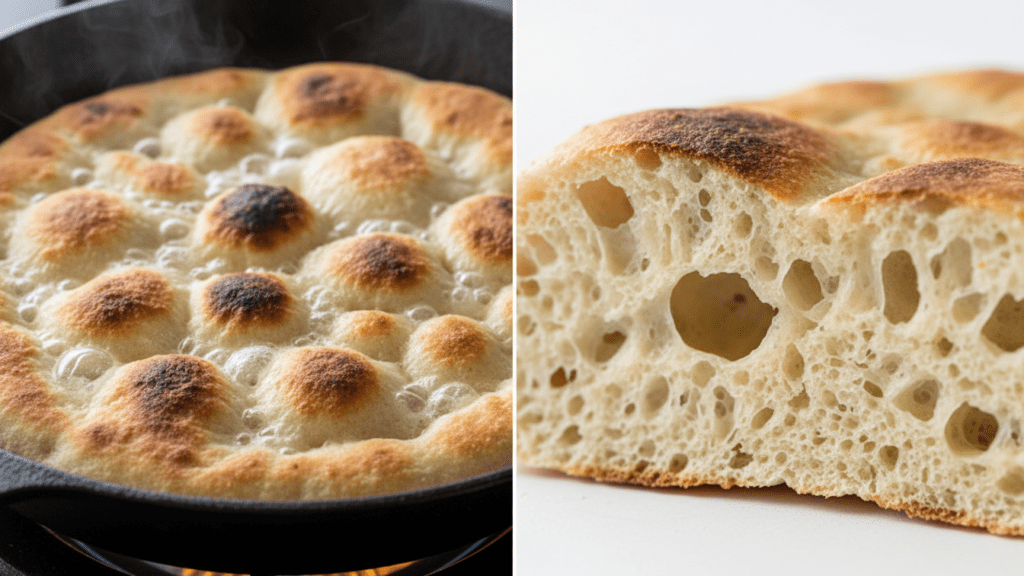
Heat your cast iron skillet over medium-high heat with a tiny drizzle of olive oil. Place the flatbread in the dry-ish pan. Cook for about 2 minutes until you see beautiful, dark brown charred spots and the top starts to bubble. Flip it and cook for another minute.
Step 6: The Steam Hug
This is the most important step: Move the hot flatbread immediately into a folded clean towel. The trapped steam softens the crust and makes it foldable. If you leave it on a plate to cool, it will turn into a giant pita-flavored rock.
Calories & Nutritional Info (Per Flatbread)
Let’s look at the numbers so you can plan your toppings accordingly. Keep in mind, these are estimates based on a 6-serving yield.
- Calories: 195 kcal
- Total Fat: 4g
- Carbohydrates: 32g
- Fiber: 3g
- Protein: 7g
- Sodium: 240mg
Common Mistakes to Avoid (Don’t Be That Person)
We’ve all made mistakes, but your lunch doesn’t have to suffer for them. Here is how to keep your flatbread on the straight and narrow.
- Using Non-Fat Yogurt: Fat is the only thing keeping this bread from becoming a dry biscuit. Use the full-fat stuff.
- Skipping the Rest: If you don’t let the dough sit, the Xanthan gum doesn’t have time to “set,” and it will crumble. Wait the 15 minutes.
- Over-flouring the Surface: If you add too much flour during rolling, the bread gets tough. Use parchment paper instead!
- Cold Skillet Syndrome: If the pan isn’t hot, you won’t get those characteristic bubbles. Wait for the sizzle.
Variations & Customizations
Once you master the basic disc, the world is your gluten-free oyster. Try these tweaks to keep things interesting.
- The Garlic Butter Special: Brush the hot flatbread with a mix of melted butter and minced garlic. It’s better than any restaurant naan you’ve ever had.
- The Herb-Crusted Delight: Mix in a tablespoon of dried rosemary and oregano directly into the dry flour for a fragrant, Italian-style wrap.
- The Spicy Jalapeño Version: Finely mince a jalapeño and knead it into the dough. It adds a slow burn that pairs perfectly with hummus.
FAQ: Your Pressing Bread Questions Answered
Why is my gluten-free flatbread so sticky? GF flour relies on starches that love water. It’s supposed to be slightly tacky! Oil your hands to shape it rather than adding massive amounts of extra flour.
Can I make this dough ahead of time? Absolutely. You can store the raw dough in the fridge for up to 24 hours. Just let it reach room temperature for 30 minutes before rolling.
How do I store the leftovers? Keep them in an airtight bag at room temperature for 2 days. To revive them, microwave for 15 seconds or toss them back on a hot pan for a few seconds per side.
Can I use almond flour instead? Not for this recipe. Almond flour behaves very differently. If you want a keto/almond flatbread, you’ll need a recipe specifically designed for those ratios.
Why didn’t my bread puff up? Your pan likely wasn’t hot enough, or your baking powder is old. Test your baking powder in a little water to make sure it bubbles before you start!
Can I bake these in the oven? You can, but they won’t be as soft. The direct heat of a skillet is what gives you that perfect bendy texture.
Is this flatbread vegan? As written, no, because of the yogurt. However, using a thick vegan Greek-style yogurt works as a great swap!
Final Thoughts
There you have it—the holy grail of gluten-free flatbread. You are now the proud owner of a recipe that actually behaves like real food. Go ahead, fill it with spicy lamb, roasted veggies, or just a mountain of cheese. Just try not to act too smug when you realize you’ll never have to buy those overpriced, cardboard store wraps again. Happy cooking, you absolute kitchen wizard!

