
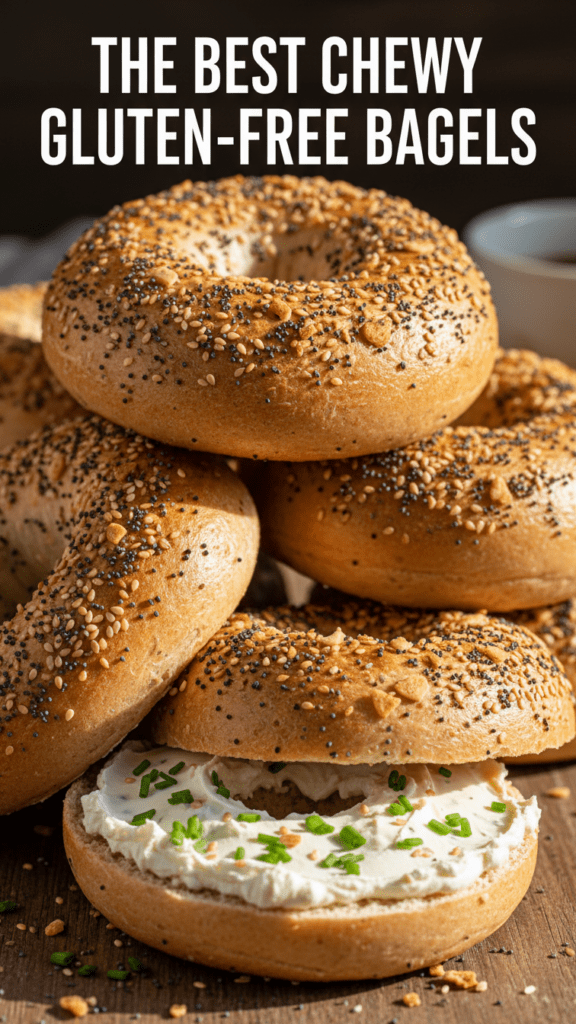
The Ultimate Gluten-Free Bagels: Because Your Cream Cheese Is Lonely
Let’s be brutally honest for a second: most store-bought gluten-free bagels have the structural integrity of a hockey puck and the flavor profile of a dusty attic. You pay eight dollars for a bag of four, toast them until they’re effectively shingles, and then cry into your expensive almond butter because they still taste like sadness. It’s a breakfast betrayal of the highest order. But what if I told you that a bagel actually exists that is chewy, golden, and won’t leave you feeling like you swallowed a brick?

I first whipped these up for a brunch where the host “forgot” that wheat makes my digestive system stage a violent protest. I had ten minutes and a bag of gluten-free flour that had been judging me from the pantry for months. Three batches later, even the die-hard sourdough lovers were asking for the recipe. This isn’t just a “safe option” for the Celiac crowd; it is objectively elite morning food. Ready to ruin standard bakery runs for yourself forever? Let’s get into the boil.
Why This Bagel Recipe Is the G.O.A.T. of Gluten-Free Baking
Why should you bother boiling dough for these gluten-free bagels when you could just eat rice cakes? Because your taste buds deserve a party, not a funeral. First off, this recipe achieves the “holy grail” of texture: a shatteringly crisp crust with an unbelievably chewy interior. We aren’t making bread with holes here; we’re making architectural masterpieces of gluten-free engineering.

Secondly, it is ridiculously easy to master. You don’t need a PhD in chemistry or a 48-hour fermentation window. It’s a straightforward “mix, boil, and bake” situation that makes you look like a Michelin-star pastry chef while you’re still in your pajamas. Plus, it impresses guests every single time—nothing says “I have my life together” like a tray of fresh, hand-rolled bagels. IMO, it’s the most empowering thing you can do with a bag of xantham gum.
The Grocery List: Clean, Simple, and Wheat-Free
Don’t overcomplicate your life by searching for rare starches harvested under a blue moon. We are using powerhouse pantry staples that actually play well together.
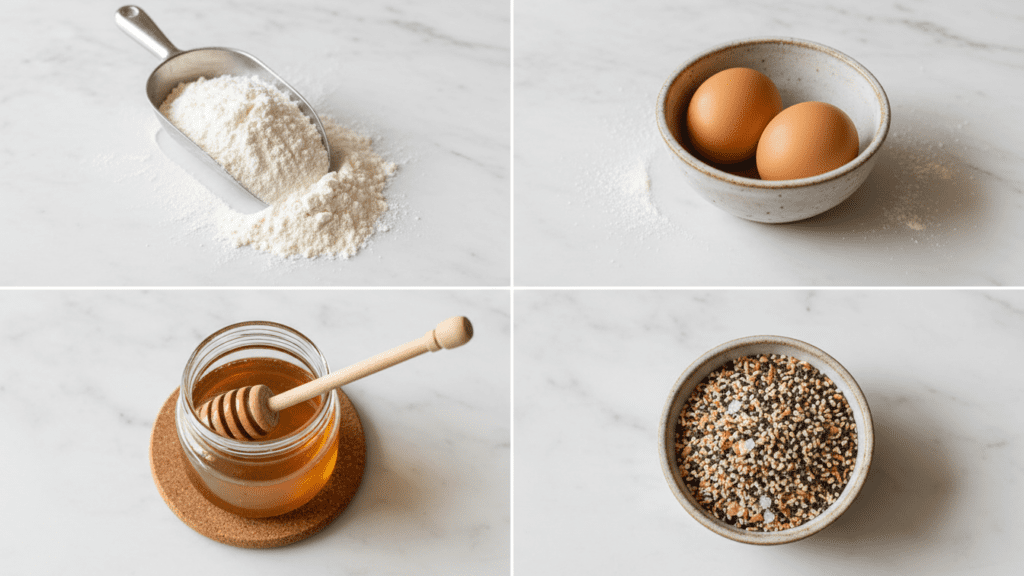
- Gluten-Free All-Purpose Flour Blend: 3 cups. Ensure it contains Xanthan Gum, or add 1.5 teaspoons if it doesn’t.
- Warm Water: 1.25 cups. Not boiling, not cold—think “nice baby bath” temperature.
- Active Dry Yeast: 1 packet (2.25 tsp). These are the tiny workers that do the heavy lifting.
- Honey or Maple Syrup: 2 tablespoons. Yeast loves sugar; it’s their version of an energy drink.
- Egg: 1 large egg for the dough, plus 1 for the wash. (The “glow-up” is real).
- Apple Cider Vinegar: 1 teaspoon. This is the secret weapon for a better rise and a slight tang.
- Sea Salt: 1 teaspoon. Because unseasoned dough is a sin.
- Everything Bagel Seasoning: For the “sparkle” on top.
Tools & Kitchen Gadgets You Need
To make this the smoothest process of your life, snag these basics. I’ve linked my favorites so you can treat your kitchen to some upgrades!
- Large Non-Stick Baking Sheet: Essential for even heat and zero sticking. Check out this professional-grade sheet on Amazon here.
- Silicone Baking Mat: The secret to a perfect bottom (for the bagel, keep it professional). These mats are a total game-changer.
- Large Stockpot: For the “dough bath.” You need room for the bagels to swim. Grab this sturdy pot here.
- Stainless Steel Slotted Spoon: Perfect for rescuing your bagels from the boiling water. Try this ergonomic model.
- Stand Mixer with Dough Hook: Because nobody has time for manual labor. This KitchenAid is the industry standard.
Step-by-Step Instructions: How to Win at Brunch
Follow these steps precisely, and please, for the love of all things savory, do not skip the “boil” phase. FYI: the boil is where the chewiness is born!
1. The Yeast Awakening
In the bowl of your stand mixer, combine the warm water, honey, and yeast. Stir gently and let it sit for about 10 minutes. If it doesn’t look like a bubbly, frothy swamp, your yeast is dead. Start over. It happens to the best of us. 🙂
2. The Liquid Marriage
Add the apple cider vinegar, one egg, and sea salt to the frothy yeast mixture. Turn the mixer on low for 30 seconds just to introduce everyone. At this point, it looks a bit weird—trust the process.
3. The Big Flour Drop
Slowly add the gluten-free flour blend. Crank the mixer up to medium and let it rip for 5 minutes. Gluten-free dough should look more like thick, sticky clay than traditional stretchy dough. If it’s too dry, add a tablespoon of water. If it’s too sticky to handle, add a sprinkle of flour.
4. The Architecture
Divide the dough into 8 equal balls. Poke a hole in the center and stretch it out until it looks like a bagel. Don’t worry about perfection; “rustic” is just a fancy word for “it tastes good anyway.” Place them on your silicone mat and let them rest for 20 minutes.
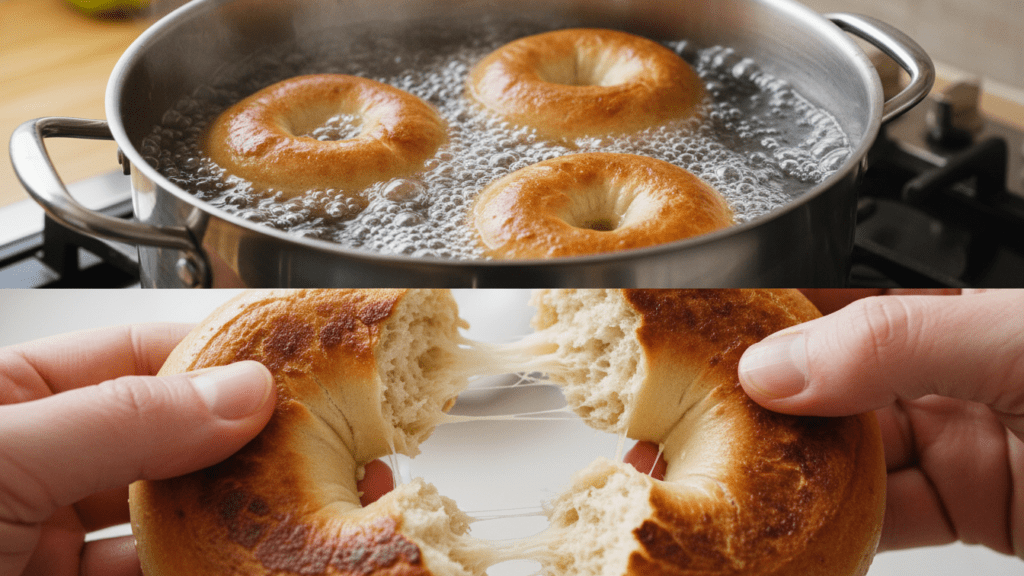
5. The Boiling Ritual
Bring your stockpot of water to a boil with a tablespoon of honey. Carefully drop 2-3 bagels in at a time. Boil for 1 minute per side. They will puff up and look a bit slimy—this is exactly what we want. This step locks in the texture!
6. The Golden Window
Move the boiled bagels back to the baking sheet. Brush them generously with the remaining egg wash and bury them in Everything Bagel seasoning. Bake at 425°F (220°C) for 20-25 minutes. You are looking for a deep, golden brown.
7. The Patience Test
Remove from the oven and let them cool for at least 15 minutes. If you cut into a hot gluten-free bagel, the steam escapes and the center turns gummy. Wait. TBH, this is the hardest part of the recipe.
Calories & Nutritional Info
For those of you who track your macros like a part-time job, here is why your body will love these:
- Calories: ~240 kcal per bagel (serves 8).
- Net Carbs: ~42g (The good kind of fuel!).
- Protein: ~6g (Thanks, eggs!).
- Fat: ~3g (Basically a rounding error).
- Fiber: ~3g (Depending on your flour blend).
Common Mistakes to Avoid: Don’t Be That Person
Even a recipe this simple can go sideways if you get cocky. Avoid these blunders to keep your kitchen dignity.
- Using Cold Eggs: Cold eggs will shock the yeast and kill the rise. Warm them up in a bowl of water first.
- Slicing Too Soon: I’m serious. The bagel finishes “cooking” as it cools. Wait the 15 minutes.
- Skipping the Boil: If you don’t boil them, you’re just making bread rolls with holes. The boil is mandatory.
- Measuring Flour by Volume: Scooping flour packs it down. Use a kitchen scale for 420g of flour if possible.
- Using Distilled Water: Yeast needs minerals. Use tap or spring water for the happiest dough.
Variations & Customizations
Feeling adventurous? Here are three ways to flip the script on these gluten-free bagels:
The Keto-Friendly Hack
Swap the flour for a mix of almond flour and mozzarella cheese (the Fathead method). It’s a different beast entirely, but it satisfies the craving without the carb-coma.
The Spicy Siren
Add a teaspoon of cayenne pepper to the dough and top with sliced jalapeños and cheddar cheese before baking. Keep a glass of water nearby. 🙂
The Cinnamon Raisin Hug
Fold in 1/2 cup of raisins and 1 tablespoon of cinnamon to the dough. Top with a sprinkle of coarse sugar for a breakfast treat that rivals any bakery.
FAQ Section: You Asked, I Answered
Why are my bagels flat? This usually happens if your water was too hot (you murdered the yeast) or you let them rise too long. Check your water temp with a thermometer!
Can I make these bagels vegan? It’s tricky because the egg provides the structure. You can try flax eggs, but the bagel will be much denser. IMO, they’re still worth eating, though.
How do I store homemade bagels? Since they have no preservatives, they only last about 2 days on the counter. Slice them and freeze them immediately for best results. They toast perfectly from frozen!
What is the best gluten-free flour to use? Look for a high-quality “1-to-1” or “Measure for Measure” blend. King Arthur and Bob’s Red Mill are the gold standards in my kitchen.
Do I have to use honey in the water? You can skip it, but the honey helps the bagels develop that classic shiny, golden crust. It’s the difference between “good” and “gourmet.”
Can I use a bread machine? Absolutely. Just use the “Dough” setting and take them out before the bake cycle starts. You still have to do the boiling part yourself!
Why is my dough so sticky? Gluten-free dough is naturally stickier than wheat dough. Oil your hands when shaping the bagels to make it a mess-free experience.
Final Thoughts
There you have it. A gluten-free bagels recipe that actually respects your time and your taste buds. They’re smoky, they’re fresh, and they’re the only reason I’m willing to interact with people before 10:00 AM. Once you make these, you’ll realize that store-bought frozen pucks are just a sad, expensive lie. Go forth, boil some dough, and enjoy the golden glory. Just don’t be surprised when your “gluten-eating” friends start raiding your freezer. 🙂

