The Ultimate Roasted Garlic Guide: How to Turn a Stinky Bulb Into Literal Kitchen Gold
We have all been there. You walk into a kitchen, and the air is thick with a scent so heavenly it could make a vampire reconsider their life choices. You look at the host, and they’re casually spreading a creamy, pale-gold paste onto a piece of crusty bread like it’s no big deal. You take a bite, and your brain basically short-circuits. “Is this butter?” you ask. “No,” they smirk, “it’s just garlic.”
Honestly, if you aren’t currently roasting entire heads of the stinking rose to the point of structural collapse, are you even living your best foodie life? It is the ultimate kitchen hack for the chronically unimpressed. I once brought a jar of roasted garlic cloves to a housewarming party, and people ignored the expensive charcuterie board just to get a hit of that sweet, mellow nectar. Ready to stop being a victim of raw, pungent “garlic breath” and start winning at life? Let’s get roasting. 🙂
Why This Recipe is Actually Awesome
Why should you bother roasting garlic when you could just throw a minced clove into a pan for thirty seconds? First off, the flavor profile is a masterclass in transformation. Raw garlic is aggressive, spicy, and frankly, a bit rude. Roasted garlic is sweet, caramelized, and has the creamy consistency of soft brie. It is the culinary equivalent of watching a heavy metal drummer suddenly play a flawless harp solo—pure magic.
TBH, the ease of cooking is the real hero here. You don’t need a degree from a fancy French school or even a clean fork. You basically just cut the top off a bulb and ignore it in the oven for an hour while you catch up on your latest binge-watch. It impresses guests every single time because they assume you’ve mastered some complex slow-cooking technique, while you secretly know it took less effort than boiling an egg.
Our Top Pick

Papier Herb Garden Recipe Journal - Hardback Design
Capture your culinary ideas and favorite memories with this beautifully designed recipe journal. Organized sections for breakfast, lunch, dinner, and treats make it easy to record recipes, ratings, dietary notes, and cooking tips, along with measurement and conversion guides. Extra pages let you list favorite restaurants, shops, and places to try. Crafted with a premium hardback cover, luxurious 100gsm paper, and a gold foil accent, it’s both durable and stylish. Thoughtfully designed to suit any kitchen, it makes a practical, timeless gift for family, friends, or yourself.
Plus, let’s talk about the versatility. You can smear it on steak, whisk it into salad dressings, or just eat it with a spoon (no judgment here). It’s efficient, it’s flashy, and it makes your house smell like a boutique Italian villa. What more could you want from a root vegetable?
The “Vampire Repellent” Ingredient List
Don’t go hunting for rare organic dust in the deep woods. You just need the basics, but make sure they are high-quality to avoid a bitter disaster.
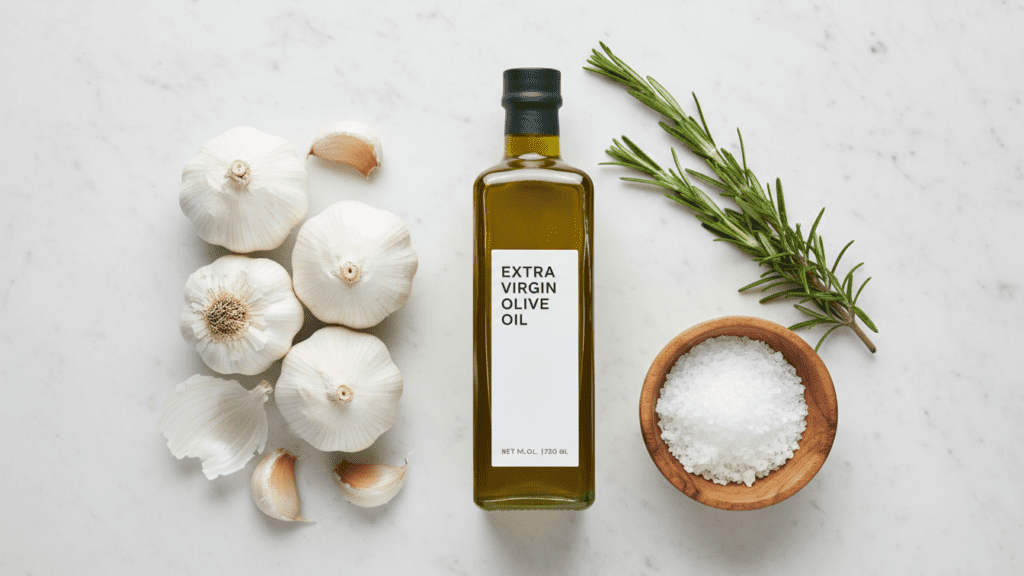
- Whole Heads of Garlic: Grab four or five. Trust me, you’ll want more than you think. Look for firm bulbs with tight, papery skins.
- Extra Virgin Olive Oil: Two tablespoons. The better the oil, the better the final “jam.”
- Sea Salt: A generous pinch to unlock the sweetness.
- Fresh Thyme or Rosemary (Optional): If you want to feel like a high-end herb gardener.
- Pinch of Black Pepper: For a tiny bit of “zing.”
Tools & Kitchen Gadgets You’ll Need
To dominate the garlic roasting game, you need the right hardware. Trying to roast these without a proper seal is a one-way ticket to “burnt carbon city.”
- Sharp Chef’s Knife: To decapitate the bulbs with precision and grace.
- Aluminum Foil: The classic “enclosed pouch” method never fails.
- Small Ramekin or Garlic Baker: If you’re feeling particularly fancy and want to save on foil.
- Baking Sheet: To catch any oil drips that might escape and ruin your oven.
- Mini Spatula or Butter Knife: For the final “squeeze and spread” ceremony.
Step-by-Step Instructions
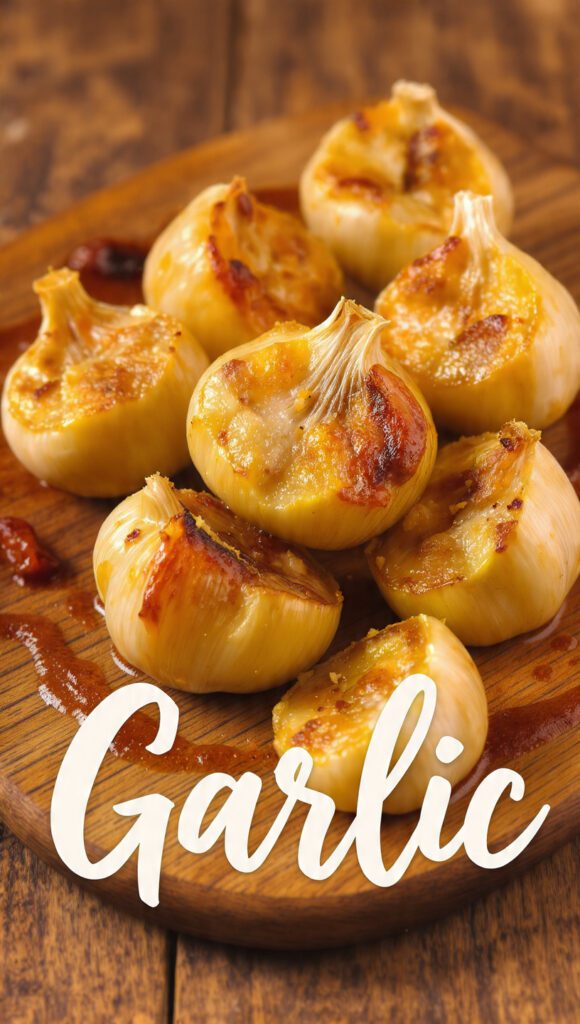
Step 1: The Great Decapitation
Preheat your oven to 400°F (200°C). Take your whole heads of garlic and peel away the loose, outer layers of paper—but leave the individual cloves tucked inside their skins. Use your sharp knife to slice about a quarter-inch off the top of the bulb, exposing the raw “eyes” of the cloves. FYI, don’t throw away those little garlic tops; toss them into a freezer bag for your next homemade stock!
Step 2: The Oil Anointing
Place your decapitated bulbs onto a large square of aluminum foil. Drizzle each exposed head with a generous amount of olive oil. You want the oil to seep down between the cloves like a delicious, greasy hug. Sprinkle with your sea salt and pepper.
Step 3: The Airtight Seal

Fold the foil up and over the garlic, crimping the edges to create a tight, sealed pouch. We want the garlic to steam and roast in its own juices. If you leave a hole, the tips will burn and taste like a tire fire. :/
Step 4: The Patient Wait
Place the foil packet on a baking sheet (just in case of leaks) and slide it into the oven. Roast for 45 to 60 minutes. This is where the magic happens. Your kitchen will start to smell so good that your neighbors might actually knock on the door with empty plates.
Step 5: The Quality Control Test
Stop the oven and carefully open the pouch. Be careful of the steam—it’s hot and very enthusiastic! Your garlic should be deep golden brown and feel as soft as room-temperature butter when poked with a knife. If it’s still pale, seal it back up and give it another 10 minutes.
Our Top Pick

LuBudingJoy Blank Recipe Book
B5 Blank Recipe Book – Create and organize your favorite recipes in one beautiful place. This hardcover recipe book (10" × 7.3") features 150 blank pages and includes DIY category stickers. Designed with conversion charts, content tables, and a back pocket for loose notes.
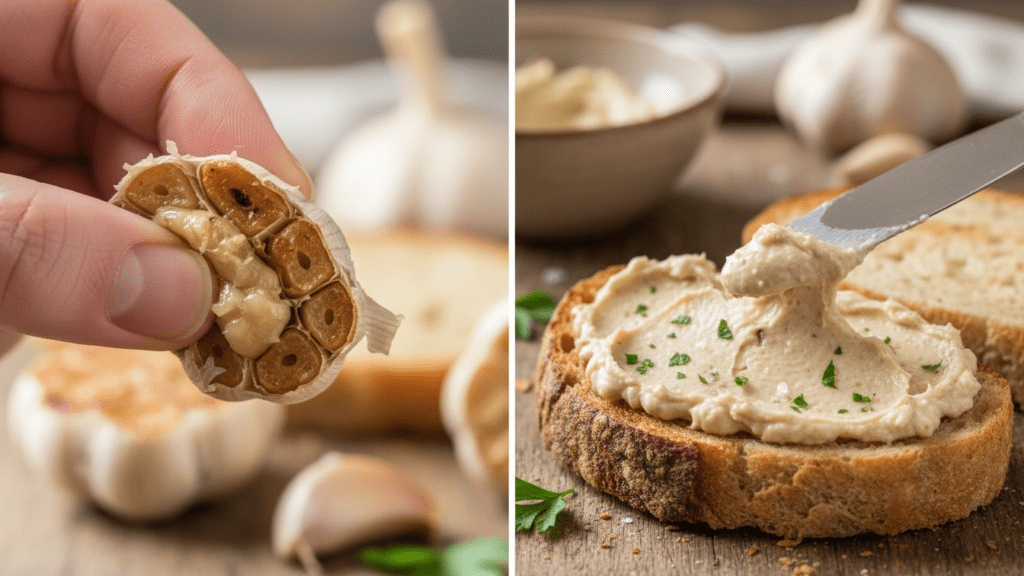
Step 6: The Big Squeeze
Let the bulbs cool until you can handle them without screaming. Now comes the most satisfying part: hold the bulb by the base and squeeze. The caramelized cloves should pop right out of their skins like toothpaste from a tube. Mash them into a paste and try not to eat the entire batch before dinner. 🙂
Calories & Nutritional Info
You are eating a “superfood,” which basically gives you a free pass on the bread you’re smearing it on:
- Calories: Approximately 40-60 kcal per whole roasted head (mostly from the oil).
- Allicin Power: Great for your heart, though slightly reduced after roasting.
- Fiber: 1g per head (every little bit helps!).
- Healthy Fats: From the olive oil to keep your skin glowing.
- Happiness Factor: 100%.
Common Mistakes to Avoid
- Using Old Garlic: If you see green sprouts in the center, the roasted result will be bitter and angry. Buy fresh bulbs.
- Skimping on the Oil: If the heads are dry, they won’t caramelize; they’ll just shrivel. Drown them slightly.
- High Heat, Short Time: If you crank the oven to 450°F, you’ll burn the outside before the center is soft. Low and slow is the pro move.
- Skipping the Foil: Without a cover, the garlic becomes tough and leathery. Seal the deal.
- The “Clean-Up Later” Lie: If you let the roasted skins sit in the foil for days, they will glue themselves to your counter. Toss the trash immediately. IMO, it’s the only way to live. 🙂
Variations & Customizations
Feeling a bit adventurous? Try these three spins on the classic roast:
The “Spicy Umami”
Drizzle the bulbs with a mix of olive oil and Sriracha before roasting. Add a splash of soy sauce at the end. It’s a salty, spicy, funky masterpiece that goes perfectly on grilled salmon.
The “Herby Provence”
Tuck fresh sprigs of thyme, rosemary, and bay leaves into the foil pouch. The garlic will absorb the floral notes of the herbs, making it taste like a vacation in the South of France.
The “Maple Glaze”
Add a teaspoon of maple syrup to the olive oil. The sugar in the syrup accelerates the caramelization and creates a sweet-and-savory paste that is life-changing on a turkey sandwich. TBH, this is my personal favorite version. 🙂
FAQ Section
How do I store roasted garlic? Squeeze the cloves into a small glass jar and cover them with a layer of olive oil. They will stay happy in the fridge for up to two weeks.
Can I freeze roasted garlic? Absolutely! IMO, the best way is to mash the cloves and freeze the paste in ice cube trays. Pop a cube out whenever your pasta sauce needs a soul.
Why is my roasted garlic bitter? You likely burnt it or used garlic that was past its prime. Next time, check it at the 45-minute mark and ensure your foil seal is air-tight!
Do I have to use olive oil? You can use avocado oil or melted butter, but olive oil provides that classic Mediterranean depth that makes people weep with joy.
Is roasted garlic good for your breath? TBH, it’s much milder than raw garlic, but you’re still going to smell like a kitchen. Carry mints or just make sure everyone you love eats the garlic too.
Can I roast garlic in an air fryer? Yes! Wrap it in foil and “air fry” at 380°F for about 20-25 minutes. It’s faster, but the oven provides a deeper caramelization.
What is the best way to peel garlic for roasting? Don’t peel it! The skins act as a little oven for the cloves. Just slice the top off and let the skins do the work.
Final Thoughts
There you have it—a bowl-licking good guide to the only garlic recipe that won’t make you regret your life choices at 3:00 PM the next day. It’s sweet, it’s creamy, and it’s a brilliant way to trick your brain into thinking you’re a professional chef.
Go ahead, give it a shot this weekend. And hey, if you end up with a golden garlic mustache and your cat looking at you with judgment, just remember: you’re a roasting legend now. Tag me in your “squeeze” videos, or just sit in your caramelized bliss. Happy roasting!