

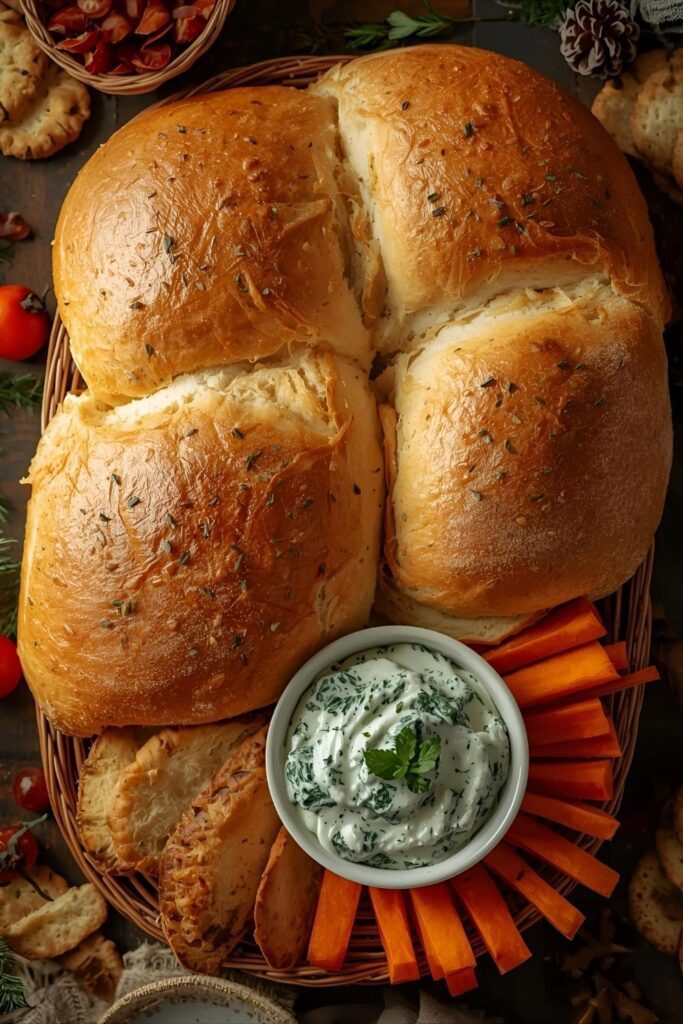
Beyond the Basket: Easy and Edible Festive Bread Baskets
Let’s be honest. The bread basket is usually the most boring part of the holiday table. It’s filled with generic rolls, maybe some sliced baguette, and definitely no excitement. This year, we’re taking the concept and turning it on its head. We’re making festive bread baskets—edible containers made of delicious, herby dough, ready to be filled with dips, rolls, or even a mini salad. It’s a spectacular showstopper that is surprisingly easy to pull off and creates zero dishwashing guilt. Seriously, who needs a ceramic bowl when you can eat the bowl?
Why This Recipe Is the MVP of Your Holiday Table

Why should you spend your time baking an edible basket? Because it instantly elevates your meal from meh to magnificent. The presentation alone is worth the effort, and the taste is fantastic—think soft, slightly chewy bread with a golden, herby crust. This hack is perfect for serving dips, holding small appetizers, or even just filling with more bread. Plus, you get to eat your serving vessel. That’s sustainable, right? It’s the ultimate edible party favor.
Ingredients: Your Shopping List for Edible Art
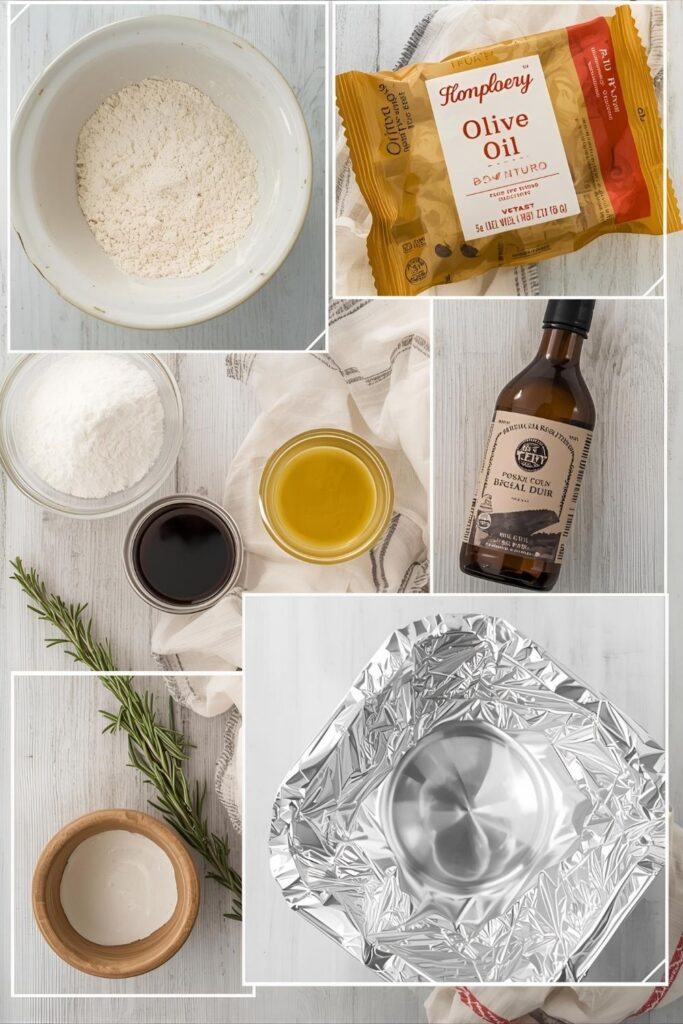
You can use your favorite basic bread dough recipe, but we’re going with a quick, dependable version that works perfectly for shaping.
- 1 packet (2 ¼ teaspoons) active dry yeast.
- 1 cup warm water (105-115°F).
- 1 tablespoon granulated sugar.
- 1 teaspoon salt.
- 3 cups all-purpose flour.
- ¼ cup olive oil.
- 1 large egg.
- For the Herby Coating:
- 2 tablespoons olive oil.
- 1 tablespoon fresh rosemary, chopped.
- 1 teaspoon flaky sea salt.
Tools & Kitchen Gadgets You’ll Need
- Large mixing bowl.
- Whisk and measuring cups/spoons.
- Rolling pin.
- Large oven-safe bowl (about 8-10 inches wide). This will be your mold.
- Aluminum foil. To cover the mold.
- Baking sheet.
Step-by-Step Instructions: Shaping Your Edible Basket

Ready to make some magic? Follow these steps, and you’ll be a bread basket pro in no time.
H3: Making the Dough
- Activate the yeast. In your large mixing bowl, whisk together the warm water, yeast, and sugar. Let it sit for about 5-10 minutes until it foams.
- Mix the dough. Whisk in the olive oil, egg, and salt. Gradually add the flour, mixing until a shaggy dough forms.
- Knead. Turn the dough out onto a lightly floured surface and knead for 5-7 minutes until it’s smooth and elastic.
- First rise. Place the dough in a lightly oiled bowl, cover it, and let it rise in a warm place for 1 to 1.5 hours, or until it has doubled in size.
H3: Shaping the Basket
- Prep the mold. Flip your oven-safe bowl upside down. Cover the outside of the bowl entirely with aluminum foil. Then, grease the foil generously with cooking spray or oil. This is crucial—you don’t want the bread sticking!
- Roll and shape. Punch the risen dough down to release the air. Roll it out into a large circle, about 16-18 inches in diameter. It should be thinner than a standard pizza crust.
- Drape the dough. Carefully lift the dough and center it over your greased foil-covered mold. Gently press the dough against the sides of the bowl. Trim the excess dough at the bottom (you can use the scraps to make decorative braids or leaves).
- Add the herby coating. Brush the entire outside surface of the dough with the 2 tablespoons of olive oil, then sprinkle with the chopped rosemary and flaky sea salt.
- Second rise. Loosely cover the dough-covered mold with a clean kitchen towel or plastic wrap. Let it rise for a second time for 30 minutes.
H3: Baking and Finishing
- Bake the basket. Place the mold (on a baking sheet for stability) into a preheated oven at 375°F (190°C). Bake for 25-35 minutes, or until the bread is a deep golden brown and sounds hollow when tapped.
- Cool and remove. Carefully remove the baking sheet. Let the bread basket cool on the mold for about 15 minutes. Then, gently lift the bread off the mold and flip it right-side up. If the foil sticks, you can peel it off carefully.
- Serve! Fill the cooled bread basket with your favorite rolls, dips, or appetizers.
Calories & Nutritional Info
Since this is a large, shared bread, these are approximate values per 1/10 of the bread basket.
- Estimated Calories per serving (1/10th of basket): ~200-250 calories
- Carbs: ~35-45g
- Fat: ~5-8g
- Dietary Note: This is a fantastic source of carbohydrates and a great base for many holiday dishes. The olive oil is a source of healthy monounsaturated fats.
Common Mistakes to Avoid (Unless You Want a Flop)
- Not greasing the mold enough. The bread will stick to the foil, and you will cry. Grease it heavily. Use oil, not butter, as butter can burn.
- Overworking the dough during shaping. Handle the dough gently when draping it over the mold. If you stretch it too thin, it might tear or rise unevenly.
- Slicing it while it’s hot. I know it’s tempting, but slicing it while it’s hot will cause it to fall apart. Let it cool completely for clean slices.
- Using a non-oven-safe bowl. Use a ceramic or metal bowl that can handle the heat. Plastic is obviously a huge no-no.
Variations & Customizations: Be a Baking Innovator
You can easily tweak this recipe to fit your taste. Don’t be afraid to add your own flair!
- Cheesy Pull-Apart Basket: Before draping, cut the rolled-out dough into 1-inch squares, then dip each square in a mix of melted butter, garlic, and Parmesan cheese. Re-form the shape on the mold. The pieces will easily pull apart after baking.
- Sweet Cinnamon Sugar Bowl: Replace the rosemary and salt with a mixture of cinnamon sugar. Brush the finished bread with a sugar glaze after baking. Fill it with fruit salad or sweet rolls.
- Savory Onion and Poppy Seed: Add ½ cup caramelized onions to the dough before the first rise. Brush with an egg wash and sprinkle with poppy seeds before baking.
FAQ Section: All Your Bread Basket Questions Answered
What kind of bowl is best for the mold? A wide, shallow, oven-safe ceramic or metal bowl works best. Look for one that is about 8-10 inches wide.
Can I make the dough ahead of time? Yes! After the first rise, punch the dough down, wrap it tightly, and refrigerate it for up to 24 hours. Bring it to room temperature for about 1 hour before rolling and shaping.
Why did my bread stick to the foil? You didn’t grease the foil enough, or you used butter, which can melt away. Use oil or cooking spray and apply generously.
Can I freeze the finished bread basket? Yes! Once the bread is completely cooled, you can wrap it tightly in plastic wrap and then foil. It will keep in the freezer for about 3 months. To reheat, thaw and pop it in a hot oven for a few minutes.
How do I serve dips in a bread basket? Place a piece of parchment paper or a large lettuce leaf inside the basket before adding the dip. This keeps the inside of the bread from getting soggy immediately.
What is the best way to slice and eat the bread basket? Slice it into wedges like a pizza, or just let people tear off pieces of the sides. The crusty edges are the best part!
What are some good fillings for a festive bread basket? Garlic bread sticks, dinner rolls, a spinach artichoke dip, a creamy hummus, or a simple garden salad all work great.
Final Thoughts
And there you have it. You now possess the power to banish boring bread baskets forever and replace them with edible works of art. These festive bread baskets are the perfect solution for anyone who wants to impress their guests without spending hours cooking. Go forth, get baking, and prepare to receive all the compliments you deserve. You’ll never serve bread in a regular basket again.

