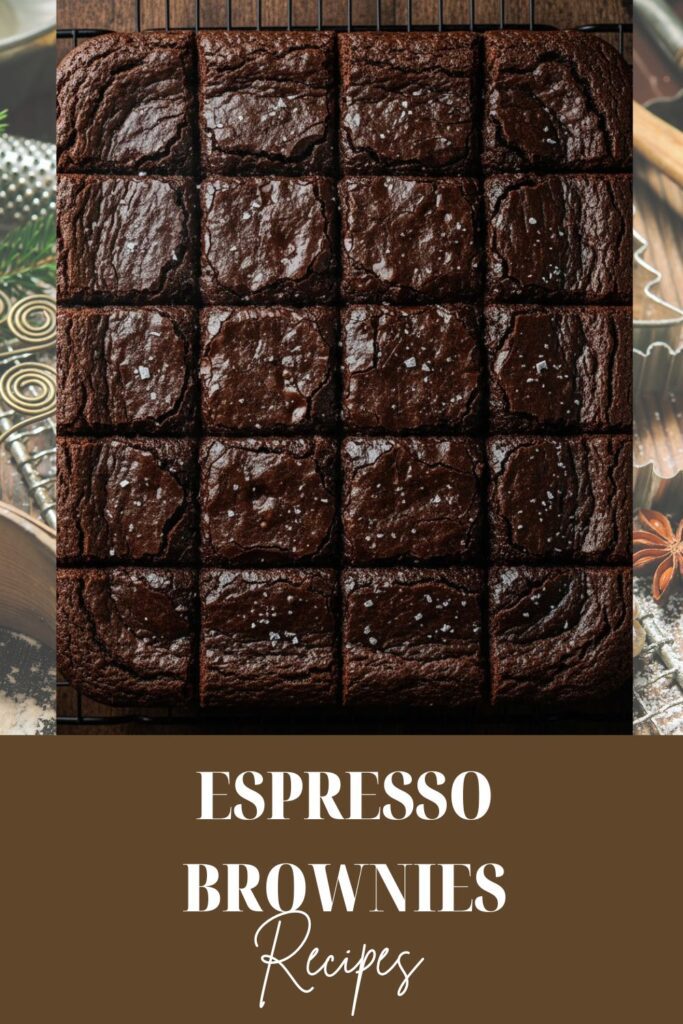
The Only Espresso Brownies Recipe You’ll Ever Need (Seriously, Ditch the Box)
That Time I Accidentally Became a Brownie Guru
Okay, real talk. Has your week been… a lot? Mine too. Last Tuesday, I stared at my sad, deflated face in the mirror and realized my usual emergency chocolate stash just wasn’t going to cut it. I needed an intervention, specifically one involving caffeine and a deep, dark chocolate flavor. I grabbed my espresso powder, threw it into a brownie mix, and what happened next was nothing short of miraculous. My friends, this isn’t just a brownie recipe; it’s a personality upgrade. These Espresso brownies are so fudgy and rich, they basically demand you put on a velvet robe and listen to classical music while eating them. Do you want basic, flat, cakey squares? Didn’t think so.
Why This Recipe is Your New Obsession
Why should you bother making these instead of, say, stealing one from a bakery? Because this recipe is stupid easy and tastes like a million bucks. We’re talking about a brownie so decadent, it makes the store-bought versions look like cardboard. The secret? That hit of espresso powder doesn’t actually make them taste like coffee (unless you use a whole jar, which, TBH, I won’t judge); it just turbo-charges the chocolate. It deepens the cocoa flavor, making it intensely dark and unbelievably fudgy. Plus, you get a beautiful, crinkly, crackly top—the holy grail of brownies—and a center that’s pure, gooey bliss. Impress guests? Please. You’ll impress yourself. They take mere minutes to prep, so you can go from “I need chocolate” to “I am a baking goddess” in about 45 minutes. Win-win, right?
🍫 The Essential Lineup of Ingredients

You’ve probably got most of this lurking in your pantry already. If not, consider it an investment in future happiness. IMO, don’t skimp on the chocolate here!
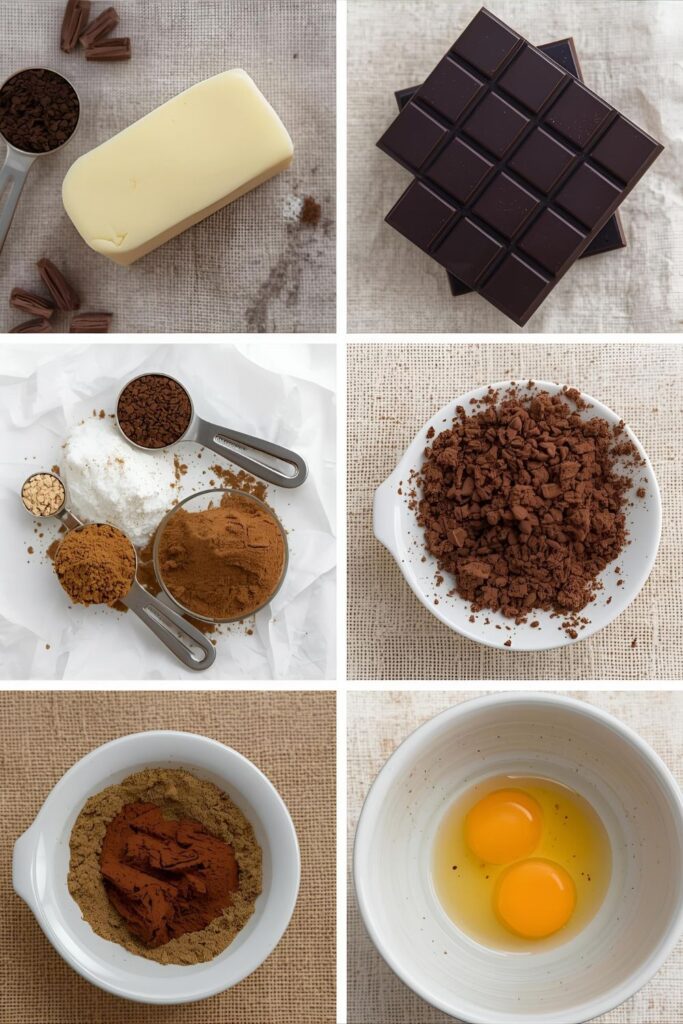
- 1 cup (2 sticks) Unsalted Butter: Melted, of course. Don’t try to be fancy with softened butter; we need liquid gold.
- 4 oz Unsweetened Chocolate: This is where the real chocolate flavor lives.
- 1 3/4 cup Granulated Sugar: Yes, it’s a lot. We’re making brownies, not health food.
- 1/2 cup Packed Light Brown Sugar: Hello, chewiness!
- 3 Large Eggs: Bring them to room temperature. It helps with that shiny top. Trust me.
- 1 Tablespoon Vanilla Extract: Real vanilla, not the imitation stuff. Your brownies deserve better.
- 2 Tablespoons Instant Espresso Powder (Finely Ground): The MVP. FYI, this is the key to deep chocolate flavor.
- 3/4 cup All-Purpose Flour: Just enough to hold the fudge together.
- 1/2 cup Unsweetened Cocoa Powder: Dutch-process gives a darker color and richer flavor.
- 1/2 teaspoon Salt: It’s a flavor enhancer! Don’t skip it, or your brownies will taste flat.
- 1 cup Semi-Sweet or Dark Chocolate Chips: Optional, but are you really going to say no to more chocolate?
Substitutions Notes:
- You can swap in salted butter, but cut the added salt down to 1/4 teaspoon.
- Use a darker chocolate (like 70% cacao) for an even more intense flavor profile.
- Gluten-free? Use a good quality 1:1 gluten-free flour blend.
🛠️ Tools & Kitchen Gadgets Used
This is your excuse to finally buy that cute spatula. Don’t deny yourself.
- 8×8 Inch Metal Baking Pan: Metal conducts heat best for those perfect edges.
- Parchment Paper: Cut it so it hangs over two sides—a sling for easy removal. Trust me, it’s a lifesaver.
- Medium Saucepan: For melting butter and chocolate.
- Large Mixing Bowl: You need room to whisk like a maniac.
- Whisk or Electric Hand Mixer: Whisking is good for your arms, but an electric mixer is faster. Your call.
- Rubber Spatula: For scraping down the sides and folding in the dry ingredients.
- Measuring Cups and Spoons: Precision is key in baking, you rebel.
- Wire Cooling Rack: Let those bad boys cool properly so they don’t implode.
👩🍳 Step-by-Step Instructions (No Drama, Just Fudge)
You’re about to make magic happen. Follow these short, punchy steps, and don’t panic.
- Prep Your Pan and Oven: Preheat your oven to 350°F (175°C). Grease your 8×8 inch pan and line it with parchment paper, leaving an overhang. Do this right now. Don’t wait.
- Melt the Chocolate: In your saucepan, melt the butter and unsweetened chocolate together over low heat. Stir constantly until smooth and fully combined. Remove it from the heat once melted.
- Add the Sugars: Dump in the granulated and brown sugars. Stir them into the warm chocolate mixture until they look grainy and somewhat dissolved. The batter should still be warm, but not hot enough to cook an egg (so, let it cool for a minute if it’s steaming).
- Whisk the Wet Ingredients: Now, whisk in your eggs one at a time. Add the next egg only once the first is completely incorporated. Then, whisk vigorously for about a minute. This aeration is essential for that coveted crinkly top! Stir in the vanilla extract and espresso powder.
- Combine the Dry Ingredients: In a separate medium bowl, whisk together the flour, cocoa powder, and salt. Seriously, whisk them well. Nobody wants a pocket of unmixed salt.
- Fold It In: Gently pour the dry ingredients into the wet mixture. Use a rubber spatula to fold them in until just combined. Stop mixing as soon as you see no streaks of flour left. Overmixing equals tough, cakey brownies, and we have standards.
- Final Chocolate Boost: Fold in the chocolate chips (if using). Pour the beautiful, thick batter into your prepared pan.
- Bake the Magic: Bake for 25-30 minutes. You want a toothpick inserted near the center to come out with moist, sticky crumbs, not raw batter, but definitely not clean. A clean toothpick means dry, sad brownies. You wouldn’t do that to yourself, would you?
- Cool Down (The Hard Part): Pull the pan out and let it cool completely on a wire rack before cutting. Yes, completely. At least an hour, or, TBH, stick it in the fridge. Cutting warm brownies is a one-way ticket to a crumbled mess. Use your parchment paper sling to lift them out, slice them up, and then bask in the glory.
📊 Calories & Nutritional Info
Listen, you didn’t click on an espresso brownie recipe looking for a diet plan, but I respect you for asking. This is an estimate for one generous 2-inch square (assuming you cut the 8×8 pan into 16 squares).
- Estimated Calories Per Serving (1/16th of the pan): Approximately 250-280 calories.
- Key Nutritional Notes (Estimated):
- High in Sugar (Duh).
- Good source of Fiber (from all that lovely cocoa!).
- Contains a small amount of Caffeine (from the espresso powder). It’s enough to enhance the flavor but probably not enough to keep you up unless you eat the whole pan. Don’t do that. Or do. I’m just a paragraph, not your mom.
🚧 Common Mistakes to Avoid (AKA, Your Brownie Safety Briefing)
Don’t mess this up. Nobody likes a crispy, cakey brownie pretender.
- Overmixing the Batter: The number one killer of fudgy brownies. Mix until just combined. Seriously, stop as soon as the flour disappears. You don’t want to develop the gluten like you’re making bread.
- Overbaking: This results in a dry, cake-like texture. Your toothpick should have moist, sticky crumbs attached, not be perfectly clean. Better slightly underdone than overdone, IMO.
- Using Coarse Espresso Powder: If your espresso powder isn’t finely ground, it won’t dissolve properly. You’ll end up with gritty pockets, and that’s just tragic. Use instant, finely ground espresso powder.
- Cutting Them Hot: Pure chaos. You get uneven, crumbling pieces and a melted chocolate catastrophe. Cool them completely, or even chill them for an hour before slicing.
- Skimping on the Chocolate: Replacing the unsweetened chocolate with just cocoa powder? Not the same. Use the melted, solid chocolate for that iconic fudgy chew.
🌶️ Variations & Customizations (Let’s Get Creative)
You nailed the original. Now, are you ready to get weird? Here are a few ways to mix things up.
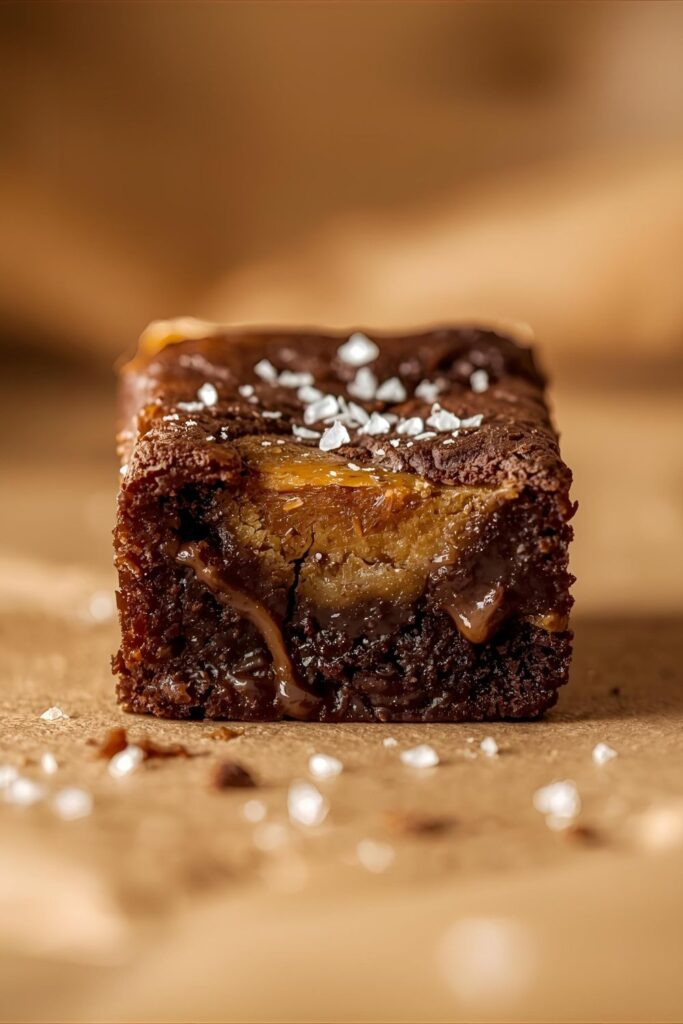
H3: The Salted Caramel Swirl
Before baking, warm up about 1/4 cup of thick, jarred caramel sauce. Drizzle it over the brownie batter and use a toothpick to create a gentle swirl pattern. Top with a generous sprinkle of flakey sea salt (like Maldon). Salty, sweet, and coffee-infused? Perfection.
H3: The Nutty Crunch Express
Fold in 1 cup of toasted, chopped walnuts or pecans along with the chocolate chips. The nutty crunch provides a fantastic textural contrast to the fudgy batter. Coffee and walnuts are basically soulmates, so this is a no-brainer.
H3: The “Kick it Up a Notch” Mocha Spice
Add 1/2 teaspoon of high-quality cinnamon and a tiny pinch (like, 1/8 teaspoon) of cayenne pepper to your dry ingredients. The cinnamon gives warmth, and the cayenne provides a barely-there kick on the finish that’s totally unexpected and addictive. It’s a little sassy, just like you.
❓ FAQ Section (The Questions Everyone Asks)
Still got questions? Don’t worry, I’ve got the answers before you even Google them.
H3: Will Espresso Brownies keep me awake?
Probably not, unless you eat half the pan before bed. The small amount of espresso powder we use is mainly for flavor enhancement, not a major caffeine hit. It deepens the chocolate, remember?
H3: Can I use instant coffee granules instead of espresso powder?
You can, but it’s not ideal. Instant espresso powder is finer and has a much more concentrated, dark flavor. Instant coffee granules often don’t dissolve as well and have a milder taste, so you might need to use more and accept a slightly different texture.
H3: How do I get that perfectly crinkly top?
Two things: whisking the eggs and sugar mixture vigorously (like, for a full minute after adding the last egg) and ensuring your melted chocolate mixture is warm (not hot!) when you add the eggs. This forms a meringue-like crust on top as it bakes.
H3: How should I store the leftover brownies?
Store them in an airtight container at room temperature for up to 4 days. For a fudgier texture, you can also store them in the fridge, but let them come back to room temp before eating for the best flavor.
H3: Can I double the recipe?
Absolutely! Use a 9×13 inch pan and increase all the ingredients by double. You’ll probably need to increase the baking time by about 5-10 minutes. Watch for those moist crumbs!
H3: Do I need a stand mixer to make these?
Nope! A regular whisk and some elbow grease do the job just fine. In fact, many people prefer a hand mix for brownies to prevent overmixing. Save your stand mixer for that complicated cookie monster cake recipe.
H3: Why did my brownies turn out cakey?
You overmixed the batter or overbaked them. Next time, stop mixing the second the flour disappears and pull them out of the oven when the center still looks slightly soft (but not liquid).
🎉 Final Thoughts
You just made the world’s most perfect, fudgy, crinkly-topped Espresso brownies. Go ahead, take a bow. Seriously, never buy a box mix again—you’re better than that. This recipe is a keeper, a secret weapon, and an absolute mood booster. Now that you’ve mastered the espresso brownie, how about you share a photo of your masterpiece? Tag me! I need to see that glorious, cracked top. And if you happen to hide the first batch from your family? I’ll never tell.