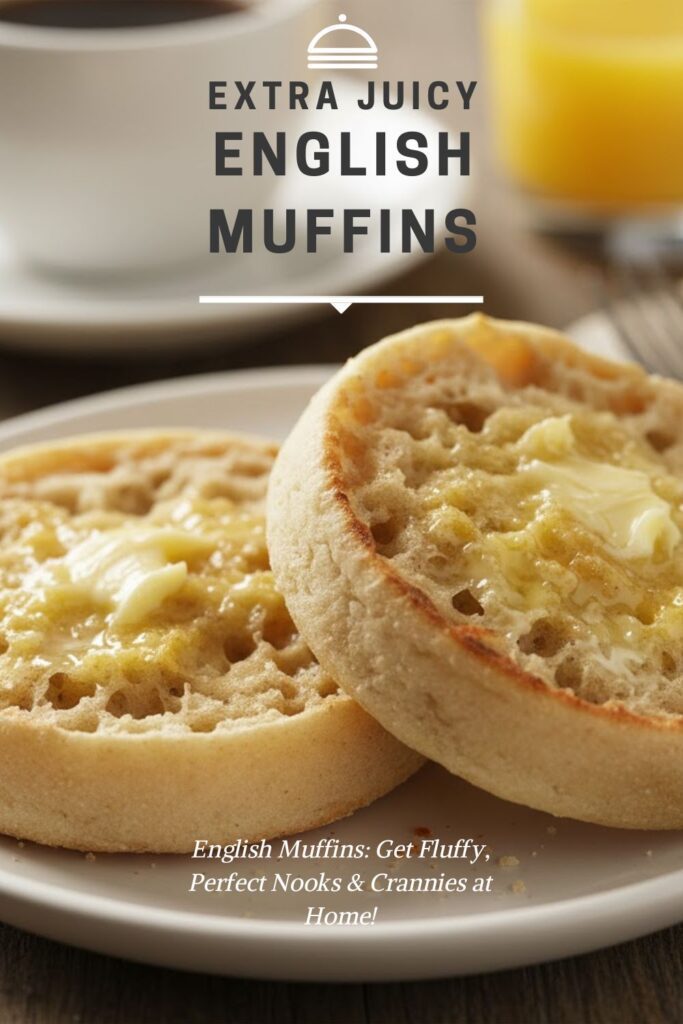
Ditch the Deli! Your Guide to Fluffy, Homemade English Muffins That Will Change Your Life
Ever stood in the bakery aisle, eyeing those perfectly craggy English muffins, and thought, “Could I actually make these myself?” Or maybe that was just me, before I embarked on a journey that changed my breakfast game forever. Let me tell you, friend, those store-bought imposters have nothing on the warm, yeasty, nooks-and-crannies perfection you’re about to pull off in your own kitchen. Prepare yourself for a breakfast revolution. No, seriously.
Why This Recipe Is Awesome (And Why You Need It STAT)
Look, I get it. Life’s busy. Who has time for homemade bread, right? Wrong! This isn’t just any bread; these are English muffins, and they are a revelation. We’re talking about a flavor profile that blows anything from a plastic bag out of the water. Think subtle tang, a hint of sweetness, and that irresistible chewiness. Plus, the sheer satisfaction of tearing one open to reveal those beautiful, butter-trapping nooks? Pure culinary joy, IMO.
And ease? You’ll be surprised. While it requires a bit of waiting (yeast works on its own schedule, darling), the actual hands-on time is minimal. You’ll impress guests, yourself, and probably even your pet, who will undoubtedly beg for crumbs. Imagine Sunday brunch, homemade English muffins piled high, perhaps with some perfectly poached eggs. Yeah, you’re welcome.
Ingredients: The MVPs of Muffin Magic

Keep it clean, keep it simple. You probably have most of these lurking in your pantry already, you domestic goddess (or god)!
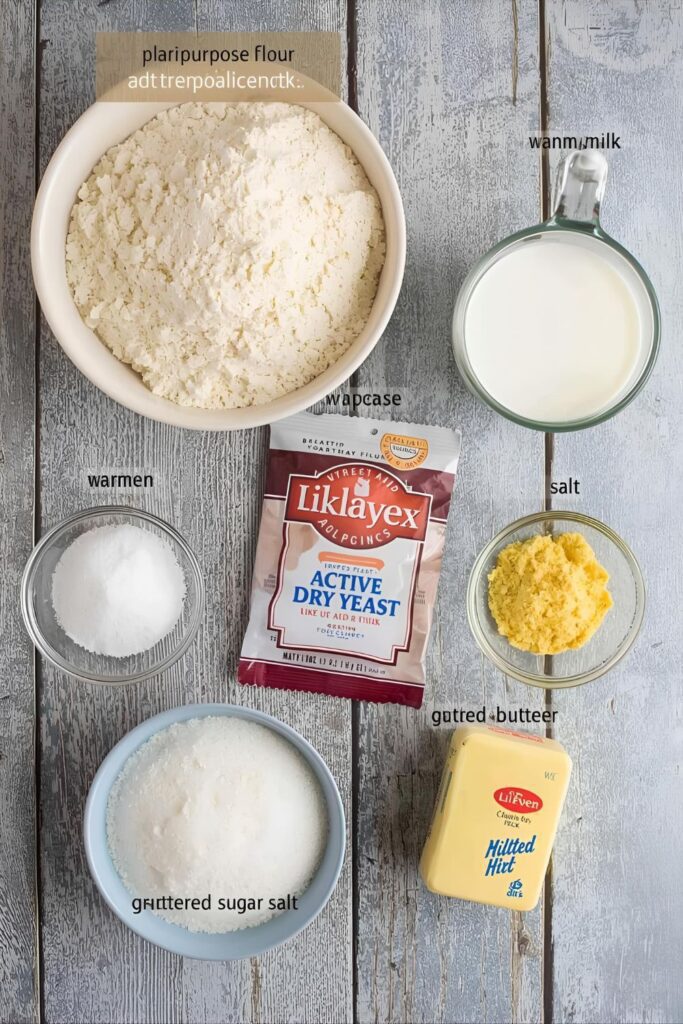
- 3 cups (360g) All-Purpose Flour: The backbone of our glorious muffins. Don’t be tempted by fancy flours unless you know what you’re doing.
- 1 cup (240ml) Milk (Warm, about 105-115°F / 40-46°C): Whole milk is best for richness, but 2% works in a pinch. Crucial for activating yeast! Too hot, you kill it; too cold, it sleeps.
- 2 ¼ teaspoons (1 packet) Active Dry Yeast: Our little bubbly friends making all the magic happen.
- 2 tablespoons Granulated Sugar: Just enough to give the yeast a snack and add a touch of sweetness.
- 1 teaspoon Salt: Essential for flavor; don’t skip it!
- 2 tablespoons Unsalted Butter (Melted): Adds richness and tenderizes the dough.
- Cornmeal (for dusting): The secret weapon for that classic English muffin texture and preventing sticking.
- Optional (but recommended!): A sprinkle of baking soda (¼ teaspoon) with the flour can boost those nooks and crannies. Think of it as a little extra insurance for maximum deliciousness.
Tools & Kitchen Gadgets Used: Your Arsenal for Awesomeness
Before we dive into the dough, let’s gather our trusty sidekicks. Having these ready makes the process smooth sailing.
- Large Mixing Bowl: For all the doughy goodness.
- Measuring Cups and Spoons: Precision matters here, folks.
- Kitchen Thermometer: Non-negotiable for getting your milk temperature just right. Don’t eyeball it unless you enjoy gambling with your yeast.
- Whisk: To combine dry ingredients.
- Rubber Spatula or Wooden Spoon: For initial mixing.
- Stand Mixer with Dough Hook (Optional, but a lifesaver): If you have one, use it! Your arms will thank you. If not, get ready for a mini arm workout.
- Plastic Wrap or a Clean Kitchen Towel: For covering the dough while it rises.
- Rolling Pin: To achieve that perfect muffin thickness.
- Round Biscuit Cutters (2.5-3 inch / 6-7.5 cm): Essential for perfectly shaped English muffins. If you don’t have one, a clean, empty tuna can with both ends removed works in a pinch!
- Large Griddle or Cast Iron Skillet: For cooking those beauties on the stovetop.
- Parchment Paper: For resting the cut muffins.
- Wire Rack: For cooling.
- Tongs or a Spatula: For flipping.
Step-by-Step Instructions: Let’s Get This Dough Party Started!
Alright, apron on, good vibes only. We’re making history, one muffin at a time!
Step 1: Wake Up That Yeast!
- In your large mixing bowl, combine the warm milk (remember, 105-115°F / 40-46°C – use that thermometer!), sugar, and yeast. Give it a gentle stir.
- Let it sit for 5-10 minutes. You want to see it get all foamy and bubbly. This means your yeast is alive and ready to party! If it’s not bubbling, your milk was probably too hot or too cold, or your yeast is past its prime. Start over, no shame in it.
Step 2: The Dry Mix & Initial Dough Dance
- While your yeast wakes up, whisk together the flour and salt (and optional baking soda) in a separate bowl.
- Once your yeast is frothy, add the melted butter to the milk mixture.
- Gradually add the dry ingredients to the wet ingredients, mixing with a rubber spatula or wooden spoon until a shaggy dough forms.
- If using a stand mixer, attach the dough hook and knead on low speed for 5-7 minutes.
- If kneading by hand (get those biceps ready!), turn the dough out onto a lightly floured surface and knead for 8-10 minutes until it’s smooth and elastic. It might be a bit sticky at first, but resist adding too much extra flour!
Step 3: First Rise – The Nap Time
- Lightly grease your large mixing bowl. Place the dough in the bowl, turning it once to coat.
- Cover the bowl with plastic wrap or a clean kitchen towel.
- Let it rise in a warm, draft-free place for 1 to 1.5 hours, or until it has doubled in size. This is where the magic really begins. Go read a book, watch some Netflix, or contemplate the meaning of life.
Step 4: Shape Shifters – Muffin Edition
- Once doubled, gently punch down the dough to release the air. Don’t be aggressive, it’s not its fault it’s so fluffy!
- Lightly dust your work surface with cornmeal.
- Roll out the dough to about ½-inch thick. Not too thin, not too thick – we want some substance!
- Dip your biscuit cutter in a little flour, then cut out your English muffins. You should get about 10-12 muffins. Reroll any scraps gently and cut more.
- Dust a baking sheet lined with parchment paper with more cornmeal. Place the cut muffins on the sheet, leaving a little space between them. Dust the tops with cornmeal too.
Step 5: Second Rise – Almost There!
- Loosely cover the muffins with plastic wrap or a clean kitchen towel.
- Let them rise again for another 30-45 minutes, or until they look puffy and slightly larger. Patience, young padawan.
Step 6: Griddle Time! The Moment of Truth
- Heat your griddle or cast-iron skillet over medium-low heat. This is crucial – you want them to cook through without burning. Resist the urge to crank up the heat!
- Place the English muffins on the hot griddle, leaving room between them. Don’t overcrowd the pan.
- Cook for 5-7 minutes per side, or until they are golden brown and cooked through. The internal temperature should be around 200°F (93°C) if you’re feeling fancy with a thermometer.
- Repeat with the remaining muffins.
- Transfer the cooked muffins to a wire rack to cool completely. Resist the urge to tear into them immediately! (Okay, fine, tear into one. I won’t tell.)
Calories & Nutritional Info: The Nitty-Gritty (Estimated)
Because we’re all about informed deliciousness here. These are estimates, so don’t come at me with your calorie counter apps, okay?
- Calories per serving (1 English muffin): ~150-180 calories
- Carbohydrates: ~28-35g
- Protein: ~5-7g
- Fat: ~2-4g
- Fiber: ~1-2g
Nutritional Notes:
- These homemade beauties offer fewer preservatives and often less added sugar than store-bought versions. Score!
- The fiber content is decent for a breakfast bread, helping you feel fuller longer.
- For a healthier twist: You can slightly reduce the sugar or use whole wheat flour for a portion of the all-purpose flour.
Common Mistakes to Avoid: Learn From My (Painful) Past
Nobody’s perfect, especially in the kitchen. Here are the pitfalls I’ve stumbled into so you don’t have to. You’re welcome.
- Killing the Yeast: The number one rookie mistake! Milk too hot (above 120°F/49°C)? Say goodbye to rise. Milk too cold (below 100°F/38°C)? Your yeast stays snoozing. Use a thermometer! It’s not optional, it’s essential.
- Adding Too Much Flour: The dough is supposed to be soft and a bit sticky. If you keep adding flour during kneading, you’ll end up with dense, hockey-puck muffins. Resist the urge! A lightly floured surface is enough.
- Not Enough Cornmeal: Those signature crispy exteriors and non-stick magic? That’s cornmeal, baby. Be generous with it on your work surface and the baking sheet.
- Overcrowding the Griddle: You want even cooking and golden-brown perfection. Give your muffins some space; they don’t like to feel squished.
- High Heat Hysteria: Burning the outside before the inside cooks through is a real tragedy. Keep that griddle on medium-low. Patience is a virtue, especially with English muffins.
- Impatience During Rising: This isn’t a race, it’s a marathon. Let your dough and cut muffins rise properly. If they haven’t doubled or become puffy, they won’t have those glorious nooks. Don’t rush the rise!
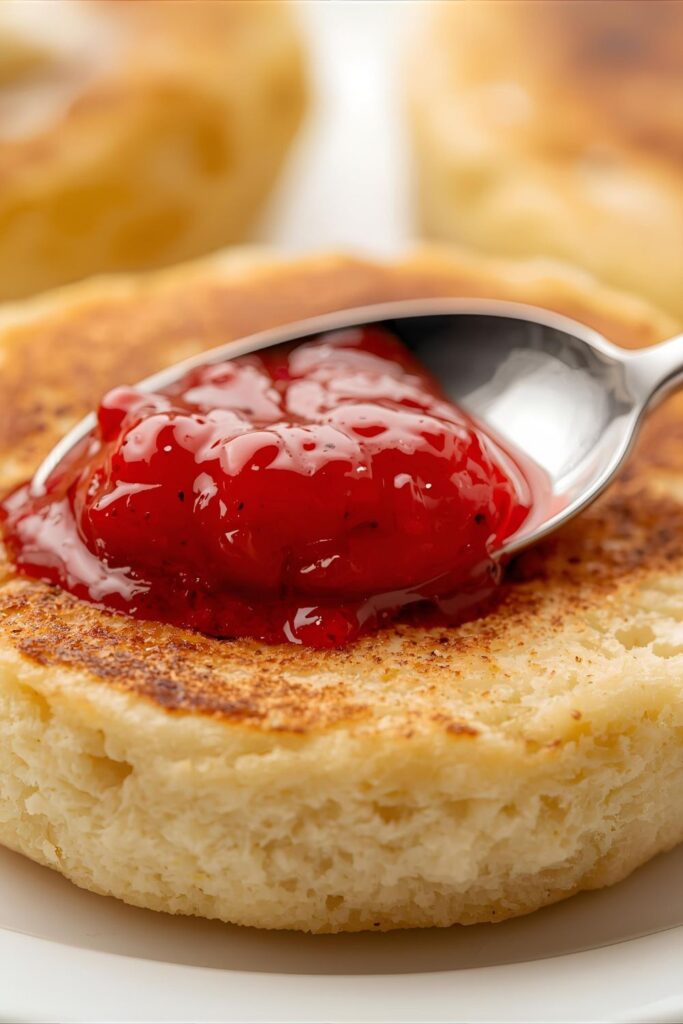
- Cutting, Not Fork-Splitting: The cardinal sin! You must fork-split your English muffins to preserve those epic nooks and crannies. Slicing with a knife destroys them. Don’t do it!
Variations & Customizations: Get Your Muffin Mojo On!
Ready to get creative? These are just starting points, my friend.
- Whole Wheat Wonders: Substitute half of the all-purpose flour with whole wheat flour for a heartier, nuttier flavor and an extra fiber boost. You might need a tiny bit more liquid, FYI.
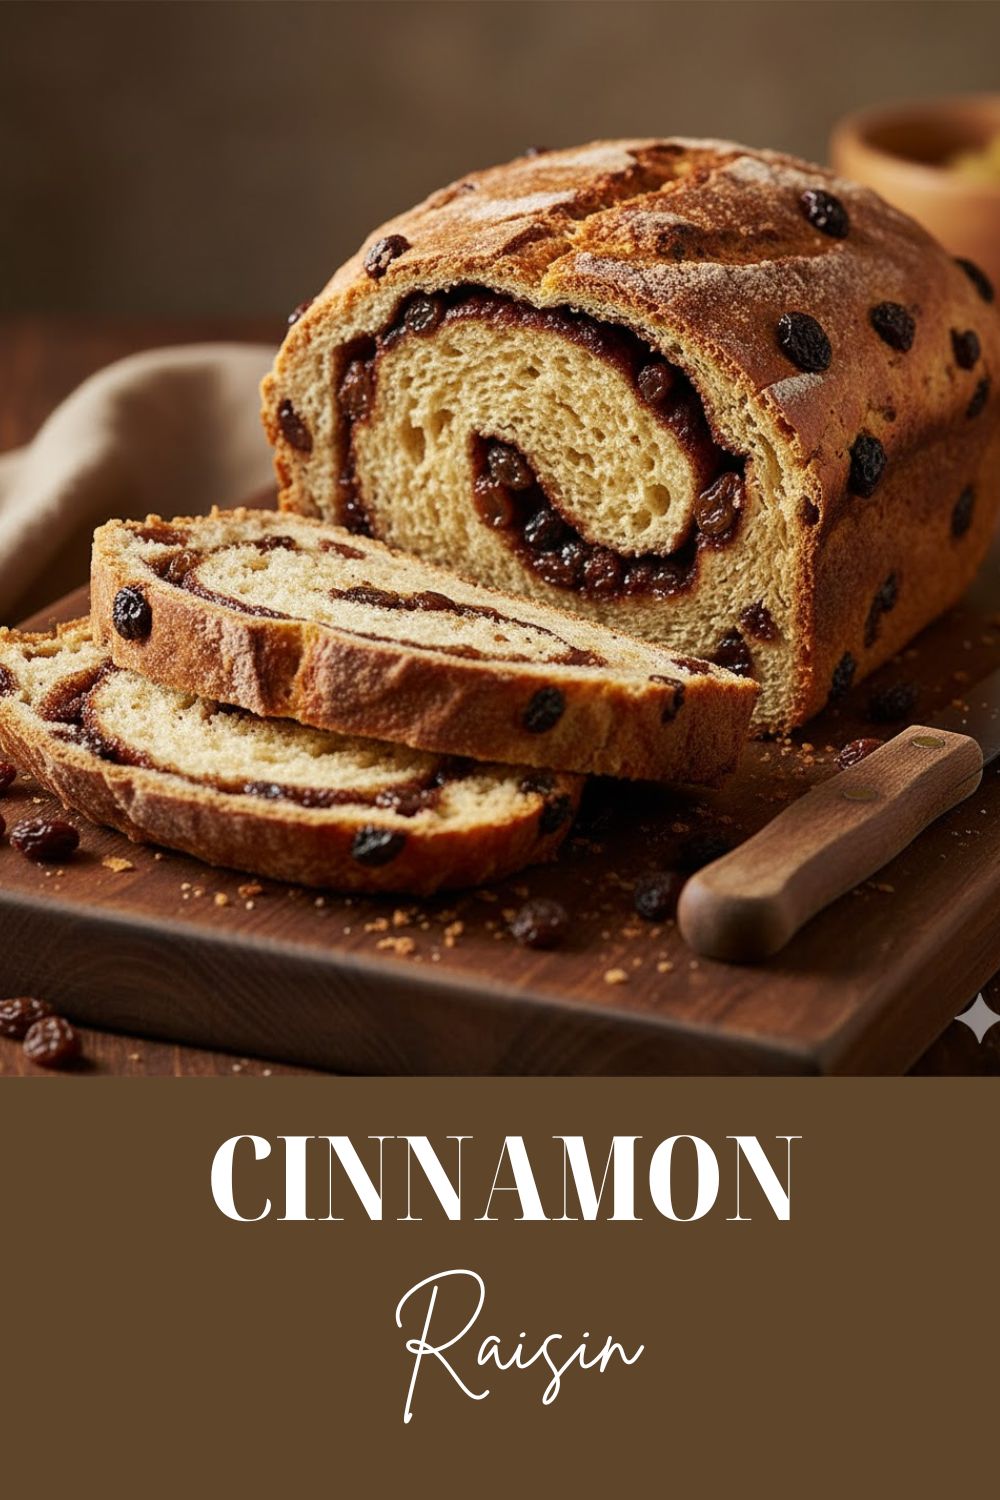
- Cinnamon Raisin Dream: Add ½ cup of raisins and 1 teaspoon of ground cinnamon to the dry ingredients for a sweet, spiced twist. Perfect for a cozy morning!
- Savory & Herbaceous: Mix in 2 tablespoons of chopped fresh rosemary or chives and a ½ teaspoon of garlic powder to the dough. Imagine these with some sharp cheddar and a fried egg. OMG.
- Vegan Vibes: Swap the dairy milk for warm unsweetened almond or soy milk and use plant-based butter or coconut oil. The results are surprisingly fantastic!
FAQ Section: Because You’ve Got Questions, We’ve Got Answers
You’re curious, and I appreciate that. Here are some of the burning questions people often ask about English muffins.
Q1: What makes English muffins different from regular bread?
A: Great question! The key differences are the cooking method (griddle-cooked, not baked in an oven), the inclusion of cornmeal for texture, and most importantly, those glorious nooks and crannies that are perfect for trapping butter and jam.
Q2: Can I make English muffins ahead of time?
A: Absolutely! You can let the dough have its first rise in the refrigerator overnight after punching it down. Just bring it to room temperature for about 30-60 minutes before rolling and cutting. You can also cook them fully and freeze them for later.
Q3: How do you get those perfect nooks and crannies?
A: It’s all about the dough consistency (soft and slightly sticky), proper rising, and the fork-splitting method! Don’t use a knife to open them; use a fork to gently pry them apart, preserving those beautiful pockets.
Q4: Why are my English muffins dense and not fluffy?
A: This usually points to a few culprits: inactive yeast, too much flour (leading to a stiff dough), or not enough rising time. Double-check your milk temperature and be gentle with the flour.
Q5: Can I use instant yeast instead of active dry yeast?
A: Yes, you can! Instant yeast can be mixed directly with the dry ingredients without proofing. Use the same amount (2 ¼ teaspoons). However, I find proofing active dry yeast gives me more confidence that it’s alive and kicking.
Q6: How should I store homemade English muffins?
A: Store them in an airtight container or bag at room temperature for up to 3-4 days. For longer storage, freeze them for up to 3 months. Just pop them in the toaster straight from the freezer!
Q7: What’s the best way to reheat English muffins?
A: The toaster is your best friend here! Fork-split them, then toast them until warm and lightly golden. The nooks and crannies will crisp up beautifully, ready for butter.
Final Thoughts: Your New Breakfast Obsession Awaits
Well, there you have it, folks. You’ve officially conquered the majestic English muffin. No more sad, squishy store-bought versions for you! Now, go forth, make these, slather them with butter and jam (or make an epic breakfast sandwich!), and then come back and tell me how your life has fundamentally changed. Because, TBH, it will. Seriously, you’ll never look back.