The Ultimate Eggnog Desserts: Easy No-Bake Eggnog Cheesecake
Ever had a giant carton of eggnog in your fridge after Christmas and wondered, “What on earth do I do with all of this?” You can only drink so much of the stuff, right? Don’t let that creamy, nutmeg-spiced goodness go to waste! Instead, turn it into a dessert that will make people forget all about those dry fruitcakes and weird, lumpy puddings. I’m talking about a rich, creamy, no-bake eggnog cheesecake. It’s the perfect way to use up that holiday beverage and create a show-stopping dessert with zero baking and minimal effort. This isn’t just a recipe; it’s a holiday life hack.
Why This Recipe is Your New Holiday BFF

Look, I get it. The holidays are a chaotic dance of gift wrapping, party planning, and trying to remember if you’ve actually sent out your holiday cards yet. This recipe for No-Bake Eggnog Cheesecake is the antidote to your holiday stress. It’s got that “wow” factor, with its silky-smooth texture and a flavor that just screams holiday cheer. Plus, it only takes about 15 minutes of active prep time, which means you can spend less time in the kitchen and more time avoiding your weird uncle’s political rants. The combo of creamy eggnog, rich cream cheese, and a crunchy gingersnap crust is a flavor explosion that will make people ask for the recipe.
Ingredients You’ll Need (AKA Your Shopping List)
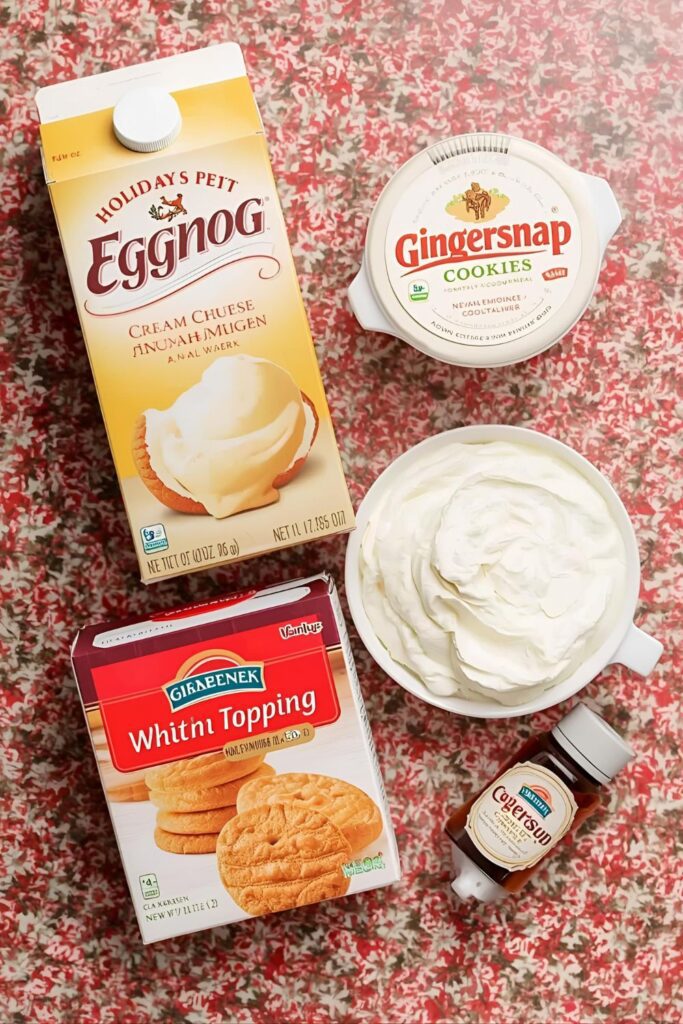
Don’t panic; this list is short and sweet. Pun intended.
- For the Crust:
- 2 cups gingersnap cookie crumbs (about 30 cookies)
- 1/2 cup unsalted butter, melted
- For the Filling:
- 1 (8-ounce) package cream cheese, softened
- 1/2 cup granulated sugar
- 1 1/2 cups eggnog, chilled
- 1 teaspoon vanilla extract
- 1/2 teaspoon ground nutmeg
- 1 (8-ounce) container whipped topping, thawed
- For Garnish:
- A dusting of ground nutmeg
- Optional: Crushed gingersnaps or whipped cream

Substitutions, IMO: No gingersnap cookies? You can use a crushed shortbread or graham cracker crust instead. For the filling, you can use store-bought eggnog or make your own. You can also use mascarpone cheese instead of cream cheese for a richer flavor.
Tools & Kitchen Gadgets to Get the Job Done
Here’s the gear you’ll need. Nothing complicated, I promise.
- 9-inch pie pan or springform pan
- Food processor or a Ziploc bag and rolling pin
- Large mixing bowl
- Electric mixer (hand or stand)
- Rubber spatula
- Measuring cups and spoons
The Super-Simple, Step-by-Step Instructions
Ready? Let’s do this. You’re just a few steps away from dessert glory.
- Crush the Cookies. First things first, crush your gingersnap cookies into fine crumbs. A food processor is the easiest way, but you can also put them in a sturdy Ziploc bag and go to town with a rolling pin.
- Make the Crust. In a medium bowl, combine the cookie crumbs with the melted butter. Stir until the crumbs are evenly coated. Press the mixture firmly into the bottom and up the sides of your pie pan. Pop the pan in the fridge while you make the filling.
- Whip the Filling. In a large mixing bowl, beat the softened cream cheese and granulated sugar with an electric mixer until it’s smooth and creamy. Be sure to scrape down the sides of the bowl.
- Add the Flavor. Gradually beat in the chilled eggnog, vanilla extract, and nutmeg until the mixture is smooth and well combined.
- Fold in the Topping. Now, gently fold in the whipped topping with a rubber spatula. Do this in two batches to ensure it’s evenly distributed without deflating the mixture.
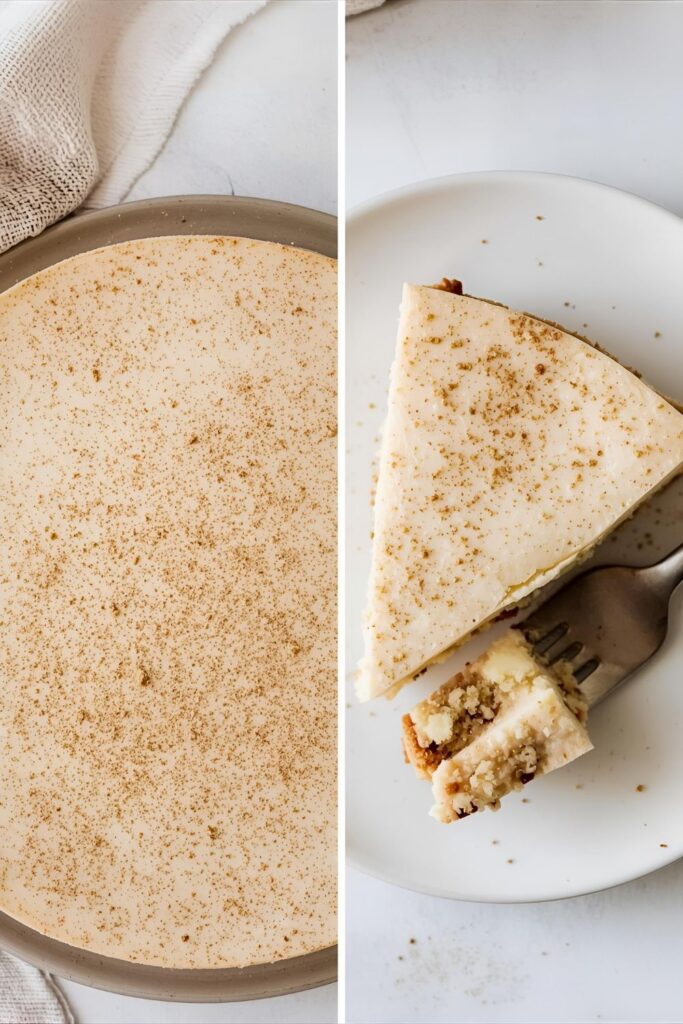
- Chill Out. Pour the filling into your prepared crust and spread it evenly with your spatula. Pop the whole thing in the fridge for at least 4 hours, or until the cheesecake is completely set and firm.
- Garnish and Serve. Once it’s firm, remove the cheesecake from the fridge. Dust the top with a generous sprinkle of ground nutmeg and, if you’re feeling fancy, top with some crushed gingersnaps or extra whipped cream. Cut into slices and serve immediately.
Calories & Nutritional Info (The Not-So-Fun Part)
I’m not a nutritionist, so these are just estimates, but IMO it’s totally worth it.
- Estimated Calories per serving: ~350-450 kcal (depending on the size of your slice, let’s be real)
- Key nutrients:
- Carbs: Mostly from sugar in the cookies, eggnog, and whipped topping. It’s a dessert, what did you expect?
- Fats: From the cream cheese, butter, and whipped topping. These are the good fats that make it so rich.
- Protein: A little bit from the cream cheese and eggnog. So, it’s basically a health food, right? 😉
Common Mistakes to Avoid (So You Don’t Mess It Up)
Listen up, buttercup. These are the top reasons your cheesecake might go wrong.
- Not Softening the Cream Cheese: This is the most common crime against cheesecake. If your cream cheese isn’t soft, you’ll end up with a lumpy filling. Let it sit on the counter for at least an hour before you start.
- Not Chilling Long Enough: Patience is a virtue, especially when it comes to no-bake cheesecake. If you try to cut it before it’s completely set, you’ll end up with a messy, runny dessert.
- Using a Different Pan: If you use a pan that’s too large, your cheesecake will be too thin and won’t set up properly. Stick to the 9-inch pan.
- Overmixing: Once you add the whipped topping, mix it in gently with a spatula. Overmixing will cause the air to deflate, and your cheesecake won’t be as light and fluffy.
Variations & Customizations (Time to Get Creative)
You’ve mastered the classic, now let’s mix it up.
- The Spiced-Up Version: For an extra layer of festive flavor, add 1/4 teaspoon of ground cinnamon and a pinch of ground cloves to the filling mixture. The spices will really bring out the holiday cheer.
- The Boozy Twist: For a more “adult” version, add a tablespoon of bourbon or rum to the filling mixture. The alcohol will enhance the flavors of the eggnog and give it a nice kick.
- The Nutty Crunch: For an added nutty flavor, use a crust made with crushed pecans or walnuts instead of gingersnaps. The nutty flavor is a great complement to the creamy filling.
FAQ Section (Because You Have Questions, I Have Answers)
- Can I make this with low-fat cream cheese? You can, but I don’t recommend it. Full-fat cream cheese provides the best texture and flavor. Low-fat can result in a more watery or less rich filling.
- How do I store the cheesecake? Store the cheesecake in an airtight container in the fridge for up to 3-4 days.
- Can I freeze this cheesecake? Yes! You can freeze it for up to 3 months. Just be sure to wrap it tightly in plastic wrap and then in foil to prevent freezer burn. Thaw it in the fridge overnight before serving.
- What’s the best way to get a smooth filling? Make sure your cream cheese is very soft and that you beat it with the sugar until it’s completely smooth before adding the other ingredients.
- Can I use a different crust? Absolutely! A crushed shortbread or graham cracker crust would work well.
- What if my cheesecake is too soft? It likely needs more time to chill. Pop it back in the fridge for a few more hours, or even overnight. It needs a full 4 hours to set up properly.
- Can I make this ahead of time for a party? Yes! This is the perfect make-ahead dessert. You can make it a day or two in advance. Just be sure to keep it covered in the fridge.
Final Thoughts (The Mic Drop)
So there you have it. The secret to being a holiday hero is not in a complicated baking recipe or a store-bought dessert. It’s right here, in this ridiculously simple, ridiculously delicious No-Bake Eggnog Cheesecake. Go forth and conquer your holiday dessert anxieties. Your friends and family will thank you, and you’ll never let a carton of eggnog go to waste again. Now, who’s ready for a second slice?