
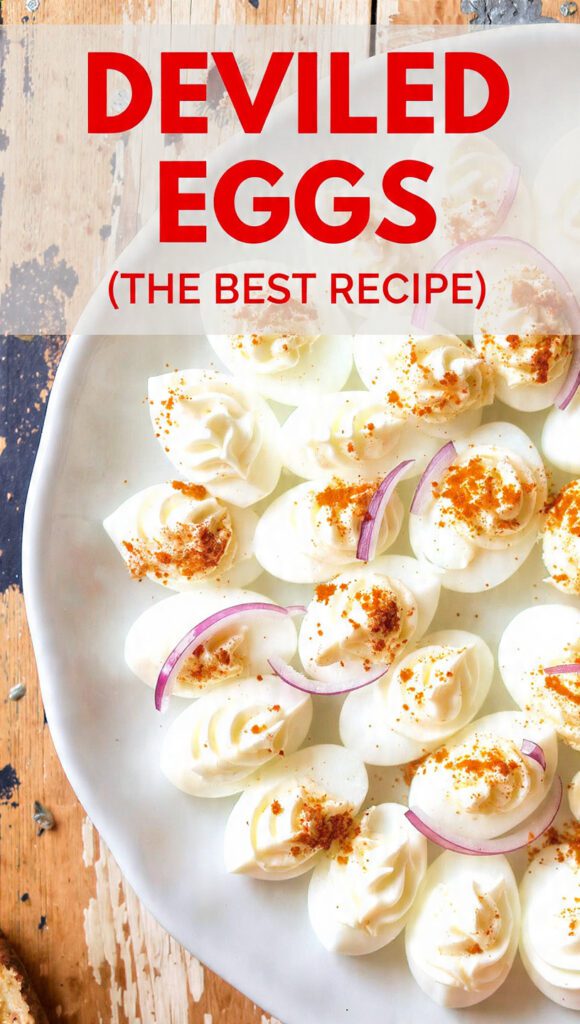
😈 Seriously Simple Sin: The Best Classic Deviled Eggs Recipe
Let’s be honest, every family gathering, every potluck, every backyard BBQ has one dish that disappears faster than a free sample at Costco. That dish, my friends, is the perfectly crafted deviled eggs. They’re creamy, they’re tangy, they’re savory, and they are, quite frankly, addictive. Too many people settle for that bland, pasty filling that tastes like sadness and vinegar. No more! We’re making the ultimate deviled eggs recipe today—one that achieves maximum flavor and a piping-bag-worthy texture without any weird, questionable ingredients. Get ready to watch these things vanish into thin air.
Why This Appetizer is the Undisputed King

Deviled eggs are the perfect party food because they are single-serving elegance. They require no cutlery, they’re naturally gluten-free (hello, keto friends!), and they look deceptively difficult to make. People see a platter of beautifully piped yolks and assume you have a culinary degree. Lies!
You need to master this recipe because it’s a three-step wonder. Boil, mash, pipe. That’s the entire process! They offer a huge payoff in flavor complexity—the sharp mustard, the tangy vinegar, the creamy mayo—for very little effort. Plus, they’re the ultimate make-ahead appetizer.

Are you looking for a dish that guarantees you get invited back to the next party? Do you want a high-protein snack that tastes like a cheat day? This is your answer. They are creamy, savory, and the perfect canvas for endless customization. IMO, deviled eggs are the superior appetizer.
Essential Ingredients for Creamy Filling Perfection
The classic recipe is best, so we stick to the basics. Quality ingredients make all the difference here!
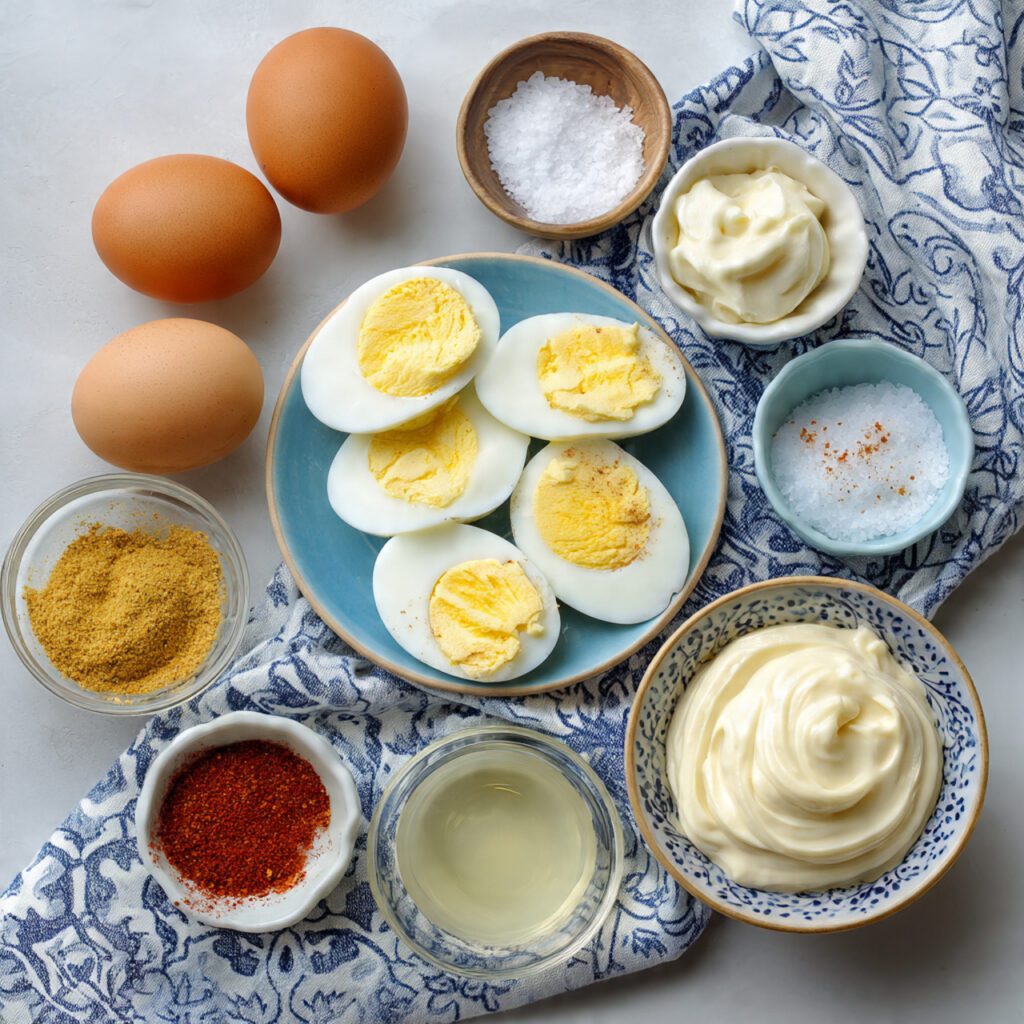
- 12 Large Eggs: Hard-boiled and completely cooled. Older eggs peel best!
- 1/2 cup Mayonnaise: Use high-quality, full-fat mayo for the best creaminess and flavor.
- 1 tbsp Dijon Mustard: Adds a sophisticated tanginess.
- 1 tsp White Vinegar or Apple Cider Vinegar: Crucial for the necessary bright acidity.
- 1/4 tsp Salt: Seasoning is key! Don’t be shy.
- Pinch of Black Pepper: Freshly ground, please.
- Garnish: Paprika (sweet or smoked) and fresh chopped chives.
Key Substitutions:
- Mayonnaise: Greek yogurt or sour cream (full-fat) can replace half the mayo for a tangier, slightly lighter filling.
- Dijon Mustard: Use yellow mustard if you crave that classic picnic flavor, but Dijon adds better complexity.
- Vinegar: A splash of pickle juice works wonderfully and adds a savory punch!
Tools & Kitchen Gadgets Used
You need equipment for the three crucial stages: boiling, mashing, and piping.
- Large Saucepan with Lid: For boiling the eggs efficiently.
- Large Bowl: For the ice bath (critical for perfect peeling!).
- Rubber Spatula or Fork: For mashing the yolks.
- Fine Mesh Sieve (Optional, but awesome): The secret to ultra-smooth filling! Push the yolks through this before mixing.
- Piping Bag and Star Tip (Optional): For that bakery-perfect presentation. You can use a zip-top bag with the corner snipped, too.
- Deviled Egg Platter (Optional): Just to look fancy.
- Measuring Cups and Spoons: To ensure the filling ratio is perfect every time.
Step-by-Step Instructions: Mastering the Egg Game
The hardest part is boiling the eggs. Once you nail that, it’s all downhill (a very delicious downhill).
H3 Phase 1: Perfect Hard-Boiled Eggs
- Boil the Water: Place the 12 large eggs in the saucepan. Cover them with cold water, ensuring the water level is about 1 inch above the eggs.
- Bring to Boil: Bring the water to a full, rolling boil over high heat.
- Shut Off and Cover: As soon as the water boils, immediately remove the pot from the heat, put the lid on tightly, and set a timer for 10 minutes. This gentle cooking prevents rubbery whites and green rings.
- The Ice Bath: When the timer goes off, immediately drain the hot water and fill the pot with ice and cold water. Let the eggs sit in the ice bath for at least 5–10 minutes. This stops the cooking and shrinks the egg white from the shell for easy peeling.
H3 Phase 2: Create the Creamy Filling
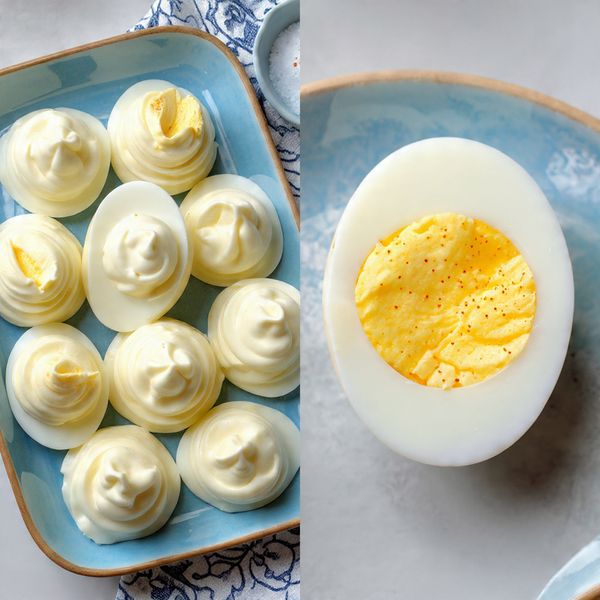
- Peel and Slice: Gently tap and roll the eggs to crack the shells. Peel them under running cold water—the water helps lift the shell. Slice the peeled eggs lengthwise (hotdog style) and gently scoop out the yolks into a medium bowl. Place the whites on your serving platter.
- Mash the Yolks: Use a fork or a rubber spatula to thoroughly mash the yolks. You want zero lumps. Pro Tip: Push the yolks through a fine mesh sieve with a spatula for a velvet-smooth filling.
- Mix the Magic: Add the mayonnaise, Dijon mustard, vinegar, salt, and pepper to the mashed yolks. Mix everything until the filling is perfectly smooth and creamy. Taste it! Does it need more tang? Add a dash of pickle juice. Seasoning is key!
H3 Phase 3: Fill and Finish
- Fill the Whites: You have two options here: The Quick and Dirty Method (use a spoon to dollop the filling back into the egg white halves) or The Fancy-Pants Method (scoop the filling into a piping bag fitted with a star tip).
- Pipe (or Scoop): Pipe the filling high into the egg white halves. Making a tall swirl looks professional and impressive.
- Garnish: Dust the tops lightly with paprika (smoked paprika adds a nice depth of flavor!) and sprinkle with fresh chopped chives or parsley for color.
- Chill: Cover the platter loosely and chill the deviled eggs for at least 30 minutes before serving. This lets the flavors meld.
Calories & Nutritional Info (The Protein Powerhouse)
These are surprisingly low-carb and high-protein appetizers. Estimates are per whole deviled egg (two halves).
- Estimated Calories Per Whole Egg: Approximately 100–120 calories. (Based on standard mayo use).
- Protein: High! Around 6–7g per whole egg.
- Carbohydrates: Very Low. Less than 1g.
- Fat: Moderate, primarily from the yolk and mayonnaise.
- Key Nutritional Note: Excellent source of Choline, Vitamin D, and healthy fats. FYI, this is the ultimate keto-friendly party snack.
Common Mistakes to Avoid (The Anti-Dry Egg Guide)
Avoid these slip-ups unless you want pasty, green-ringed disappointments.
- Overcooking the Egg: Boiling the eggs too aggressively or for too long creates that terrible greenish-gray ring around the yolk and makes the whites rubbery. Stick to the 10-minute covered rest!
- Not Using an Ice Bath: Skipping the ice bath prevents the egg from cooling rapidly, making peeling a nightmare and risking overcooked yolks. Ice bath is mandatory for easy peeling!
- Under-Mixing the Yolks: Lumpy filling is a tragedy. Mash the yolks completely smooth before adding the wet ingredients. A sieve is the key to silky smooth filling.
- Seasoning Too Early: If you mix the filling and chill it for hours, you might need to add more seasoning. Taste and adjust the salt/vinegar just before piping to ensure peak flavor.
Variations & Customizations
Bored of the classic? Give these twists a try!
H3 Bacon, Jalapeño, and Cheddar
Make it a party! Replace 1/4 cup of the mayo with cream cheese. Add 2 tbsp of crispy crumbled bacon and 1 tbsp of finely minced jalapeño (seeds removed) to the filling. Top with a tiny shaving of sharp cheddar cheese.
H3 Spicy Sriracha Kick
For the heat seeker. Reduce the mayo by 1/4 cup and replace it with a mix of Sriracha and Greek yogurt. Use smoked paprika for the garnish. The creamy texture remains, but the heat level goes way up!
H3 Pesto and Pine Nut Perfection (Herbaceous)
Make it Italian-inspired. Replace 1/4 cup of the mayo with store-bought pesto. Mix in a dash of lemon juice instead of vinegar. Garnish the top with a toasted pine nut and a tiny basil leaf.
FAQ Section: Deviled Egg Dilemmas Solved
You’ve got questions about these little devils. We have the answers.
1. How do I get easy-to-peel eggs?
Use slightly older eggs (about 1 week old) and shock them immediately in an ice bath after cooking. This combination is the most reliable peeling hack.
2. Why do my yolks have a green ring?
You overcooked them! The sulfur in the egg white reacts with the iron in the yolk when exposed to high heat for too long. Stick to the 10-minute rest method described above.
3. Can I make the filling ahead of time?
Yes, but store the filling and the egg white halves separately in airtight containers in the fridge. Assemble and pipe them no more than 2 hours before serving to prevent the whites from drying out.
4. How long do deviled eggs last in the fridge?
Because they contain mayonnaise and are highly perishable, you should consume them within 2 days of preparation. Keep them chilled until serving!
5. How do I make the filling super smooth?
Push the yolks through a fine mesh sieve before mixing them with the wet ingredients. This removes any tiny lumps the fork missed, resulting in a velvety smooth texture.
6. What’s the best way to transport deviled eggs to a party?
Transport the filling and whites separately (or use a dedicated deviled egg carrier that holds the eggs securely). Assemble them quickly at the party location for the freshest result.
7. Can I use a different vinegar?
Yes! White vinegar or apple cider vinegar provides the best neutral tang. Avoid dark vinegars like balsamic, which will discolor the filling.
Final Thoughts
You just unlocked the secret to perfect, creamy, tangy, totally addictive deviled eggs. You conquered the boil, you mastered the smooth filling, and you earned the right to watch your creation disappear in seconds. Now, seriously, go make a double batch. You’re going to need it.

