

Viral Dessert Board Masterpiece: The Ultimate Way to Look Fancy Without Actually Cooking
Okay, let’s be honest. We’ve all been there: you invite people over, promising an epic dessert, and then panic sets in. Do you bake the complicated cake that takes three hours? Do you attempt those fussy little tartlets? Ugh. No thanks. I’m far too busy rewatching old reality TV. But what if I told you the single best, most viral way to serve dessert is the one that requires absolutely zero actual cooking? Enter the glorious Dessert board. This isn’t just a plate of sweets; it’s a curated landscape of sugar, a visually stunning mountain of treats that screams, “Yes, I am sophisticated, and no, I didn’t stress about this.”
Why You Need to Drop Everything and Build This Board

Why is this not just awesome, but absolutely essential for your entertaining arsenal? Simple: it’s the dessert equivalent of a superhero. It appeals to literally every palate (seriously, who doesn’t like a choice?). It requires only assembly, making it incredibly easy. And let’s not forget the “wow factor.” People go absolutely wild over a stunning Dessert board. It makes you look like a host who has their life together, even if you just threw on a clean shirt five minutes ago. Plus, the sheer variety means everyone gets exactly what they want. It’s a win-win, IMO.
Ingredients: The “No-Bake” Hall of Fame
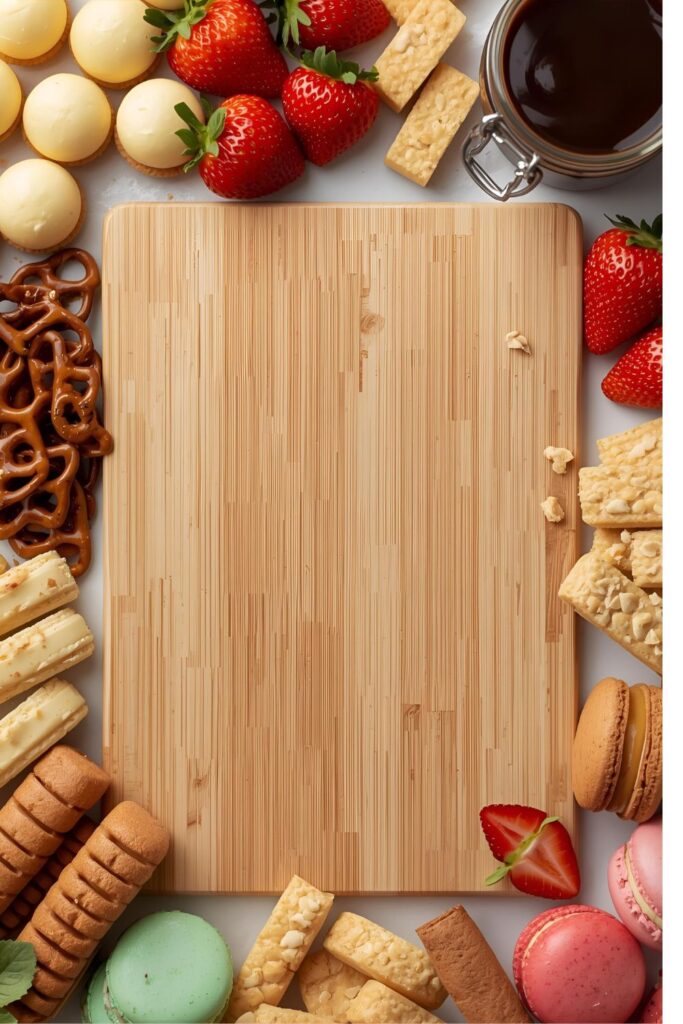
The beauty of a Dessert board is that there are no rules, only suggestions. Think of this list as the foundation for greatness. Mix, match, and substitute based on your personal sugar addiction.
- Creamy Component:
- Mini Cheesecake Bites: Store-bought is your friend.
- Chocolate Hummus or Dip: Trust me on this one.
- Substitution: A small bowl of melted milk or white chocolate for dipping.
- Fruity & Fresh Component:
- Strawberries, Raspberries, and Blueberries: Color, color, color!
- Sliced Apples or Pears: Offer a satisfying crunch.
- Substitution: Dried apricots or candied orange slices for a longer shelf life.
- Crunchy & Dippable Component:
- Vanilla Wafers or Graham Crackers: The classics never fail.
- Pretzel Rods: For that necessary salty-sweet balance.
- Substitution: Biscotti or small almond thins.
- Small, Poppable Sweets:
- Macarons or Mini Meringues: They look fancy, which is the whole point.
- Mini Peanut Butter Cups: Because nostalgia.
- Substitution: Chocolate truffles or gourmet jelly beans.
- The “Glue” (Spreads & Sauces):
- Caramel Sauce: A must-have for drizzling.
- Small Jar of Nutella: Because it’s Nutella.
- Substitution: Lemon curd or raspberry jam.
Tools & Kitchen Gadgets Used

This is where we go from “cooking” to “artful arranging.” Your tools are simple, but crucial for creating that lush, overflowing look that dominates Pinterest.
- Large Wooden or Marble Board: The star of the show! Choose a board with a raised edge if you want to really pack things in.
- Small Serving Bowls or Ramekins (3-5): Essential for holding dips, sauces, and small candies.
- Small Spreaders/Mini Spoons: For the spreads and sauces.
- Parchment Paper or Wax Paper (Optional): To line the board for easy cleanup (and to look rustic).
- Tongs or Skewers (Optional): Helpful for guests to grab items cleanly.
- Sharp Pairing Knife: For slicing fruit.
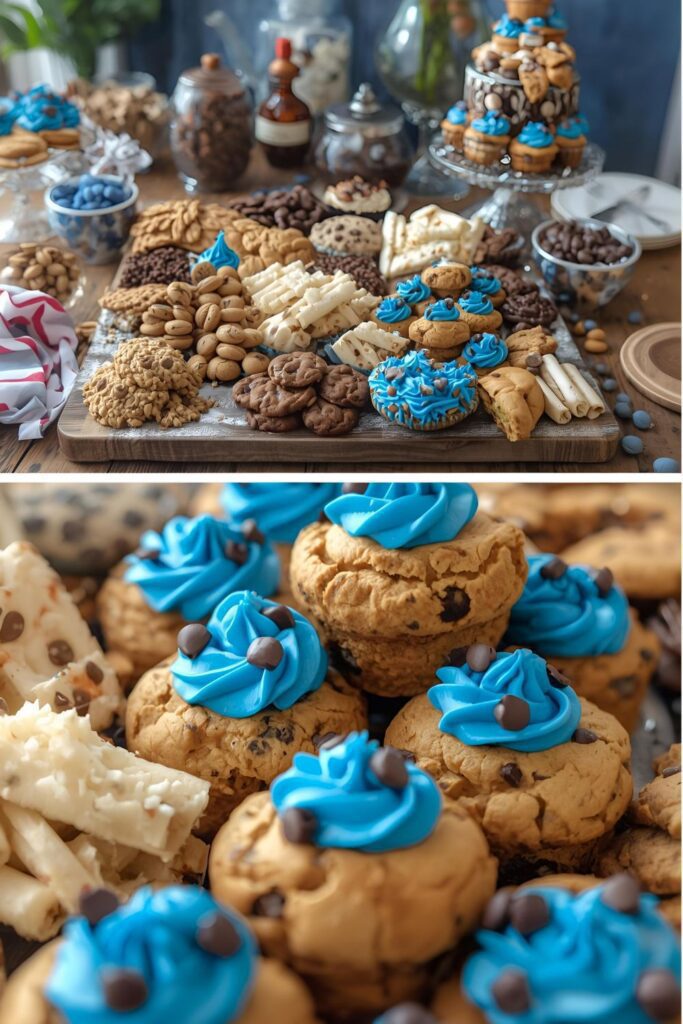
Step-by-Step Instructions: The Assembly Line of Joy
This isn’t a recipe; it’s a strategy. Follow these steps, and you’ll have a gorgeous Dessert board that looks like it took hours (but really took 20 minutes). Remember, your goal is to make it look abundant and slightly chaotic.
Step 1: Lay the Foundation
First, grab your large wooden or marble board. If you use parchment paper, cut it to size and lay it down now. This is a nice little trick for minimizing post-party scrubbing.
Step 2: Anchor the Spreads
Place your small serving bowls or ramekins onto the board first. Fill them with your spreads (Nutella, caramel, chocolate dip). Place them strategically—usually three, spaced out on the board—to act as visual anchors. Why first? Because you build around the containers, not the other way around.
Step 3: Arrange the Biggest Items
Next, place the biggest treats. Think your cheesecake bites, sliced cake pieces, or large cookies. Place them in groups, creating a few distinct clusters around the bowls. Don’t worry about empty space yet!
Step 4: Scatter the Fruit
Now, add your sliced fruits and berries. Use them to fill in the gaps between your anchors and your large desserts. Use the berries especially to tumble and trail along the board’s edges. That pop of color is vital!
Step 5: Insert the Dippables
Stand up your pretzel rods and graham crackers in open spaces. You can also lay them down next to the dips they’re meant for. Create some height and different levels on the board to keep things interesting.
Step 6: Fill Every Single Void
This is the secret sauce! Take your small, poppable sweets (macarons, mini cups, jelly beans) and literally dump them into every remaining empty space. Seriously, cram them in. You want the board to look so full it’s practically spilling over. A packed board looks generous; a sparse board looks like you ran out of money.
Step 7: The Grand Finale Garnish
Give the board a final, light dusting with a little powdered sugar. You can also tuck a few small fresh mint sprigs in between the fruit. This adds a fresh scent and a tiny bit of “I planned this” sophistication. Stand back and admire your handiwork!
Calories & Nutritional Info (A Gentle Reality Check)
Look, you don’t build a Dessert board for a strict diet. This is for fun, indulgence, and sharing. That said, let’s keep it real. These are very rough estimates per serving, which we’ll define as a small handful of items from the board.
- Estimated Calories Per Serving: Approximately 300-450 calories. (It depends on your choices, obviously, but a few chocolates and a handful of pretzels add up!).
- Primary Nutrient: Carbohydrates (Sugar, duh!). Expect around 40-60g per serving.
- Fat Content: Varies greatly, but likely around 15-25g (especially if you load up on the Nutella and cheesecake).
- Redeeming Qualities: The fruit brings fiber and antioxidants! So, you’re practically eating health food. 😉
- Pro Tip: Portion control is key (good luck with that, though!).
Common Mistakes to Avoid (So Your Board Doesn’t Look Sad)
Listen up, buttercup. A few simple blunders can turn your grand vision into a sticky mess. Don’t be the person who makes these mistakes!
- Serving Everything Ice Cold: Do not put cold items directly on the board. Let your cheesecakes and creamy dips sit out for about 15 minutes before serving. Room temperature equals maximum flavor.
- The “Sparse” Look: This is the most critical mistake. NEVER leave empty spaces! A crowded, abundant board looks better and tastes more inviting. Cram everything in!
- Only Using Brown and Beige: If everything is chocolate chip cookies and graham crackers, it looks bland. Add vibrant, fresh colors—strawberries, raspberries, and green mint are your friends!
- Forgetting Dippers for Dips: You have a caramel bowl, but no vanilla wafers right next to it? Rookie mistake. Place dippable items immediately adjacent to their corresponding dips.
- Putting Liquid Sauces Directly on the Board: Unless you want a huge, sticky mess (and trust me, you don’t), always use a small ramekin for sauces like melted chocolate or caramel.
Variations & Customizations: Themed Boards for Every Occasion
Your Dessert board doesn’t have to be a free-for-all. Theme it out! It’s the easiest way to make a basic board look instantly bespoke and thoughtful.
- The “Cookie Monster” Board: Focus entirely on cookie dough, baked cookies (like the famous cookie monster cake), and cookie-themed candies. Add a small bowl of milk for dunking. Use blue sprinkles and bright colors for a fun, playful vibe.
- Keto/Low-Carb Dream Board: Swap out all traditional sweets for low-sugar alternatives. Focus on berries, dark chocolate (85%+ cacao), sugar-free peanut butter, coconut flakes, and maybe some keto-friendly fat bombs or sugar-free jello.
- S’mores Night Board: Build the whole thing around a DIY s’mores station! Include graham crackers, various chocolates (milk, dark, peanut butter cups), and different flavors of marshmallows. If you have a tabletop butane torch, that’s next-level!
- Vegan/Dairy-Free Delight: Use fresh fruit, vegan cookies, dairy-free chocolate chips, nut butter dips, and dried fruit. You can easily find excellent vegan chocolate truffles and mini cakes now, FYI.
FAQ Section: All Your Burning Dessert Board Questions Answered
Still got questions? It’s a simple concept, but the execution can be daunting. Let’s clear up the confusion.
- What size board should I use? It depends on your group! For a crowd of 8-10 people, aim for a board that is at least 15×20 inches. Remember: bigger is almost always better for that abundant look.
- How far in advance can I prepare my Dessert board? You can prep all the fruit and open packages the day before. However, assemble the board no more than 1-2 hours before serving. The fresh fruit and certain sweets can start to “weep” or dry out if left too long.
- Should I include both store-bought and homemade items? Absolutely! The mix is what makes it great. Homemade cookies or brownies add a nice personal touch, but rely heavily on quality store-bought items like macarons or mini cheesecakes to save time.
- How do I prevent the chocolate from melting too fast? If your room is very warm, keep the board in the fridge until the last possible minute. If you use melted chocolate, serve it in a double-walled bowl to help maintain the temperature a little longer.
- What’s the best way to handle sticky sauces? Use small serving utensils (spoons or mini spreaders) for each sauce. Also, ensure the sauce ramekins are placed away from the edges where they might get knocked over.
- Can I use a regular cutting board? Yes, any flat, clean surface works. A wooden cutting board, a marble slab, or even a large platter are great options. Just make sure it’s food-safe!
- How much dessert should I buy per person? A good rule of thumb is to aim for about 4 to 6 small items per person. People graze, so they won’t take one of everything, but you want enough variety to make it look full.
Final Thoughts: You Are Now a Sugar Architect
You have officially mastered the art of the Dessert board. You managed to create a stunning, crowd-pleasing, conversation-starting masterpiece without even turning on your oven. Doesn’t that feel good? You didn’t bake anything, you curated it, which sounds way fancier. Next time someone asks for the recipe, just smirk and say, “It’s all in the assembly.” Now go forth and create the most epic sugar landscape the world has ever seen. Seriously, share your photos—I need the inspo!

