

Your Ultimate Guide to the Best Christmas Pudding Recipe (Seriously, It’s Epic!)
Ever stared at a store-bought Christmas pudding, feeling that pang of existential dread, wondering what mysterious, rubbery orb you’re about to serve your unsuspecting family? Yeah, me too. For years, I avoided the traditional festive dessert like it was a fruitcake with a bad reputation. But then, a few Christmases ago, I decided enough was enough. I dove headfirst into the world of homemade Christmas pudding, and let me tell you, it changed my life (and my holiday dessert game) forever. This Christmas pudding recipe is the real deal, folks.
Why This Christmas Pudding Recipe Will Make You a Legend
Let’s be honest, who doesn’t want to be a holiday legend? This recipe isn’t just “good”; it’s “call your grandma and tell her you’ve outdone her” good. Forget the dry, dense, and frankly, depressing puddings of yore. This bad boy is moist, rich, bursting with fruit and spice, and has a gloriously boozy kick. Plus, making it from scratch? Total bragging rights. You’ll impress every single guest, even that one aunt who always critiques everything. “Oh, this old thing? Just a little something I whipped up.” 😉

It’s surprisingly easy to make, too. Seriously, if you can stir a bowl and wait patiently (the hardest part, IMO), you can master this. The magic happens mostly in the steaming, which means your oven is free for other festive chaos. And the flavor? It deepens and develops over time, making it the ultimate make-ahead dessert. Win-win, right?
The Goods: What You’ll Need
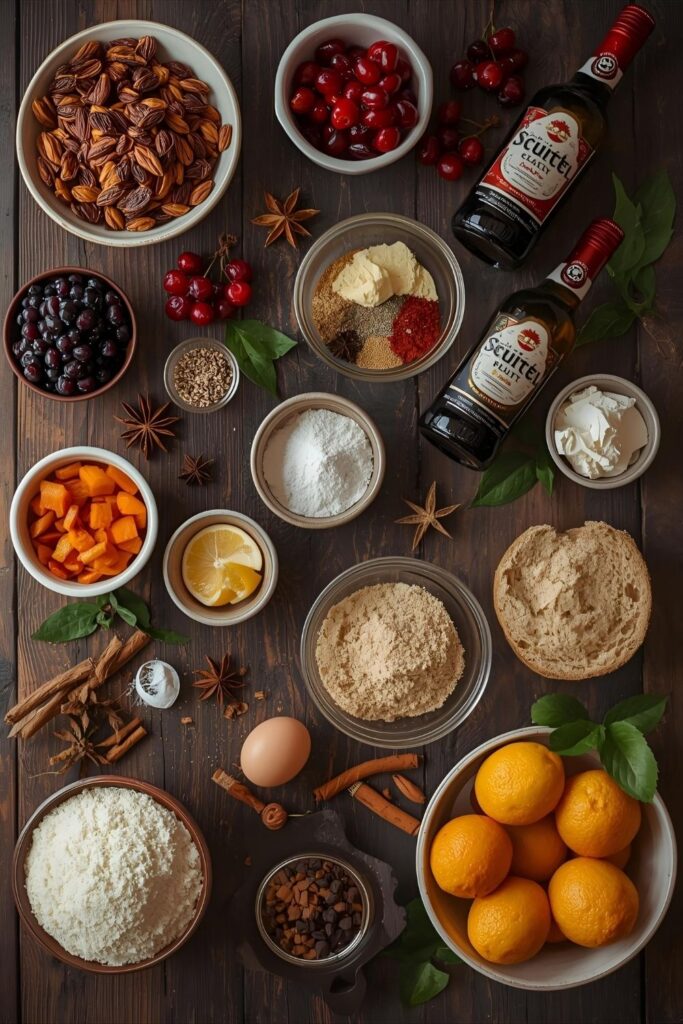
Gather your ingredients, my friend. Think of it as assembling your culinary Avengers.
- 200g (7 oz) Raisins
- 200g (7 oz) Sultanas
- 200g (7 oz) Currants
- 100g (3.5 oz) Dried Cranberries (optional, but they add a lovely tartness!)
- 150g (5 oz) Mixed Peel (yes, the stuff you usually skip – it’s crucial here!)
- 150g (5 oz) Glacé Cherries, chopped
- 150g (5 oz) Dark Muscovado Sugar (for that deep, caramel goodness)
- 100g (3.5 oz) Self-Raising Flour
- 100g (3.5 oz) Fresh Breadcrumbs (stale white bread works best, FYI)
- 175g (6 oz) Shredded Suet (beef or vegetable suet, pick your poison!)
- 2 Large Eggs, beaten
- 1 Apple, grated (peel it first, obvs)
- 1 Lemon, zest only
- 1 Orange, zest and juice
- 1 tsp Mixed Spice
- 1/2 tsp Ground Cinnamon
- 1/4 tsp Ground Nutmeg
- 100ml (3.5 fl oz) Brandy or Dark Rum (plus extra for feeding and flaming!)
- 50ml (1.7 fl oz) Stout or Ale (Guinness works a treat!)
- Pinch of Salt
Substitutions? You Betcha!
- Dried Fruit: Feel free to swap out some of the traditional fruits for dried apricots, prunes, or figs. Just keep the total weight roughly the same.
- Alcohol: If you’re not a brandy fan, dark rum or even a good quality sherry works wonders. For an alcohol-free version, use orange juice or strong cold tea.
- Suet: Vegetarian suet is widely available and performs just as well.
- Sugar: Dark brown sugar can stand in for muscovado if you’re in a pinch, but the flavor won’t be quite as rich.
Your Kitchen Arsenal: Tools & Gadgets

You don’t need a professional kitchen, but a few key pieces make life easier.
- Large Mixing Bowl: You’ll be doing a lot of stirring!
- 2-Liter Pudding Basin with Lid: Or two 1-liter basins if you prefer smaller puddings.
- Large Stockpot or Deep Saucepan with a Lid: For steaming the pudding. Make sure your basin fits inside with room for water!
- Heatproof Trivet or Steaming Rack: To keep the basin off the bottom of the pot. A crumpled piece of foil works in a pinch.
- Foil and Baking Parchment: For covering the pudding basin if it doesn’t have a tight-fitting lid.
- Grater: For the apple and citrus zest.
- Measuring Jug and Scales: Precision is key, my friend.
- Spatula or Wooden Spoon: For mixing all that goodness.
Let’s Get Pud-ding! Step-by-Step Instructions
Alright, buckle up buttercup, it’s time to make some magic.
Step 1: The Soaking Extravaganza (Do This the Night Before!)
In your large mixing bowl, combine all the dried fruits, mixed peel, and glacé cherries. Pour over the brandy/rum and stout/ale. Stir it all up, cover the bowl, and leave it to soak overnight (or at least for 8 hours). This is where the fruits get plump and happy, soaking up all that boozy goodness. Don’t skip this, seriously.
Step 2: Assemble Your Troops
The next day, it’s game time! Lightly grease your pudding basin(s). If your basin doesn’t have a lid, cut a large circle of baking parchment and then a larger circle of foil. You’ll need these later.
Step 3: Mix It Up!
Add the muscovado sugar, self-raising flour, breadcrumbs, suet, beaten eggs, grated apple, lemon zest, orange zest and juice, mixed spice, cinnamon, nutmeg, and salt to the bowl with the soaked fruit. Now, this is the fun part – or the arm workout, depending on your perspective. Mix everything thoroughly. Like, really thoroughly. You want all those ingredients to be best friends, perfectly combined. This is traditionally where everyone in the family gives a stir and makes a wish. Go on, make a wish!
Step 4: Pack It In
Spoon the mixture into your prepared pudding basin(s), packing it down gently. Don’t fill it right to the brim; leave about an inch for expansion. Nobody likes an overflowing pudding disaster, TBH.
Step 5: Lid It Up!
If your basin has a lid, simply pop it on. If not, here’s a pro tip: Place the circle of baking parchment directly on top of the pudding, then cover it tightly with the foil, pressing it down around the rim. Tie it securely with string if you’re feeling fancy, creating a handle with the string over the top for easy lifting. This prevents water from getting in.
Step 6: The Steaming Marathon
Place your trivet or steaming rack in the bottom of your large stockpot. Carefully lower the pudding basin onto the trivet. Pour boiling water into the pot until it comes about two-thirds of the way up the side of the pudding basin.
Bring the water to a gentle simmer, then cover the pot with its lid. Now, here’s the kicker: steam the pudding for 6-8 hours for a large 2-liter pudding, or 4-5 hours for smaller 1-liter puddings. Check the water level occasionally and top it up with more boiling water if needed. Don’t let it boil dry! That would be a tragedy of epic proportions.
Step 7: Cool Down, Buttercup
Once steamed, carefully lift the pudding basin out of the pot. Remove the foil/lid and let the pudding cool completely in the basin. Once cool, recover it with fresh baking parchment and foil.
Step 8: The Waiting Game (aka Feeding Time)
Store your Christmas pudding in a cool, dark place for at least a month before Christmas. The longer it matures, the better it tastes! Every week or so, poke a few holes in the top with a skewer and “feed” it with a tablespoon or two of extra brandy or rum. This keeps it moist and develops that glorious flavor. IMO, this is the secret sauce.
Step 9: Re-Steaming for Glory!
On Christmas Day (or whenever you decide to unleash its deliciousness), steam the pudding for another 2-3 hours (or 1-1.5 hours for smaller puddings) using the same method as before.
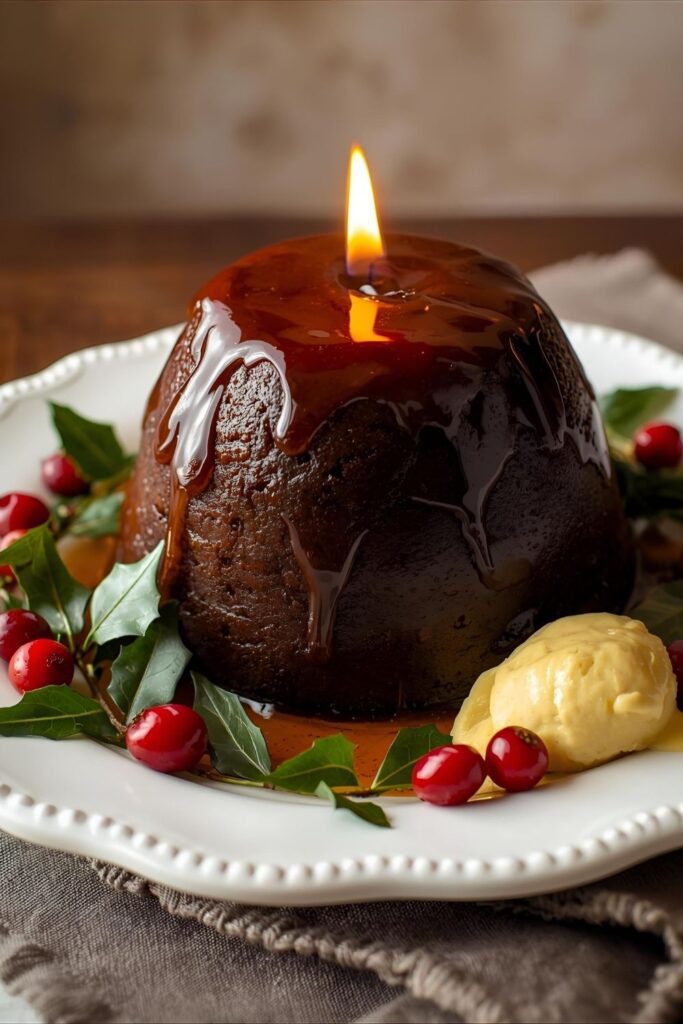
Step 10: The Grand Finale
To serve, invert the pudding onto a serving plate. Warm a little extra brandy in a ladle, light it carefully (away from anything flammable, please!), and pour it over the pudding as you bring it to the table. Oohs and aahs guaranteed! Serve with brandy butter, custard, or clotted cream. Enjoy your masterpiece!
Calories & Nutritional Info (The Not-So-Fun But Necessary Bit)
Alright, let’s be real. This isn’t health food. But it’s Christmas, so who cares, right? 😉 Here’s a rough estimate per serving (assuming 12 servings from a 2-liter pudding).
- Calories: Approximately 400-500 kcal per serving (this varies greatly depending on ingredients and portion size).
- Fat: Around 15-20g (mostly from suet and dried fruit).
- Carbohydrates: Roughly 60-70g (hello, sugar and fruit!).
- Sugar: A significant portion of the carbs, probably around 40-50g.
- Fiber: Decent fiber content from all those glorious fruits!
- Protein: Minimal, as expected.
Nutritional Note: This is an indulgent treat, best enjoyed in moderation. It’s packed with energy, perfect for fueling your festive cheer!
Common Mistakes to Avoid (So You Don’t Cry into Your Custard)
Nobody’s perfect, but we can avoid these common pudding pitfalls.
- Not Soaking the Fruit: This is a cardinal sin! Always soak your fruit overnight. Otherwise, you’ll end up with dry, shriveled bits and a less flavorful pudding.
- Under-Steaming: Patience, grasshopper! Don’t cut short the steaming time. It needs those hours to cook through properly and develop its texture. An undercooked pudding is dense and gluey. Blech.
- Overfilling the Basin: Remember that inch of space? It’s crucial. Overfilling leads to spillage and a messy steamer, plus a misshapen pudding. Not pretty.
- Letting the Steamer Boil Dry: This is a disaster. Always keep an eye on the water level and top it up with boiling water when needed. A dry pot means a burnt, ruined pudding.
- Not Feeding the Pudding: A well-fed pudding is a happy pudding! Regularly feeding it with brandy (or your chosen tipple) keeps it moist and enhances the flavor. Don’t neglect it!
- Skipping the Maturation: If you make this right before Christmas, it’ll still be good, but it won’t be great. The magic truly happens during the maturing period. Plan ahead!
Variations & Customizations (Because You’re a Culinary Rebel)
Feeling adventurous? Here are some ways to tweak this classic.
- Boozy & Spicy: Amp up the spices even more with a pinch of cloves or allspice. For extra boozy kick, use a higher proof brandy or even a touch of rum essence in addition to the real stuff. You could even swap the stout for a rich porter or a spiced rum.
- Citrus Zest Explosion: Double down on the citrus! Add the zest of two lemons and two oranges for a brighter, zingier pudding. You could also include a tablespoon of finely chopped candied citrus peel.
- Nutty Perfection: Incorporate 50g (1.7 oz) chopped walnuts or pecans into the mixture for added texture and a lovely nutty flavor. Toast them lightly beforehand for extra oomph!
- Chocolate Indulgence: For the chocoholics, add 50g (1.7 oz) good quality dark chocolate chips or chopped dark chocolate to the mixture. It melts beautifully and adds a luxurious touch.
- Apple Cider Swap (Alcohol-Free): For a non-alcoholic version that still has depth, substitute the brandy and stout with a good quality, unsweetened apple cider or even strong, cold Earl Grey tea. You can still feed it with apple cider or a non-alcoholic spirit alternative.
FAQ Section: Your Burning Pudding Questions, Answered!
Q1: Can I make Christmas pudding in advance?
A: Absolutely, and you should! Making it at least a month in advance allows the flavors to mature and deepen, resulting in a much richer and more complex pudding. Some folks even make it months earlier.
Q2: How do I store Christmas pudding?
A: Once cooled, wrap it tightly in fresh baking parchment and foil, then store it in a cool, dark, dry place. A pantry or larder is perfect. No need to refrigerate it unless your house is super warm.
Q3: Can I freeze Christmas pudding?
A: Yep! After the initial steaming and cooling, wrap it well in foil and then a layer of cling film (plastic wrap) before freezing. It will keep for up to a year. Thaw it completely in the fridge before re-steaming.
Q4: What do I serve with Christmas pudding?
A: The classics are brandy butter, custard (homemade is best!), clotted cream, or even a simple scoop of vanilla ice cream. Some people also like a dollop of boozy cream. Pick your poison!
Q5: My pudding is dry, what went wrong?
A: Likely culprits: not enough liquid initially, under-steaming, or not “feeding” it enough during maturation. Make sure you follow the soaking and steaming times, and don’t skimp on those brandy feeds!
Q6: Can I make this gluten-free?
A: You bet! Simply swap the self-raising flour for a gluten-free self-raising flour blend and ensure your breadcrumbs are made from gluten-free bread. The suet is naturally gluten-free, but always check labels.
Q7: What’s the best way to reheat Christmas pudding?
A: The best way is to re-steam it for 2-3 hours (or 1-1.5 hours for smaller puddings) on the day you plan to serve it. You can also microwave individual portions for a minute or two, but steaming gives a much better texture.
Final Thoughts (You’re a Pudding Pro Now!)
So there you have it, folks! Your complete, no-nonsense guide to making a Christmas pudding that will have your family singing your praises (or at least, not complaining about dessert). Seriously, once you’ve made your own, you’ll never go back to those sad, supermarket imposters. This isn’t just a recipe; it’s an experience. Now go forth, conquer that pudding, and don’t forget to share your triumphs (and maybe a pic or two!) with me. Happy stirring, you culinary genius, you!

