The Melted Snowman Cookies That Are a Glorious, Adorable Mess
Let’s get one thing straight. The holidays are a time for joy, not for weeping over a piping bag that has exploded for the third time. We’ve all seen the flawlessly decorated cookies on the internet, each one a tiny, perfect work of art. And we’ve all attempted to recreate them, only to produce a batch of cookies that look like they’ve been decorated by a squirrel on a caffeine bender.

But what if I told you there’s a design where “messy” is the entire point? What if “oops, it’s a little lopsided” was actually the goal? If you’re looking for some Christmas cookie decorating ideas that are fun, foolproof, and downright adorable, then you need to embrace the chaos and make these Melted Snowman Cookies.
Why This Decorating Idea is Pure, Unadulterated Genius
First of all, this is the most forgiving cookie design in the history of baking. The whole point is that the snowman is a melted puddle, so there are no straight lines, no perfect circles, and absolutely zero precision required. It’s a craft project where your lack of artistic talent is actually an asset. Can I get a hallelujah?

Second, it’s an incredibly fun and interactive activity for all ages. Kids can go wild creating their own little melty friends, and adults will get a kick out of the whimsical, charming result. They are guaranteed to be the most talked-about cookie on the platter, not because they’re perfect, but because they’re full of personality.
The “Recipe” for Adorable Puddles of Joy
This is less of a recipe and more of a ridiculously fun assembly project.
For Decorating a Dozen Cookies:

- 12 Baked and Cooled Round Sugar Cookies: Your favorite recipe or even store-bought will work. A 3-inch round is a great size.
- 12 Large Marshmallows: The classic, puffy kind.
- Mini Chocolate Chips: For the eyes and buttons.
- Orange Sprinkles (Jimmies) or Orange Star Sprinkles: For the all-important carrot nose.
- Pretzel Sticks: For the twig arms.
Tools & Kitchen Gadgets Used
You need an absolute minimum of fancy gear for this. Your microwave is the star player.
- Baking Sheet: Lined with parchment paper.
- Microwave: Or an oven set to a low temperature.
- That’s it. Seriously. It’s that easy.
Step-by-Step Guide to Your Melty Masterpieces
Ready to create the cutest, most low-stress cookies of the holiday season? Let’s get melting.
H3: The Great Meltdown
- Prep Your Station: Before you start melting, get all your decorating components ready to go in little bowls: your mini chocolate chips, your orange sprinkles, and your pretzel sticks broken in half. You’ll need to work quickly once the marshmallow is melted.
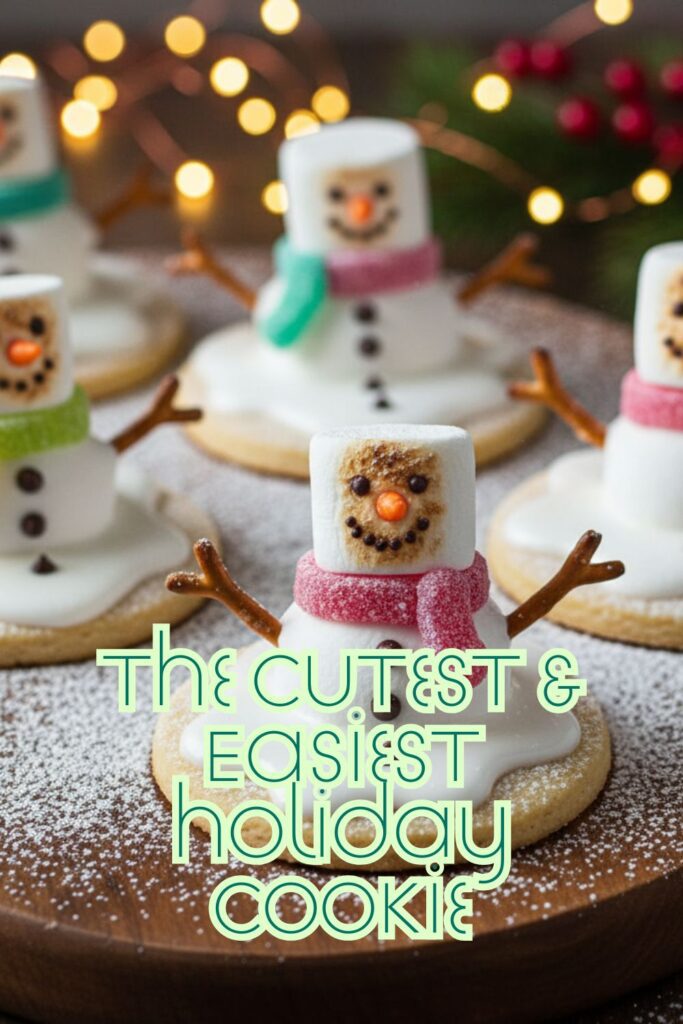
- Arrange the Cookies: Place your completely cooled round sugar cookies on a parchment-lined baking sheet, giving them a little space. Place one large marshmallow in the center of each cookie.
- Time to Melt! This is the fun part. Place the baking sheet in the microwave. Heat on high in very short bursts of 5-7 seconds. Watch it like a hawk! You want the marshmallow to puff up and then slump down into a glorious, misshapen, melted puddle. Do not walk away, or you will have a volcanic marshmallow situation.
- (Alternative Oven Method: Place the baking sheet in a preheated 350°F (175°C) oven for just 1-2 minutes until the marshmallows are soft and slumped.)
H3: Bring Your Snowman to Life (Work Fast!)
- Create the Face: As soon as you take them out of the microwave, and while the marshmallow is still warm, soft, and sticky, gently press two mini chocolate chips into the upper part of the puddle for the eyes.
- Add the Nose: Carefully place one orange sprinkle where the nose should be. It will look hilariously tiny and perfect.
- The Buttons: Press three more mini chocolate chips down the “body” of the melted marshmallow to look like little coal buttons.
- Give ‘Em Arms: Gently press two broken pretzel stick halves into the sides of the marshmallow for the twig arms. Let your creativity shine—make them wave, make them reach for the sky, who cares!
- Let Them Set: Let the cookies sit at room temperature for at least 30 minutes for the marshmallow to cool and set completely. Once set, they will no longer be sticky to the touch.
Calories & Nutritional Info

It’s a cookie with a marshmallow and candy on it. Let’s not kid ourselves.
- Serving Size: One adorable, melted snowman.
- Nutritional Value: 100% pure, unadulterated holiday cheer.
- Active Ingredient: Whimsy.
(Disclaimer: The main health benefit of this cookie is the serotonin boost you get from looking at its goofy little face.)
Common Mistakes to Avoid (For Maximum Cuteness)
Don’t let these simple errors turn your cute puddles into a hot mess.
- Incinerating the Marshmallow: The line between “perfectly slumped” and “a terrifying, expanding sugar-monster that will weld itself to the inside of your microwave” is very, very thin. Use short 5-second bursts and watch it the entire time.
- Decorating a Cold Marshmallow: You have a very short window while the marshmallow is warm and sticky to add your decorations. If you wait for it to cool, nothing will stick to it. Have all your decorations ready to go before you start melting.
- Using Mini Marshmallows: While cute, mini marshmallows don’t create the same satisfying, large puddle. You need the heft of one large marshmallow per cookie to get the right melted effect.
- Starting with Warm Cookies: If your base cookie is still warm from the oven, it will make the marshmallow melt too quickly and can create a soupy mess. Your cookies must be completely cool before you begin.
Variations & Customizations
These little guys are begging for some creative flair!
- Add a Festive Scarf: Before you add the arms, drape a small piece of a fruit roll-up or a thin strip of sour candy belt around the “neck” of your snowman for a colorful, edible scarf.
- Sparkly Snow Scene: Before you place the marshmallow on the cookie, spread a thin layer of simple white icing or frosting on the cookie and immediately cover it with white or iridescent sanding sugar. This creates a beautiful, sparkly snow base for your snowman to melt on.
- Chocolate Lovers’ Melted Snowman: Use a chocolate sugar cookie or a brownie bite as your base. Use a regular marshmallow, or if you can find them, a chocolate-flavored one for a “muddy” snowman look.
FAQ: Your Christmas Cookie Questions, Answered
Let’s clear up some common questions about this fun project.
1. What’s the best kind of cookie to use as a base?
A sturdy cut-out sugar cookie is the best choice because it provides a flat, stable base. A simple round shortbread or even a snickerdoodle would also work!
2. Can I use frosting instead of a melted marshmallow?
You can, but you won’t get the same 3D, “puddled” effect. If you do, use a thick, white royal icing or buttercream and spread it in an irregular circle to mimic a puddle.
3. How do I store these cookies?
Once the marshmallow is completely set, you can store these cookies in a single layer in an airtight container at room temperature for up to 3 days. Stacking them can cause the pretzel arms to break or stick.
4. Can I make these ahead of time?
You can bake the sugar cookie bases several days in advance and store them in an airtight container. The decorating part is so fast that it’s best done the day of or the day before you plan to serve them for the freshest look.
5. My marshmallows are just puffing up and not slumping. What’s wrong?
Every microwave is different. It might need another 2-3 seconds. If it puffs up like a balloon, just wait a second after the microwave stops; it should naturally deflate and slump down. You can also give it a gentle poke to encourage the slump.
6. What else can I use for the nose?
A single orange nonpareil sprinkle, the tip of a candy corn, or even a tiny dot of orange-tinted frosting would all work perfectly for the carrot nose.
7. The pretzel arms keep breaking! Any tips?
Pretzel sticks are delicate. Try to gently press them into the sides of the marshmallow puddle rather than pushing them down from the top. If they keep breaking, you can also use chocolate sprinkles (jimmies) for a different kind of twig arm.
Final Thoughts
You are now ready to create the most charming, personality-filled, and stress-free cookies of the holiday season. These Melted Snowman Cookies are a hilarious and joyful reminder that holiday baking doesn’t have to be perfect to be wonderful. So go on, embrace the mess, have a laugh, and create some delicious, melty little friends.