
The Easiest Christmas Bark Bites (Your Holiday Hero Recipe!)
We need to talk about December. It’s a magical month filled with joy, cheer, and an overwhelming sense of panic as your to-do list multiplies like Gremlins in a swimming pool. You’ve got gifts to buy, parties to attend, and you foolishly promised to “bring a festive treat.” Before you spiral into a full-blown tinsel-fueled meltdown, I’m here to offer you a lifeline: these ridiculously easy Christmas bark bites. This isn’t just a recipe; it’s a holiday survival hack. It’s the answer to the question, “How can I produce something that looks adorable and festive with the absolute minimum amount of effort and time?” So, put down that complicated 12-step cookie recipe and let’s make some magic.
Why These Christmas Bark Bites Are a Genius Idea

Still think you need to turn your kitchen upside down to make a decent holiday treat? Think again. These little bites of joy are your new secret weapon, and here’s why.
It’s a No-Bake, 10-Minute Miracle
I am not exaggerating. The active work time for this recipe is about 10 minutes. The primary skills required are melting chocolate in a microwave and having the artistic vision to sprinkle things on top. It’s the perfect recipe for when you’re short on time, energy, and patience.
Infinitely Customizable and Fun

This is the ultimate “clean out the pantry” holiday recipe. Got some pretzels? Throw ’em on. A handful of festive M&Ms? Perfect. Random sprinkles from your kid’s last birthday party? Go for it! You can create a new masterpiece every time, and it’s a fantastic recipe to make with kids.
The Perfect Bite-Sized Gift
Because we cut these into small “bites,” they are absolutely perfect for packaging. Stuff them into little cellophane bags, pile them into a holiday tin, or arrange them on a platter. They’re colorful, festive, and scream “I’m a thoughtful person who makes delicious things.”
The Ingredients for Your Festive Masterpiece

Think of this less as a strict recipe and more as a very strong suggestion.
The Base
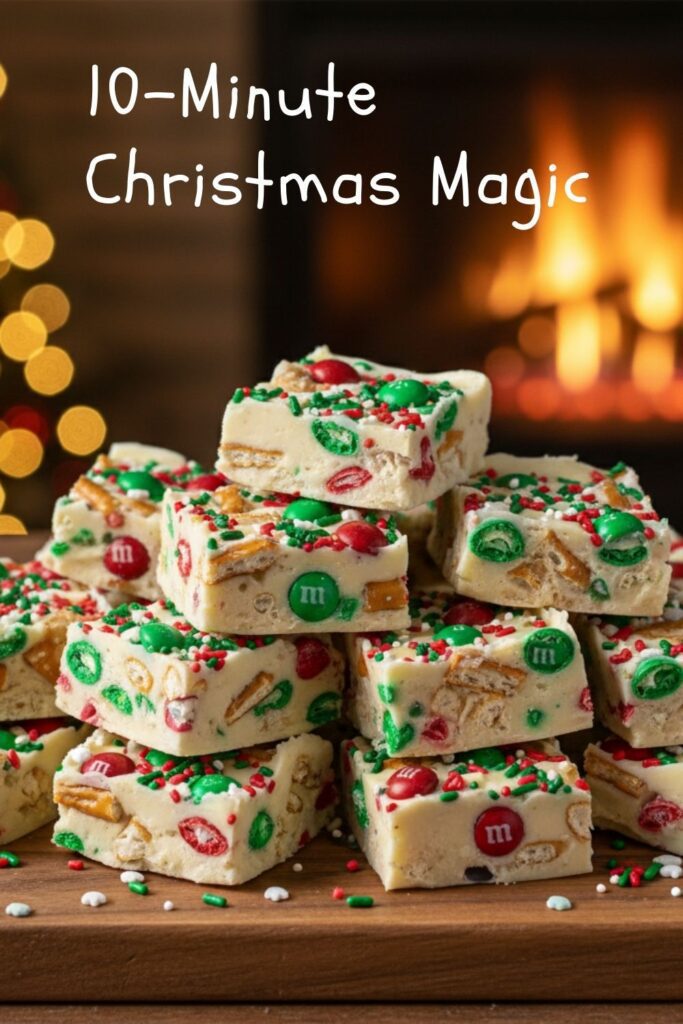
- White Almond Bark or Vanilla Candy Melts: 24 ounces. This is our canvas. It melts beautifully and sets up hard without any fuss, making it ideal for bark.
The Toppings (Go Wild!)
- Holiday M&Ms: About 1 cup, red and green are classic.
- Crushed Pretzels: About 1 cup. For that essential sweet and salty crunch.
- Crushed Peppermint Candies or Candy Canes: About ½ cup. It’s not Christmas without peppermint, right?
- Festive Sprinkles: As many as your heart desires. Jimmies, nonpareils, little trees—you name it.
- Optional Add-ins: Chopped dried cranberries, pistachios, or mini chocolate chips.
The Uncomplicated Tools & Kitchen Gadgets
You don’t need anything fancy to become a bark-making artist.
- Baking Sheet: A large, rimmed one is your best friend here.
- Parchment Paper or a Silicone Baking Mat: This is NON-NEGOTIABLE. Seriously. Do not skip this.
- Large, Microwave-Safe Bowl: For melting your chocolatey base.
- Silicone Spatula or an Offset Spatula: For spreading the melted candy coating smoothly.
- A Sharp, Heavy Knife: For cutting the bark into perfect little bites without shattering it.
Step-by-Step Instructions: Let’s Get Festive!
This is quite possibly the easiest recipe you will ever read. Let’s do it.
Step 1: Prep Your Pan and Toppings
Line a large baking sheet with parchment paper. This creates a non-stick surface that will make your life so much easier later. Get all your toppings ready in small bowls so you can work quickly once the chocolate is melted.
Step 2: Melt the Candy Coating
Place your white almond bark or candy melts into a large, microwave-safe bowl. Microwave on 50% power for 1-minute intervals, stirring well after each one. It’s crucial to use lower power and stir often to prevent it from scorching. Stop heating when it’s about 90% melted and just stir until the residual heat melts the remaining lumps and it’s perfectly smooth.
Step 3: Spread it Out
Pour the beautifully melted candy coating onto your prepared baking sheet. Use your spatula to spread it into a thin, even layer. It doesn’t need to be a perfect rectangle, a rustic shape is part of the charm.
Step 4: Unleash the Topping Storm!
Now, for the fun part. Working quickly while the candy coating is still wet, sprinkle all your toppings evenly over the top. Start with the bigger items like pretzels and M&Ms, then fill in the gaps with the crushed peppermint and festive sprinkles. Gently press the toppings into the melted candy with your hands or the back of a spatula to make sure they stick.
Step 5: Chill Out
Place the entire baking sheet in the refrigerator for 30-60 minutes, or until the bark is completely firm and hard to the touch. You shouldn’t be able to leave a fingerprint in it.
Step 6: Cut into Bites
Once the bark is fully set, lift the whole sheet of it off the pan using the parchment paper. Place it on a sturdy cutting board. Use a large, sharp knife to press down firmly and cut the bark into small, 1 to 1.5-inch squares or “bites.” A heavy knife works better than a thin, flimsy one.
Calories & Nutritional Info

Let’s just call each bite a tiny parcel of holiday joy and leave it at that.
- Serving Size: 1 Christmas bark bite (approx. 1×1 inch)
- Calories: Approximately 80-100 kcal
- Fat: ~5g
- Carbohydrates: ~9g
- Sugar: ~8g
- Protein: ~1g (Disclaimer: This is a wild guess. The actual nutrition will change drastically depending on what treasures you decide to sprinkle on top.)
Common Mistakes to Avoid (Don’t Be a Grinch)
This is easy, but you can still make a mess if you’re not paying attention.
- Burning the Candy Coating: I’ll say it again for the people in the back: microwave on low power and in short bursts. Burnt almond bark is a sad, clumpy, unsalvageable tragedy.
- A Topping Catastrophe: If you wait for the candy coating to start setting before you add your toppings, they will just sit on top and fall off later. You need to sprinkle them on immediately while the base is still wet and acting like glue.
- The Shatter Effect: Trying to cut cold, hard bark with a flimsy knife will result in it shattering into a million sad shards. Use a heavy, sharp chef’s knife and press down firmly to make clean cuts. Letting the bark sit at room temp for 10 mins before cutting can also help.
- Forgetting the Parchment Paper: Do you enjoy scraping hardened candy off of metal surfaces for hours? No? Then use parchment paper.
Variations & Customizations (Choose Your Own Adventure!)
The base recipe is just a starting point. Let your festive flag fly!
1. “Grinch” Bark Bites
Use green candy melts for your base. Once you spread it out, swirl in a little bit of melted white candy coating. Top with red heart sprinkles and a dusting of white nonpareils. Your heart will grow three sizes, I promise.
2. Dark Chocolate Reindeer Bark
Use a semi-sweet or dark chocolate base. Top with mini pretzels, candy eyeballs, and a single red M&M on some of the pretzel clusters to create adorable little reindeer faces. It’s almost too cute to eat. Almost.
3. “Cookies for Santa” Bark Bites
Use a white chocolate base. Top with crushed Oreos, crushed chocolate chip cookies, and red and green sprinkles. It’s like leaving all of Santa’s favorite treats for him in one convenient, delicious bite.
FAQ Section: Your Bark-Related Bafflements, Busted
What’s the best kind of chocolate to use?
For the easiest, most foolproof results, almond bark or candy melts are the way to go. They are designed to melt smoothly and set up hard without any special techniques. You can use real chocolate, but it may not set as firm at room temperature unless you temper it.
How do you store Christmas bark?
Store it in an airtight container at room temperature for up to two weeks. If your house is particularly warm or you used real chocolate, it’s best to store it in the fridge.
How long does it take for the bark to set?
In the refrigerator, it will be fully hardened in about 30-60 minutes. At a cool room temperature, it might take a couple of hours.
Can I layer different kinds of chocolate?
Absolutely! Spread a layer of dark chocolate, let it set briefly in the fridge (about 15-20 mins), then spread a layer of white chocolate on top before adding your toppings.
Why is my bark soft or sticky?
This can happen if you used real chocolate chips without tempering them, as they contain stabilizers and fats that keep them softer. It can also happen if the bark isn’t fully set yet or if it’s stored in a warm, humid place.
Can I make this on the stove?
Yes! You can use a double boiler to melt the candy coating. Just place it in a heatproof bowl over a saucepan of simmering water and stir until it’s smooth.
What are the best toppings for Christmas bark?
Literally anything festive! Think sweet and salty (pretzels, salted nuts), crunchy (peppermint, toffee bits), chewy (dried cranberries, mini marshmallows), and colorful (sprinkles, M&Ms).
Final Thoughts
And there you have it. You are now the proud owner of a recipe so simple, so festive, and so versatile, it will single-handedly save you from holiday stress. You can whip up a batch of these Christmas bark bites faster than it takes to watch your favorite holiday movie. So go on, embrace the ease. Make a giant batch, package it up, and become the undisputed champion of homemade holiday gifts. You’ve got this.

