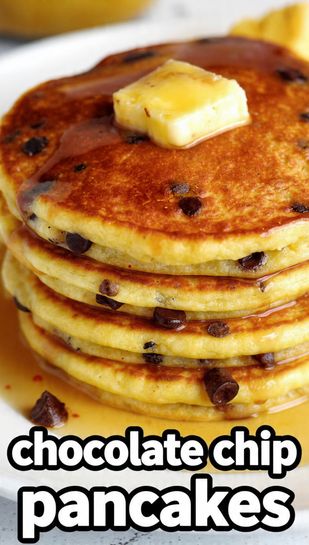
🍫 The Ultimate Fluffy Chocolate Chip Pancakes Recipe (With Melty Pools of Chocolate!)
Let’s be honest, the basic pancake is fine. It’s a respectable foundation. But when you introduce the magic of chocolate chips, you don’t just upgrade breakfast; you transform it into a glorious, dessert-for-breakfast experience. We’re not talking about those sad, meagerly studded discs from a mix. We’re going for fluffy, mile-high pancakes loaded with melty pools of rich chocolate in every single bite. If your weekend doesn’t start with a stack of the chocolate chip pancakes, are you even doing it right? I didn’t think so. Get ready to ditch the box and learn the simple secrets to making the perfect, decadent stack.
Why This Recipe is Your Weekend Necessity

This recipe is a massive crowd-pleaser and surprisingly easy. It delivers maximum indulgence with minimum kitchen chaos.
Flavor Profile: Chocolate Bliss Meets Fluffy Tang
This recipe uses a secret weapon (hint: it’s not buttermilk, but something similar!) to ensure the base pancake is light and airy, offering a slight tang that perfectly balances the sweet, intense richness of the melted chocolate chips. The edges are slightly crisp, the interior is tender, and you get that gooey, warm chocolate satisfaction in every forkful. This is the definition of comfort food decadence.
Ease of Execution: Simple Steps, Epic Results
We keep the technique minimal and the ingredients simple. You don’t need a pastry degree to master these pancakes; you just need to remember one crucial folding rule (more on that later!). This recipe is fast, forgiving, and easily scalable—perfect for a lazy Saturday morning or a massive brunch party. TBH, the hardest part is waiting for the chocolate to set enough not to burn your tongue.
The Essentials: Ingredients
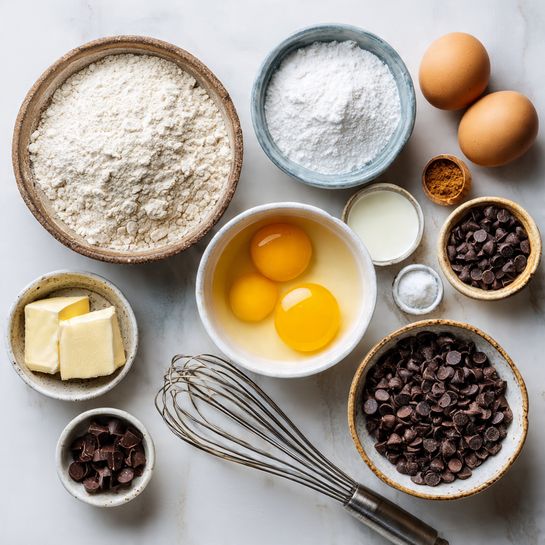
This list uses simple kitchen staples. The key is in the ratio and the temperature!
- 1 3/4 cups All-Purpose Flour: The foundation of your fluffy stack.
- 2 teaspoons Baking Powder: Provides the essential lift for thick pancakes.
- 1/2 teaspoon Baking Soda: Gives a little extra push (and helps browning!).
- 1/2 teaspoon Salt: Essential for balance.
- 2 Tablespoons Granulated Sugar: Just enough for sweetness and caramelization.
- 1 1/2 cups Milk (any kind): The liquid base.
- 1 Tablespoon White Vinegar or Lemon Juice: The secret ingredient for making “fake” buttermilk! Mix it into the milk and let it sit for 5 minutes.
- 1 Large Egg: Provides structure and richness.
- 1/4 cup Unsalted Butter: Melted and slightly cooled.
- 3/4 cup Semi-Sweet Chocolate Chips: Use mini chips for better distribution, or high-quality chocolate chunks for melty pools.
Key Substitutions for When the Craving Hits
- No Milk/Vinegar Combo? Use 1 1/2 cups of store-bought buttermilk. It works just as well and provides that classic buttermilk tang.
- Butter Substitute: Use an equal amount of neutral oil (like vegetable or canola) for the melted butter. You’ll lose a little richness, but they’ll still be fluffy.
- Chocolate Chip Swap: Use white chocolate, peanut butter chips, or coarsely chopped dark chocolate bar pieces. Make sure they are small enough not to sink.
Tools & Kitchen Gadgets Used
Minimal gear is needed for maximum morning glory. Focus on the griddle!
- Large Mixing Bowl (2): One for dry ingredients, one for wet. This is non-negotiable for proper mixing.
- Whisk: For combining the dry ingredients and blending the wet mixture.
- Rubber Spatula: Crucial for gently folding the batter! Avoid metal spoons for mixing.
- Griddle or Large Skillet: A flat griddle or cast-iron skillet is ideal for even heat distribution.
- Measuring Cups and Spoons: For accurate fluff factor.
- Ladle or 1/4 Cup Measuring Cup: For pouring perfectly uniform pancakes.
- Wire Rack and Baking Sheet: For draining and keeping the cooked pancakes crispy and warm.
The Decadent Fluff: Step-by-Step Instructions
Follow the technique exactly. The key to success is in the timing and the gentle hand.
Step 1: Prep the “Buttermilk” and the Dry Mix
First, create your fake buttermilk: pour the white vinegar or lemon juice into the milk and set it aside for 5 minutes. It will look slightly clumpy—perfect! In your first large mixing bowl, whisk together the flour, baking powder, baking soda, salt, and sugar. In the second bowl, whisk the egg into the buttermilk mixture, followed by the melted, cooled butter.
Step 2: The Gentle Fold (Lumps Are Life)
Pour the wet ingredients into the dry ingredients. Now, this is the most important step: use your rubber spatula to fold the batter gently until just combined. A few lumps of flour should still be visible. Stop mixing immediately! Let the batter rest for 5–10 minutes—this allows the leavening agents to activate.
Step 3: Add the Chocolate Chips
Gently fold in about half of the chocolate chips into the rested batter. Do not overmix! We only add half now to ensure the inside has chocolate; the rest go on the griddle.
Step 4: Cook the Stack (Watch for Bubbles)
Heat your griddle or skillet over medium heat. Test the heat with a flick of water. Lightly grease the surface with a small pat of butter or oil. Ladle the batter onto the hot griddle. Immediately after pouring, sprinkle the top of the raw pancake with a few of the reserved chocolate chips.
Step 5: The Flip and Finish
Cook until bubbles form and burst across the surface and the edges appear dry (about 2–3 minutes). Using a wide spatula, flip the pancake quickly. Cook for another 1–2 minutes until the second side is golden brown and the chocolate is melty. Transfer the finished pancakes to a wire rack in a warm oven (200°F/95°C) to keep them warm while you finish the batch. Now, pour that syrup!
Calories & Nutritional Info (The Sweet Reality)

Yes, chocolate is involved. No, we are not judging. This recipe yields about 12 medium pancakes (approx. 3 servings).
- Estimated Calories Per Serving (4 pancakes, pre-syrup): ~450–550 calories (depending on chocolate chip density).
- Carbohydrates: High, great for energy!
- Fat: Moderate, from the butter and chocolate chips.
- Protein: Moderate, from the egg and milk.
Nutritional Note: Chocolate chips bring a little extra sugar and fat to the party, but hey, it’s a weekend! Pair these with some fresh berries on top for antioxidants and fiber. Balance is key, right?
Common Mistakes to Avoid (Chocolate Chip Catastrophes)
Don’t let these common errors ruin your decadent brunch. Fluffiness is a science!
- Mistake #1: Overmixing the Batter. This is the number one cause of flat, tough pancakes. Lumps are required! Mix only until the dry flour streaks disappear.
- Mistake #2: Cooking on High Heat. High heat burns the chocolate chips before the pancake center cooks, leading to a raw middle and a black crust. Cook on medium heat, always.
- Mistake #3: Mixing All Chips into the Batter. The chips weigh the batter down, potentially making the pancakes flatter. Mix only half in, and sprinkle the rest on top once the batter is on the griddle.
- Mistake #4: Flipping Too Soon. You must wait for the bubbles to fully burst and the raw center to look set before flipping. Premature flipping deflates the pancake.
- Mistake #5: Using Excess Oil/Butter on the Griddle. Too much fat creates a greasy edge instead of an even, golden brown crust. Use just enough to prevent sticking.
Variations & Customizations (Beyond the Basic Chip)
You’ve mastered the classic. Now, time to push the boundaries of breakfast!
1. Peanut Butter Chocolate Chip Pancakes
Replace 1/4 cup of the milk with 1/4 cup of melted smooth peanut butter. Whisk the peanut butter into the wet ingredients before folding. Add a handful of peanut butter chips along with the chocolate chips. Serve with a sprinkle of chopped peanuts.
2. Double Chocolate Espresso Pancakes
Add 1/4 cup of cocoa powder to the dry ingredients for a deep chocolate flavor. Mix in 1 teaspoon of instant espresso powder with the wet ingredients to enhance the chocolate. Use dark chocolate chips for extra bitterness.
3. Banana Split Pancakes (Dessert for Breakfast)
Add 1/2 cup of finely mashed ripe banana to the wet ingredients. After cooking, top the stack with a scoop of whipped cream, a drizzle of hot fudge or cherry syrup, and a few extra chocolate chips. You’re basically eating a banana split—it’s brilliant.
FAQ Section: Your Cheesy Queries, Answered
Q1: Can I make these pancakes gluten-free?
A: Yes! Substitute the all-purpose flour with a cup-for-cup gluten-free flour blend that contains xanthan gum. The rest of the recipe remains the same, but the resting time may need to be longer (up to 15 minutes).
Q2: Why are my chocolate chips sinking to the bottom?
A: Your batter is either too thin (add 1-2 extra tablespoons of flour) or you are overmixing. Also, try coating the chocolate chips in a tiny bit of flour before adding them to the batter; this helps them suspend.
Q3: How do I store and reheat leftovers?
A: Store cooled pancakes in an airtight bag or container in the refrigerator for up to 3 days. Reheat them in a toaster or toaster oven to make them crispy again.
Q4: Should I use milk or buttermilk?
A: The milk + vinegar hack provides the needed acid for fluffiness without the heaviness of true buttermilk, resulting in a lighter pancake. If you have buttermilk, use it, but reduce the baking powder slightly (to 1 teaspoon).
Q5: How do I prevent burnt chocolate chips?
A: Cook the pancakes on medium heat and avoid placing the chips directly on the griddle surface. If the griddle is too hot, the chips will scorch before the batter cooks.
Q6: Can I freeze these pancakes?
A: Yes! Freeze the cooked and cooled pancakes flat on a baking sheet, then transfer them to a freezer bag with parchment paper between them. Reheat straight from frozen in a toaster or microwave.
Q7: What is the best syrup for chocolate chip pancakes?
A: Pure maple syrup is the classic choice, but chocolate syrup or even a little cherry syrup adds serious decadence. Don’t forget a giant slice of cookie monster cake on the side!
Final Thoughts (The Stack is Yours)
You now hold the keys to the kingdom of ultimate breakfast indulgence. You’ve mastered the chocolate chip pancakes—they are fluffy, full of melted chocolate, and impossible to resist. No more sad, flat stacks! Go ahead, make a massive batch, freeze the extras, and tell that box mix it’s officially retired. I expect pictures of your perfectly stacked, syrup-drenched masterpieces. Go forth and conquer brunch!