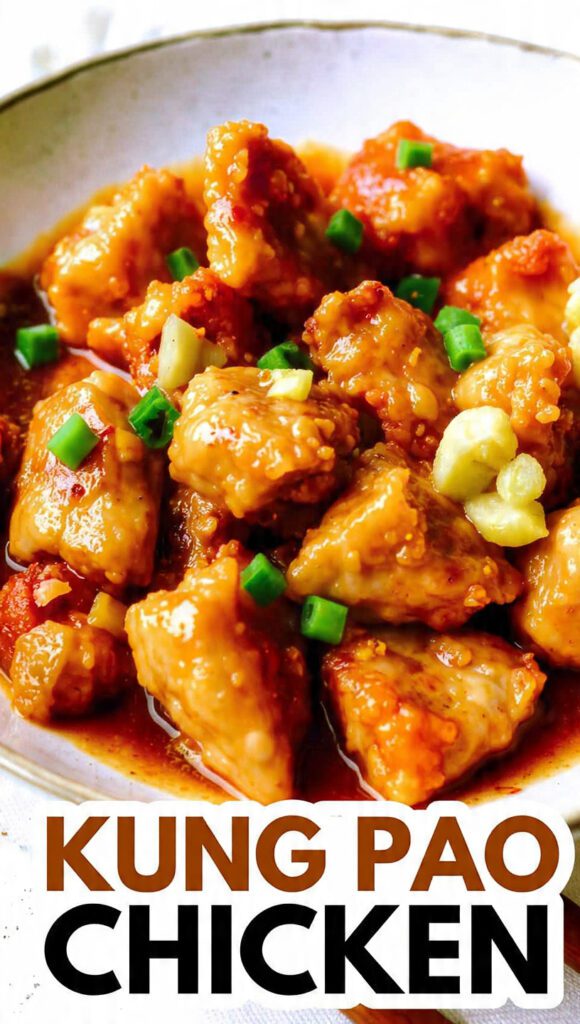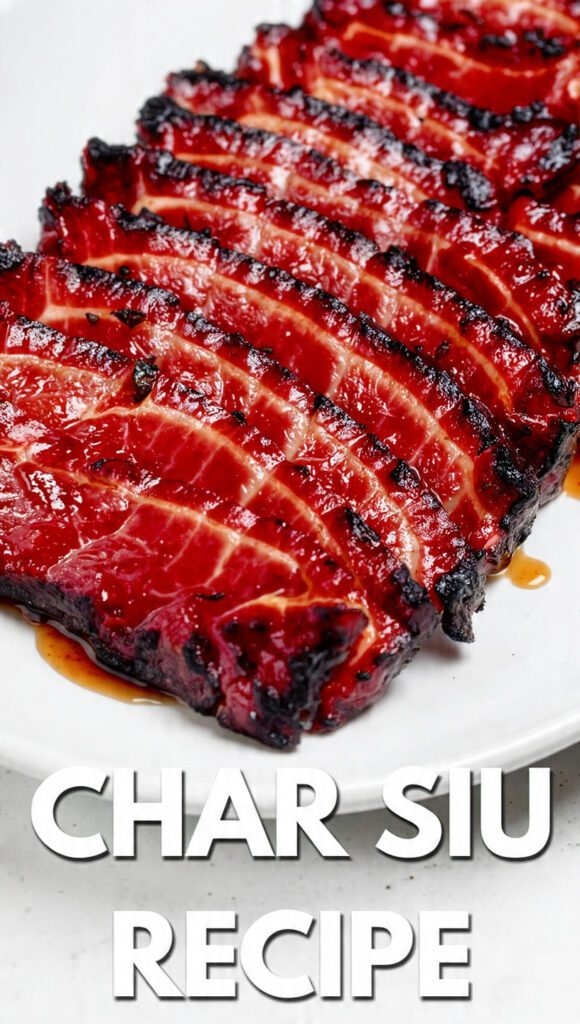
The Ultimate Authentic Char Siu Recipe: BBQ Pork That Beats Your Local Takeout
We have all been there. You are standing in front of a glowing red oven at a Chinese BBQ shop, staring at those glistening, mahogany-colored slabs of char siu hanging from hooks. You pay twelve dollars for a small container, take it home, and realize half of it is just gristle and disappointment. Why do we subject ourselves to “mystery meat” when we could be making world-class Cantonese BBQ in our own kitchens while wearing pajamas?

I remember the first time I tried to make this without a recipe; I used enough red food coloring to dye a small lake and accidentally created pork that looked like a radioactive brick. My roommate asked if I was cooking or performing a lab experiment. But after years of perfecting the glaze-to-meat ratio, I have finally mastered the art of the sticky, smoky finish. Do you want to be the legend who brings the best pork to the potluck? Or do you want to keep eating that dry, neon-pink stuff from the grocery store?
Why This Recipe Is the Absolute GOAT
Why should you bother marinating pork for 24 hours when you could just buy a jar of “BBQ sauce”? Because this recipe produces a level of umami that a bottle simply cannot compute. We are talking about the holy trinity of Cantonese flavors: salty soy, sweet honey, and that distinct, aromatic punch of five-spice powder. It is the ultimate culinary flex that makes your house smell like a Michelin-star noodle house.

Beyond the flavor, this dish is a total crowd-magnet. Serve a platter of this perfectly charred, thinly sliced pork, and your friends will forgive you for all those times you “forgot” to text back. It is surprisingly easy to cook once you nail the marinade, and IMO, it is the only way to eat pork shoulder. Ready to reclaim your kitchen throne and show that local BBQ shop who is boss?
The Ingredients: The Red Gold Lineup
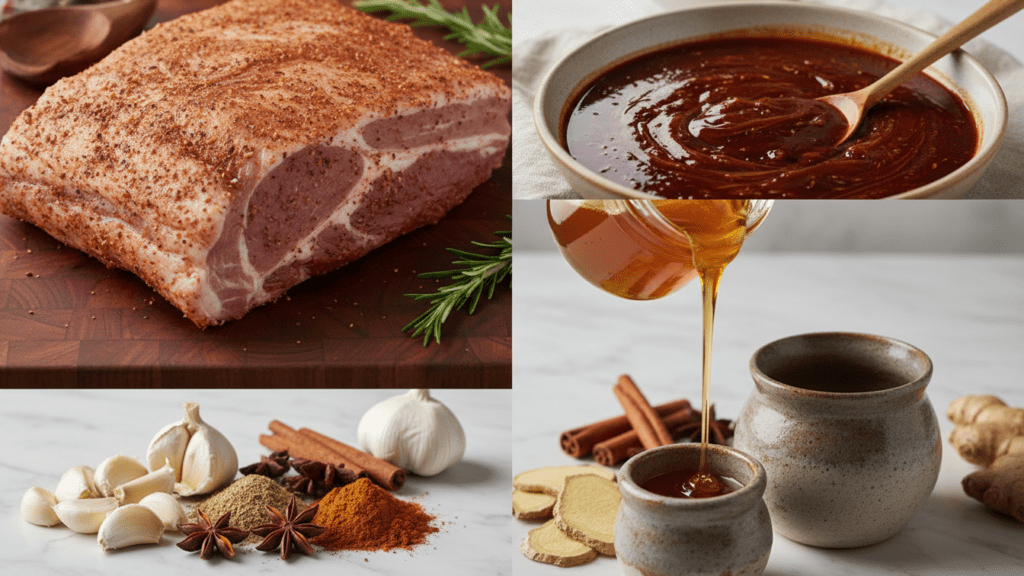
Don’t let the list intimidate you. Most of these are a quick trip to the Asian aisle or a click away on Amazon. If you try to skip the fermented bean curd, don’t come crying to me when your pork lacks “soul.”
- 2 lbs Pork Butt (Pork Shoulder): Cut into long, thick strips about 2 inches wide.
- 1/4 cup Honey: For that iconic, glass-like shine.
- 1/4 cup Hoisin Sauce: The thick, savory backbone of the marinade.
- 2 tbsp Soy Sauce & 1 tbsp Dark Soy Sauce: Dark soy is for that deep, moody color.
- 1 tbsp Red Fermented Bean Curd: The “secret” ingredient for authentic flavor and natural red color.
- 2 tbsp Shaoxing Rice Wine: For that floral, acidic kick.
- 1 tsp Five-Spice Powder: A little goes a long way, don’t overdo it!
- 3 cloves Garlic: Minced into a paste.
- 1 tsp Toasted Sesame Oil: For that nutty finish.
- Maltose (optional): For the truly hardcore who want that professional, sticky-finger glaze.
The Arsenal: Tools & Kitchen Gadgets
You don’t need a vertical roasting pit, but a few specific tools make the difference between a smoky masterpiece and a charred disaster.
- Large Ziploc Bag: The best vessel for a 24-hour marinade bath.
- Baking Sheet with a Wire Rack: Crucial! If the pork sits on the pan, it’ll boil in its own juices. We need airflow.
- Silicone Basting Brush: To paint on that liquid gold every ten minutes.
- Meat Thermometer: To ensure you aren’t serving pork “tartare.”
- Aluminum Foil: To line your pan, unless you enjoy scrubbing burnt sugar for three hours.
Step-by-Step Instructions: The Long Game
Step 1: The Meat Prep
Start by slicing your pork shoulder into long, uniform strips. Bold move: don’t trim all the fat! That fat renders down into juice that keeps the meat tender. Pat the meat dry with paper towels so the marinade sticks like glue.
Step 2: The Marinade Marriage
In a bowl, whisk together the hoisin, soy sauces, bean curd, wine, five-spice, garlic, and sesame oil. Reserve about 3 tablespoons of this mixture in a separate small jar for the final glaze. Toss the pork strips into a Ziploc bag with the rest of the sauce and massage it in. Let it sleep in the fridge for at least 12 hours—TBH, 24 hours is the sweet spot.
Step 3: The Setup
Preheat your oven to 400°F. Line your baking sheet with foil and place the wire rack on top. Arrange the pork strips on the rack, leaving space between them. Pour a little water into the bottom of the pan; this prevents the drippings from smoking out your kitchen.
Step 4: The First Roast
Slide the pork into the oven for 20 minutes. At this stage, the house will start smelling like heaven. While it roasts, mix your reserved marinade with the honey (and maltose if using) to create the “Mega Glaze.”
Step 5: The Glaze-and-Char Dance
Flip the pork and brush generously with the glaze. Roast for another 15 minutes. Now, turn the oven to Broil. Watch it like a hawk! Brush one last layer of glaze on and broil for 2-3 minutes per side until the edges turn black and “charred.” IMO, the burnt bits are the best part.
Step 6: The Rest and Slice
Remove the pork and let it rest for 10 minutes. If you cut it now, all the juice will run away and leave you with dry regrets. Slice into 1/4 inch pieces and serve over hot rice or in a bowl of ramen. Congratulations, you just won at life.
Calories & Nutritional Info

I’m going to be honest with you: this is BBQ pork. It’s high in protein, but we aren’t counting the honey calories today.
- Calories: ~380 kcal per serving.
- Protein: 28g (Pure muscle-building power!).
- Total Fat: 18g (The “delicious” kind of fat).
- Carbohydrates: 12g (Mostly from that glorious glaze).
- Sodium: Moderate-high (Drink some water, friend).
Common Mistakes to Avoid (The Cheeky Guide)
- Using Lean Meat: If you use pork loin, you are making a dry eraser. Stick to pork butt/shoulder.
- Skipping the Wire Rack: If you roast it flat on the pan, the bottom will be soggy and sad. Elevate your meat!
- Peeking Too Much: Keep the oven door shut. Every time you open it, you lose that intense heat needed for the char.
- Using “Red 40” instead of Bean Curd: If you want authentic flavor, use the fermented bean curd. Food coloring is for cupcakes, not BBQ.
Variations & Customizations
Feeling a little adventurous? Try these three spins on the classic:
- The “Air Fryer” Shortcut: You can air fry these at 360°F for 15-20 minutes, flipping and glazing every 5. It’s faster but yields slightly less char.
- The Spicy Dragon: Add 2 tbsp of Sriracha or Gochujang to the marinade. FYI, it’s not traditional, but it’s addictive.
- The Keto-ish Alternative: Swap the honey and hoisin for sugar-free alternatives and use liquid aminos. It’s a solid low-carb fix.
FAQ: Everything You’re Dying to Know
Why is Char Siu red?
Traditionally, it comes from the red fermented bean curd or red yeast rice. Modern shops use food coloring, but we prefer the OG fermented funk.
Can I make this with chicken?
Yes! Use chicken thighs with the skin on. They cook much faster, so check the temp after 20 minutes.
What is the best way to reheat it?
Never use the microwave unless you want rubber. Use a hot pan with a splash of water or the air fryer for 3 minutes.
Can I freeze the leftovers?
Absolutely. Char siu freezes beautifully. Slice it first so you can grab a handful for fried rice anytime.
Do I really need Maltose?
No, honey works fine. But maltose gives you that professional “tacky” feel that honey just can’t replicate.
Is this gluten-free?
Not usually, as hoisin and soy sauce contain wheat. Swap them for Tamari and GF hoisin to make it safe!
How long does it last in the fridge?
If it isn’t gone within 2 hours, it stays fresh for about 4 days. TBH, it never lasts that long.
Final Thoughts
There you have it—a char siu recipe that will make everyone forget you once struggled to boil an egg. It’s sweet, it’s salty, and it’s the perfect way to end a long week.
Go ahead, invite your friends over and act like this was incredibly difficult to make. I won’t tell them it mostly involved you sitting on the couch while the oven did the work. Just make sure you have plenty of rice ready. Happy roasting! 🙂