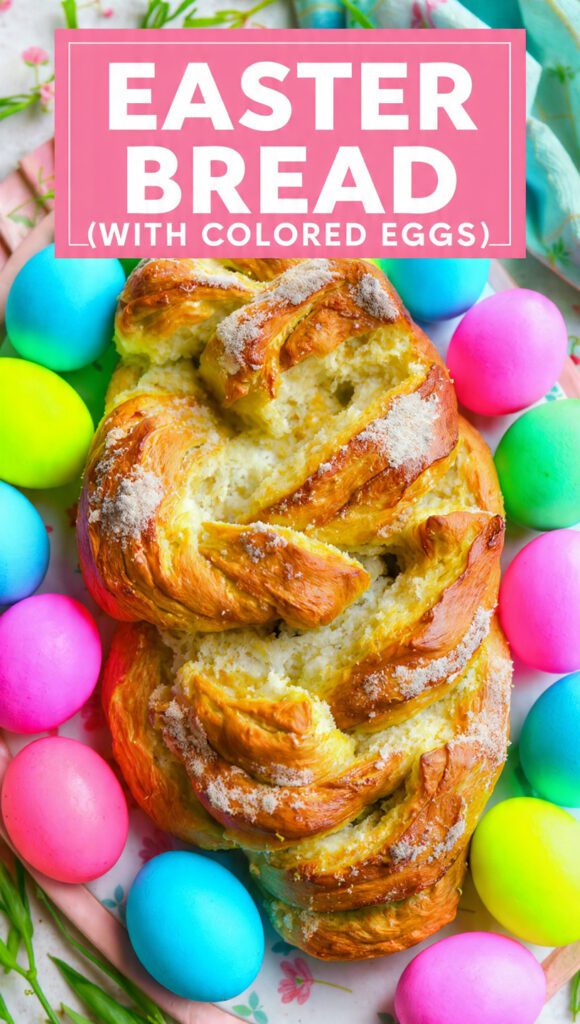
The Ultimate Easter Bread With Colored Eggs: A Festive Masterpiece That Beats The Bakery
We’ve all walked that dark path. You’re standing in the grocery store on Easter Saturday, staring at a plastic-wrapped loaf of easter bread with colored eggs that looks like it has the structural integrity of a tanned brick. You buy it anyway, thinking “it’s for the tradition,” and then spend the next three days using it as a very expensive doorstop. Why do we settle for store-bought cardboard when we can fill our kitchens with the scent of citrus, butter, and victory?

I once served a homemade loaf to my mother-in-law, and she actually stopped talking mid-sentence to take a second slice. If that isn’t a kitchen miracle, I don’t know what is. Making this at home sounds like a chore, but it’s actually the ultimate culinary flex. Are you ready to bake a bread so beautiful it’ll make your Instagram followers question their life choices? Let’s get kneading before the bunnies take over.
Why This Recipe Is The Undisputed GOAT
Why should you bother waiting for dough to rise when you could just eat a chocolate rabbit? Because this recipe produces a crumb so soft it feels like a cloud made of butter. We aren’t making dry, sad bread here; we are making an enriched Italian-style brioche that commands respect at the brunch table.

Beyond the ego boost of showing off those perfectly braided rings, the flavor profile is a total game-changer. We use real citrus zest and high-quality vanilla to create an aroma that will have your neighbors knocking on your door with empty plates. It’s festive, it’s vibrant, and IMO, it’s the best thing you can do with a dozen eggs this spring. Ready to ruin grocery store bread for your entire social circle?
The Goods: What You Need
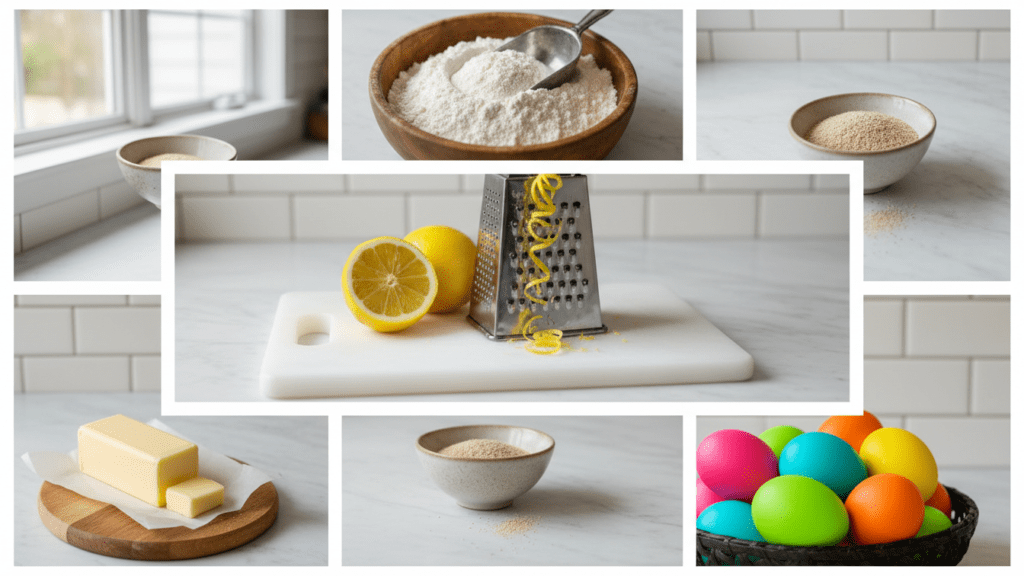
Don’t let the “braiding” scare you; the ingredient list is actually quite friendly. Just make sure your eggs are bright—sad colors make for sad bread.
- 4 cups Bread Flour: You need that gluten strength for the skyscraper rise.
- 1/2 cup Granulated Sugar: Just enough sweetness to keep things interesting.
- 1 packet (2 1/4 tsp) Active Dry Yeast: Check the date; dead yeast is a holiday buzzkill.
- 1 tsp Salt: To balance all that buttery goodness.
- 2/3 cup Whole Milk: Warm it up, but don’t boil the life out of it.
- 1/2 cup Unsalted Butter: Make sure it’s softened, or it won’t join the party properly.
- 2 Large Eggs (for the dough): Room temperature, please!
- 1 tsp Vanilla Extract & Zest of 1 Lemon: The “smells like happiness” duo.
- 5-6 Raw Easter Eggs (dyed): Do not hard-boil them first! They cook in the oven.
- 1 Egg + 1 tbsp Water: For that glorious golden egg wash.
- Rainbow Sprinkles: Because we are adults and we do what we want.
The Arsenal: Tools & Kitchen Gadgets
You don’t need a professional bakery, but a few specific tools make this process less of a workout and more of a craft. Grab these off Amazon if your current whisk looks like it survived a war.
- Stand Mixer with Dough Hook: Your arms will literally fall off if you try to knead this much butter by hand.
- Large Mixing Bowl: For the “nap time” rise.
- Digital Kitchen Scale: Baking is a science, not a suggestion. Stop “eyeballing” the flour.
- Silicone Basting Brush: For that buttery finish that makes the sprinkles stick.
- Baking Sheets & Parchment Paper: Essential! If they cool on the pan, the bottoms get soggy.
Step-by-Step Instructions: The Path to Glory
Step 1: Wake Up The Yeast
Start by whisking your yeast and a teaspoon of sugar into the warm milk. Let it sit for about 10 minutes until it looks like a frothy, beige cappuccino. If it doesn’t bubble, your yeast is probably expired, and you should start over before you waste the expensive butter. FYI, yeast is a living thing, treat it with respect.
Step 2: The Dough Build
In your stand mixer bowl, combine the flour, sugar, and salt. Pour in that fragrant milk mixture, the two eggs, vanilla, and lemon zest. Turn the mixer on low and let the dough hook work its magic. Once it looks shaggy, add the softened butter one tablespoon at a time. TBH, this part looks like a mess until it suddenly turns into silk.
Step 3: The First Nap
Move the dough to a greased bowl, cover it with a damp cloth, and find it a warm, draft-free home. Let it rise for about 1.5 to 2 hours or until it doubles in size. This is the perfect time to hide the “good” Easter candy from your kids or research why you didn’t start a bakery years ago.
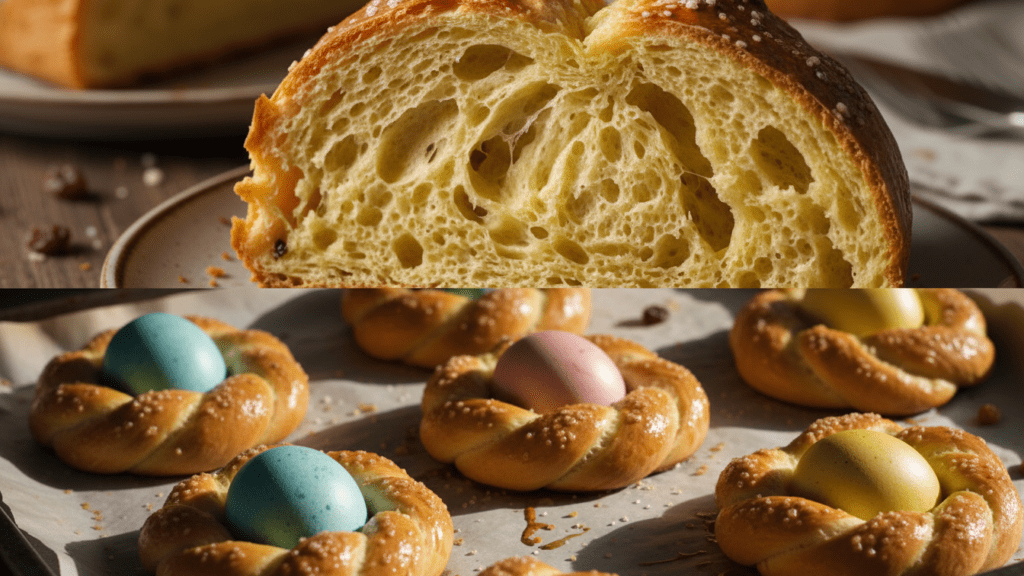
Step 4: The Braid and The Eggs
Gently deflate the dough and divide it into three long ropes (about 14 inches each). Braid them loosely together. You can make one large wreath or several mini ones. Nestle your dyed raw eggs into the crevices of the braid. Bold move: press them in deep so they don’t pop out like Jack-in-the-boxes in the oven.
Step 5: The Final Glow-Up
Let the shaped bread rise for another 45 minutes under a light cloth. Brush the dough (not the eggs!) generously with your egg wash. This is what gives it that “expensive bakery” sheen. Dump a literal mountain of sprinkles on top.
Step 6: Into The Heat
Slide the tray into a preheated 350°F oven. Bake for 20-25 minutes until the bread is deep golden brown and sounds hollow when tapped. The eggs inside will magically hard-boil to perfection while the bread bakes. Let it cool on a wire rack for at least 20 minutes before tearing into it like a hungry bunny.
Calories & Nutritional Info
I’m going to be honest with you: this is a buttery holiday treat. It’s high in protein from the eggs, but we aren’t counting the sugar.
- Calories: ~280 kcal per slice.
- Protein: 8g (Thanks, bread flour!).
- Total Fat: 11g (The butter is the hero here).
- Carbohydrates: 38g.
- Vitamin D: You get a nice hit from those baked eggs!
Common Mistakes to Avoid (The Cheeky Guide)
- Hard-Boiling Eggs First: If you boil the eggs before putting them in the oven, you’ll end up with rubbery, sulfur-smelling bouncy balls. Use raw dyed eggs!
- The Flour Trap: If the dough is sticky, don’t just dump in more flour! You’ll end up with a brick. Keep kneading; the gluten will find its way.
- Murdering the Yeast: If your milk is hotter than a hot tub, you will kill the yeast. Always use lukewarm liquid.
- Skipping the Egg Wash: Without it, your bread will look matte and sad. Glaze it like you mean it.
Variations & Customizations
Feeling a bit adventurous with your dough? Try these three spins:
- The Savory Twist: Skip the vanilla, lemon, and sugar. Add 1 cup of shredded Gruyère and chopped rosemary. It’s the ultimate brunch bread.
- The Chocoholic Version: Fold in 1 cup of dark chocolate chips during the final knead. Because Easter isn’t Easter without a chocolate overdose.
- The Keto-ish Swap: Replace the sugar with monk fruit and use almond flour/xanthan gum. FYI, it won’t be as fluffy, but it’ll satisfy the craving.
FAQ: Everything You’re Dying to Know
Why do we put eggs in Easter bread?
The egg is an ancient symbol of rebirth and new life, which fits the Easter theme perfectly. Plus, it looks cool.
Are the eggs safe to eat after baking?
Absolutely. They bake for about 25 minutes at 350°F, which is more than enough time to hard-boil them. Just don’t wait three days to eat them.
Can I make the dough ahead of time?
Yes! You can do the first rise in the fridge overnight. This actually develops a deeper flavor. Just let it come to room temperature before braiding.
Why is my bread dry?
You likely overbaked it or added too much flour. Use a digital scale next time—flour is sneaky!
Do I have to use dyed eggs?
You can use plain white or brown eggs, but where’s the fun in that? We’re here for the neon aesthetic.
Can I freeze the leftovers?
Yes! Wrap slices tightly in plastic wrap. They make the best French toast you’ve ever had on day four.
What if the eggs crack in the oven?
It happens to the best of us. Just tell everyone it’s “rustic” and “artisanal.”
Final Thoughts
There you have it—a easter bread with colored eggs recipe that will make you the star of the season. It’s a bit of a process, sure, but the smell of that lemon-scented dough baking in your oven is worth every minute of kneading.
Go ahead, invite your friends over, set the table, and enjoy the best bread of your life. Just don’t blame me when you can never go back to the store-bought version again. Happy baking! 🙂