The Two-Step Revolution: Your Guide to Brisk Kefir (And a Smug Gut)
Let’s be real: buying probiotic drinks is basically just paying for marketing buzz and tiny bottles of watery disappointment. You want that creamy, tangy, gut-health hero known as kefir, but you think making it requires a lab coat and a degree in microbiology. Wrong! Making Brisk Kefir is possibly the lowest-effort, highest-reward thing you will ever do in your kitchen. It’s a two-step process that takes less effort than deciding which streaming service to watch tonight. Seriously, we’re talking about putting milk in a jar with some weird, cauliflower-like organisms and then… waiting. Prepare to ascend to the next level of smug self-sufficiency.
Why This Recipe Is Awesome (And Why Your Wallet Will Love You)
This isn’t just about fermentation; it’s about winning at life. Why is making your own kefir so awesome?
- Budget Boss: Kefir grains live forever and multiply. You buy them once, and they keep giving you kefir for the cost of milk. You’re basically printing money (in the form of tangy, thick dairy).
- Probiotic Powerhouse: Homemade kefir typically contains a wider, more diverse array of probiotics than the stuff sitting sadistically on the supermarket shelf. You are feeding your gut the good stuff.
- The Flavor Flex: Store-bought kefir is often thin and heavily sweetened. You control the tang and the thickness here. Do you like it mild and slightly sweet? Ferment for 12 hours. Do you like it so sour it makes your eyes water? Ferment for 36 hours! You are the master of your tang.
Ingredients: All Killer, No Filler

You need two things. Two! The rest are just for fun and process.
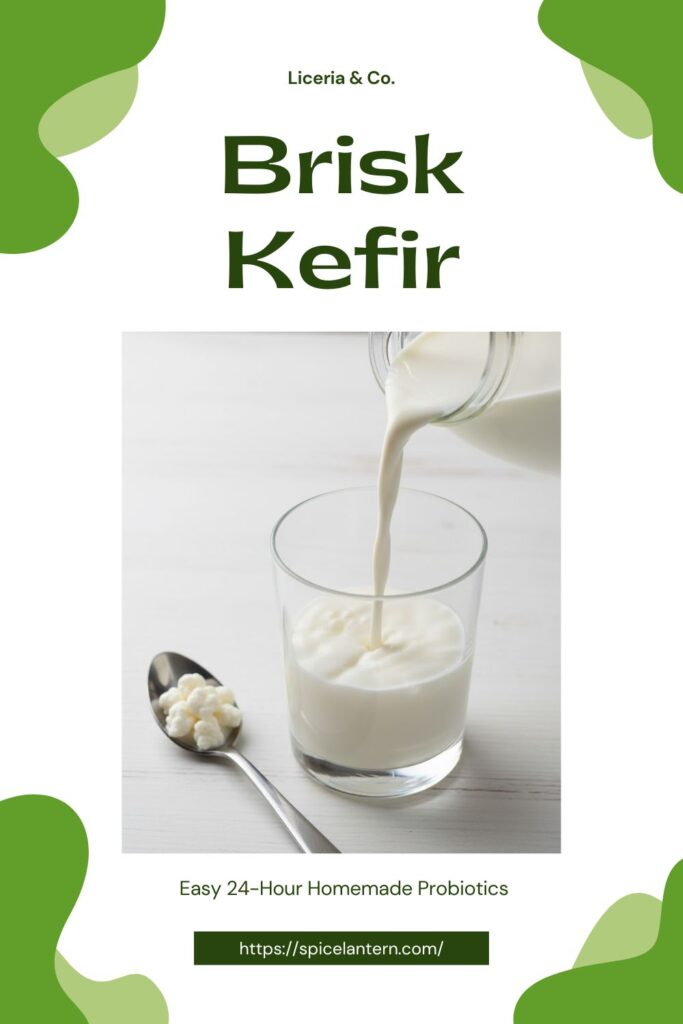
- 1 Tablespoon Active Milk Kefir Grains: These are the little microbial rock stars. You need to buy these dehydrated or get them fresh from a friend. They look like tiny cauliflower florets.
- 2-3 Cups Whole Milk (or 2%): Fresh, pasteurized dairy milk is preferred. The fat gives you a thicker, richer kefir, which is always the goal.

Key Substitutions:
- Dairy Milk: You can use coconut milk or almond milk for dairy-free kefir, but FYI, the grains do best if you “refresh” them in dairy milk every few batches to keep them happy and strong.
- Grains: You absolutely cannot substitute the grains with powdered kefir starter for this continuous, reusable method. The grains are the reusable power source.
Tools & Kitchen Gadgets Used: Minimalist Microbiology
Don’t overcomplicate it. You just need a vessel and something to fish out the grains.
- Glass Mason Jar (Quart or Half-Gallon size): Glass is non-reactive and preferred. Don’t use copper or aluminum containers—acidic liquids and metal are not friends.
- Plastic or Stainless Steel Strainer: CRITICAL for separating the grains. Avoid fine mesh strainers where the grains might get stuck. Stainless steel is considered safe for short contact, but plastic is best.
- Wooden or Plastic Spoon/Spreader: For gently stirring and transferring the grains. Avoid metal spoons for prolonged contact.
- Breathable Lid (Coffee Filter, Cheesecloth, or Cloth with Rubber Band): Kefir needs air! Don’t seal the jar tightly, or you might end up with an exploding mess (due to CO2 buildup).
- Storage Jars: For storing your strained, finished kefir in the fridge.
Step-by-Step Instructions: The Two-Step Dance to Deliciousness
This is so easy, you’ll be slightly annoyed you didn’t start sooner.
Step 1: The Primary Ferment (24 Hours of Magic)
- Gently place the kefir grains into your clean glass jar.
- Pour the 2-3 cups of milk over the grains. Use a ratio of about 1 tablespoon of grains per 2 cups of milk to start. Too many grains means a very fast, very sour ferment.
- Cover the jar with your breathable lid (coffee filter and rubber band are perfect). You need to allow the naturally occurring CO2 to escape.
- Place the jar in a warm spot (68°F to 77°F / 20°C to 25°C) out of direct sunlight. The back of the counter works great.
- Let it ferment for 12 to 24 hours. Watch for signs of readiness: You’ll see the milk thicken slightly, and sometimes a few pockets of clear liquid (whey) will separate from the thick curds. It will also smell pleasantly sour/tangy.
Step 2: Strain and Repeat (The Daily Ritual)
- Once the kefir looks thick and smells right, gently stir the contents with a plastic or wooden spoon to loosen the grains.
- Pour the entire contents of the jar through your plastic or stainless steel strainer into a clean bowl or container. Give it a gentle shake to help the thicker kefir liquid pass through. Do not force the grains through!
- The thick liquid in the bowl is your delicious Brisk Kefir! Transfer it to a storage jar and seal it for the fridge.
- The tiny clumps left in the strainer are your kefir grains. Transfer them back to the original jar, add a fresh batch of milk, and start over at Step 1! You never wash the grains.
Calories & Nutritional Info: The Healthy Scoop (Estimated)

These estimates are for 1 cup (8oz) of homemade kefir made with whole milk.
- Calories per serving (1 cup): ~110-140 calories
- Protein: ~8-10g
- Carbohydrates (Lactose): ~8-12g
- Probiotics: Counts in the billions across dozens of strains (take that, store-bought yogurt!)
- Nutritional Note: The fermentation process significantly reduces the lactose content, making kefir much easier for many people with lactose intolerance to digest.
Common Mistakes to Avoid: Don’t Starve Your Little Friends
Kefir grains are incredibly resilient, but they still have rules. Don’t be a bad host!
- Starving the Grains: Leaving the grains in the milk for longer than 48 hours risks over-fermenting, which means the grains run out of food (lactose) and become stressed. Ferment for 24 hours max until you know your grain-to-milk ratio perfectly.
- Sealing the Jar Tightly: Pressure builds up, and you risk a fizzy explosion. Always use a breathable cover.
- Using Soap/Chemicals on Grains: Never wash your grains with soap. This kills the beneficial bacteria. A quick rinse of the jar with water (not the grains) is fine, but many purists just reuse the jar.
- Forcing the Grains: Don’t press the grains through the strainer with a spoon. You damage them. Let the kefir strain naturally. Gently shaking the strainer is enough.
- Cold Temperature Confusion: Do not ferment kefir in the fridge! Cold temperatures put the grains into a dormant state. The grains need room temperature to thrive and multiply.
Variations & Customizations: Kefir, But Fun
Once you have your strained Brisk Kefir (the “First Ferment”), you can do the “Second Ferment” to add fizz and flavor!
- Fruity Fizz: Pour the strained kefir into a sealed bottle (like a Grolsch bottle). Add 1 tablespoon of chopped fruit (berries, lemon peel, ginger) and ½ teaspoon of sugar/honey (optional, but feeds the yeast). Leave it at room temperature for another 4-8 hours. This creates natural carbonation! Chill completely before opening!
- Savory Salad Dressing: Skip the second ferment. Mix 1 cup of finished kefir with dill, garlic powder, salt, and pepper. You now have a high-protein, tangy ranch substitute for salads or dips.
- Overnight Oat Upgrade (Dairy Swap): Use your finished kefir instead of milk or yogurt in your overnight oats recipe. The tartness is incredible with fruit and nuts. This is my favorite way to eat it, TBH.
FAQ Section: Your Cultured Queries Answered
You’ve got questions about these little organisms. Let’s get cultured!
Q1: What happens to the lactose in the milk?
A: The bacteria and yeast in the kefir grains consume the lactose (milk sugar) and turn it primarily into lactic acid. This is what gives kefir its tangy flavor and makes it significantly lower in lactose than milk, benefiting those with lactose intolerance.
Q2: How often do I need to feed the grains?
A: You need to feed the grains every 24 hours by adding a fresh batch of milk, or they will start to starve. If you need a break, you can place them in a small amount of fresh milk in the fridge for up to a week (the cold slows them down).
Q3: How do I know if my kefir is ready?
A: The milk will thicken (it won’t be as thin as milk anymore), and you might see streaks or pockets of clear/yellowish whey separating from the thicker white curds. It will also have a distinctly sour/tangy, yogurty smell.
Q4: Why is my kefir very thin and watery?
A: Usually, the cause is too few grains for the amount of milk (not enough microbes to process the lactose quickly), or the room temperature is too cold. Increase the grain-to-milk ratio or find a warmer spot.
Q5: Can I use a metal strainer or spoon?
A: Stainless steel is generally considered safe for the short periods needed for straining. However, many fermenters prefer plastic simply to eliminate any potential risk of leaching or grain damage from prolonged exposure to reactive metals.
Q6: Do the kefir grains multiply?
A: Yes! If they are happy and healthy (fed regularly and kept warm), the grains will grow and multiply. This means you need to add more milk to maintain the same fermentation time, or you can give the excess grains away to a friend!
Q7: Should I wash the jar between batches?
A: Yes, we recommend using a clean jar for each new batch. You don’t need to sterilize it with harsh chemicals, but a simple wash with hot water and mild soap (rinse thoroughly!) prevents excessive buildup of yeast and old milk residue.
Final Thoughts: The Easiest Health Hack Ever
You are now the proud parent of a thriving colony of gut-health heroes. You mastered Brisk Kefir, and you did it with barely any effort. The store-bought stuff seems sad and overpriced now, doesn’t it? Go enjoy your creamy, tangy, homemade goodness. I expect you to share your excess grains with the next poor soul who complains about their expensive probiotic drink.