❄️ Melt-in-Your-Mouth Magic: The Best Almond Snowball Cookies Recipe
Okay, let’s talk holiday cookies. You’ve got your cut-outs (fun, but high effort), your chocolate chip (classic, but boring), and then you have the undisputed champion of elegance and sheer deliciousness: the snowball cookie. But we’re not just making any snowball. We’re making the glorious, buttery, nutty almond snowball cookies recipe. These are the cookies that look like delicate little puffs of snow but deliver an explosion of rich, almond flavor that will make your guests weep happy tears. Is this cookie pretentious? Maybe a little. But it earns it.
✨ Why This Almond Cookie is the Ultimate Showstopper

You need these cookies in your life because they are the definition of melt-in-your-mouth perfection. Unlike dry, crispy cookies, these little puffs are intensely buttery and crumble beautifully the second they hit your tongue. It’s pure cookie science, executed flawlessly.
The secret weapon here is the almond flour and almond extract combination. This double dose of almond gives the cookie a profound, nutty flavor far superior to boring plain shortbread. Plus, let’s be honest, they look fantastic on a holiday platter. They are effortlessly elegant, require zero frosting, and only take about 10 minutes of hands-on mixing. Low effort, maximum aesthetic. Are you convinced yet?
🌰 The All-Star Ingredients Lineup
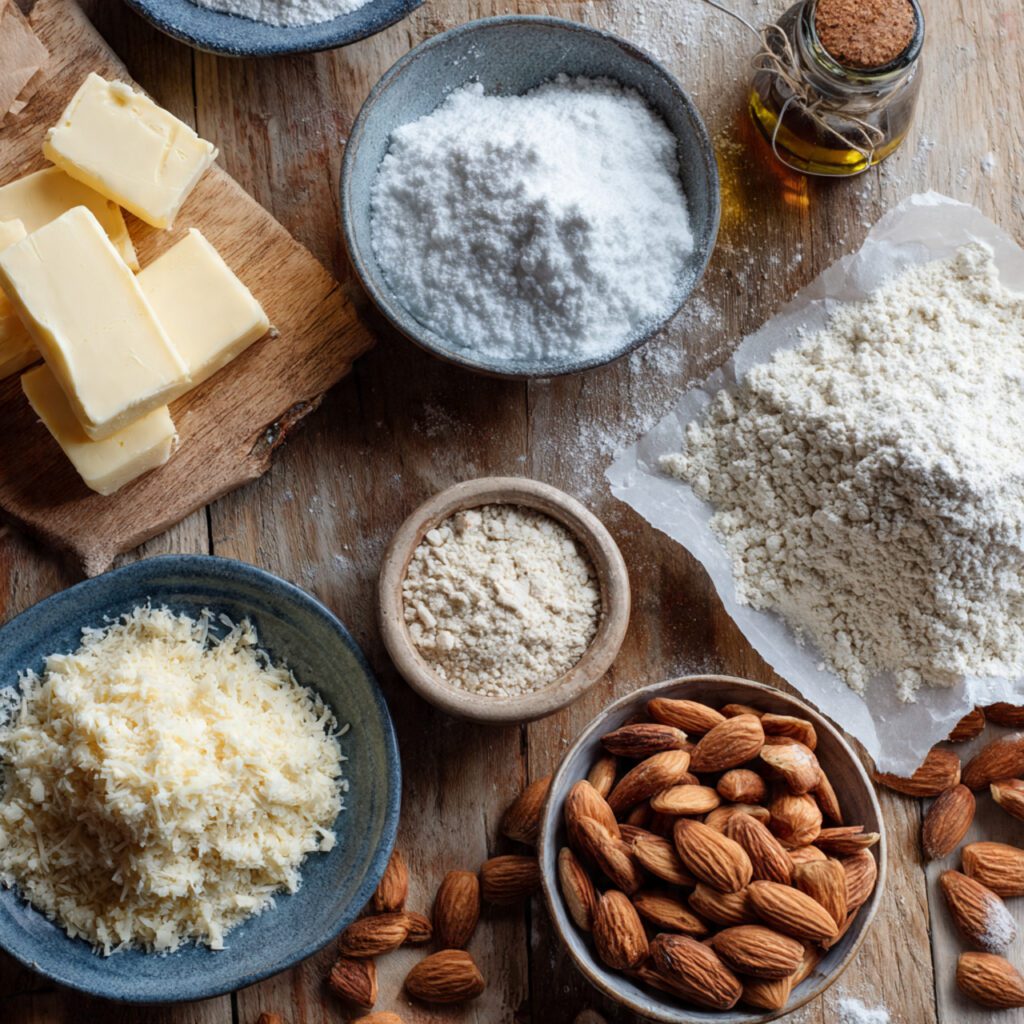
This recipe is simple, but every ingredient plays a crucial role in achieving that signature melt-away texture. Freshly toasted nuts are non-negotiable!
H3 The Cookie Core
- 1 cup (2 sticks) Unsalted Butter: Softened to room temperature. This is a very butter-forward cookie, so use quality butter!
- 1/2 cup Powdered Sugar: Sifted, plus 1 cup for rolling (the “snow”).
- 1 teaspoon Vanilla Extract: Standard flavor base.
- 1 teaspoon Almond Extract: The flavor powerhouse! Do not skip this.
- 1/4 teaspoon Salt: Essential for balance.
H3 The Dry Essentials
- 2 cups All-Purpose Flour: Spooned and leveled (don’t pack it!).
- 1 cup Finely Ground Almonds: You can use almond flour, or quickly pulse blanched almonds in a food processor. Toast the nuts first for deeper flavor!
🛠️ Tools & Kitchen Gadgets Used
This recipe is simple, but a few tools make that dough come together perfectly.
- Electric Hand Mixer or Stand Mixer: Essential for creaming the butter and sugar until light and fluffy.
- Large Mixing Bowl: For combining the dough.
- Food Processor (Optional): Great for grinding almonds finely if you don’t use pre-made almond flour.
- Sifter/Fine Mesh Sieve (Optional): Highly recommended for sifting the powdered sugar for the coating.
- Baking Sheets: For baking (obviously).
- Parchment Paper or Silicone Baking Mats: For non-stick baking.
- Small Cookie Scoop: For uniform cookie size (the secret to even baking).
- Wire Cooling Rack: For cooling the cookies.
- Shallow Dish: For the powdered sugar rolling process.
🚀 Step-by-Step Instructions: Rolling in the Snow
This dough is fast, but it requires a quick chill. Don’t rush the process—perfection takes patience (but not much!).
H3 Mix the Dough
- Cream the Butter and Sugar: In your large mixing bowl, beat the softened butter and 1/2 cup of powdered sugar with your mixer until the mixture is light and fluffy (about 2-3 minutes). Scrape down the sides of the bowl.
- Add Extracts and Salt: Beat in the vanilla extract, almond extract, and salt until fully combined. This is going to smell amazing, BTW.
- Incorporate Dry Ingredients: In a separate bowl, whisk together the flour and ground almonds. Gradually add this dry mixture to the butter mixture on low speed. Mix only until the dough just comes together. It will be thick and crumbly. Do not overmix!
H3 Chill, Scoop, and Bake
- Chill the Dough: Wrap the dough tightly in plastic wrap and chill it in the refrigerator for at least 30 minutes. This prevents the cookies from spreading too much and makes them easier to roll. Seriously, don’t skip the chill.
- Preheat and Scoop: Preheat your oven to 350°F (175°C). Using a small cookie scoop, scoop the dough and roll it into perfect 1-inch balls between your palms. Place them 1 inch apart on the prepared baking sheets.
- Bake to Pale Perfection: Bake for 12-15 minutes. These cookies should stay pale and light in color. The bottoms should be set, but the tops should still look soft. Over-baking makes them dry and defeats the purpose.
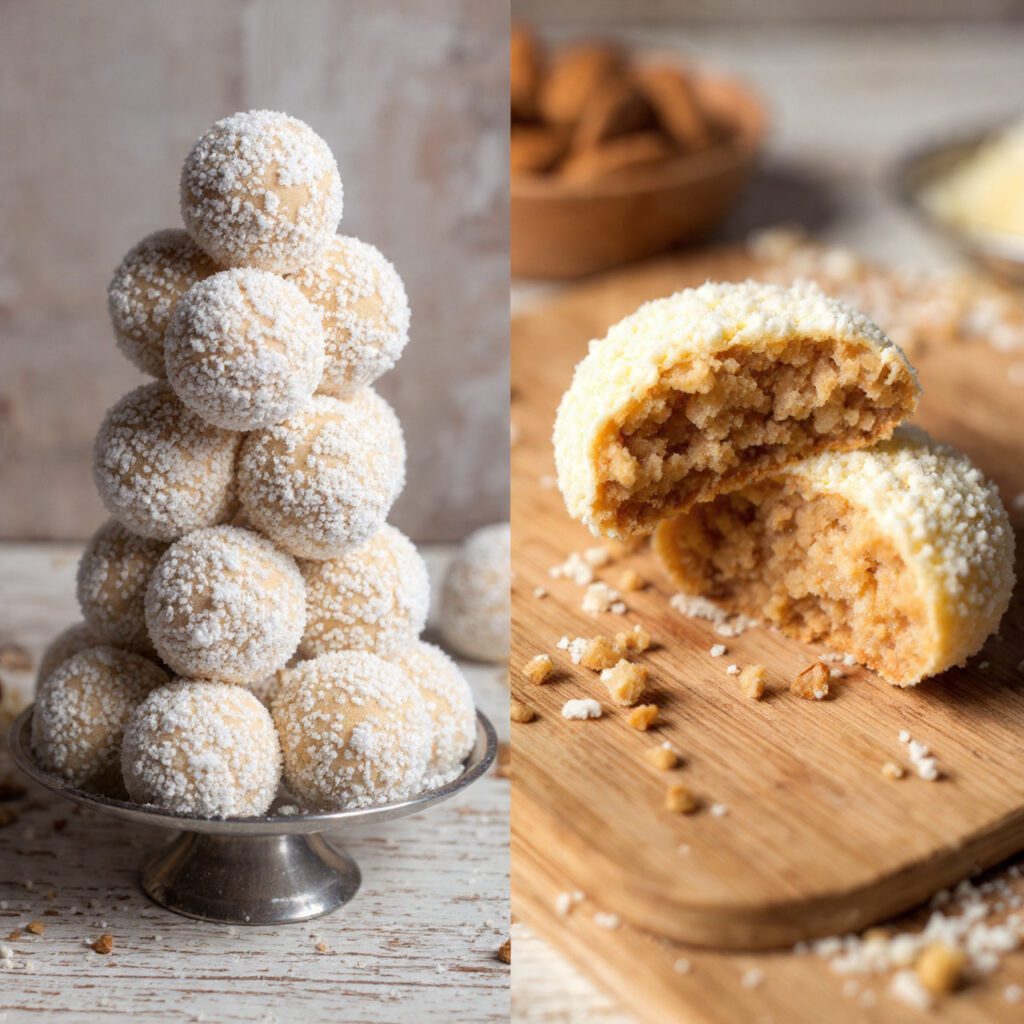
H3 The Double Roll (The Snow Effect)
- First Roll (Hot!): While the cookies are still hot (seriously, 5 minutes out of the oven max!), roll them gently in the bowl of powdered sugar. The sugar will melt slightly and create a beautiful base layer.
- Cool Completely: Transfer the cookies to the wire rack and let them cool completely. They must be 100% cool before the second roll.
- Second Roll (Cold!): Once fully cooled, roll the cookies again in fresh powdered sugar. This final coat creates that beautiful, snowy, melt-in-your-mouth finish. Now, go impress someone!
📊 Calories & Nutritional Info
Yes, these are butter cookies, but they are also tiny! These are estimated notes per serving (assuming 36 cookies per batch).
- Estimated Calories Per Cookie: ~100-120 kcal (These are small, but they are buttery!).
- Macronutrient Notes:
- High Fat: Butter is the main component, providing richness and tenderness.
- Nutrient Boost: Almonds provide healthy fats, Vitamin E, and a touch of protein and fiber.
- Low Sugar (Relatively): The dough uses very little sugar; most of the sweetness comes from the coating.
- Note: These are a treat. Don’t pretend you are eating kale. Enjoy the butter!
🛑 Common Mistakes to Avoid (Hockey Pucks vs. Snowballs)
Want tender, perfect snowballs? Avoid these common disasters.
- Using Warm Dough: If the dough is too warm, the butter melts before the flour sets, causing the cookies to spread into flat disks instead of staying spherical. Chill the dough!
- Over-Baking: These are not meant to be deeply golden brown. Bake until they are just set and still pale. Over-baking makes them hard and dry.
- Skipping the First Powdered Sugar Roll: The first roll, done while the cookie is hot, melts the sugar slightly and creates a sticky base for the second coat. Skipping this step results in a sugar coating that falls off easily.
- Overmixing the Dough: This develops the gluten, resulting in tough, chewy cookies. Mix only until the flour is just incorporated into the butter mixture.
- Using Salted Butter: This cookie has very specific seasoning. Using salted butter throws off the flavor balance, and you can’t control the salt content precisely. Stick to unsalted butter and add the salt separately.
🌶️ Variations & Customizations: Your Cookie, Your Rules
Want to try something slightly different? Go for it!
H3 Citrus Zest Snowballs
Give them a bright, fragrant twist. Omit the almond extract. Add 1 tablespoon of fresh orange zest and 1/2 teaspoon of fresh lemon zest to the creamed butter mixture. The citrus notes are surprisingly refreshing against the buttery base.
H3 Hazelnut Mocha Snowballs
Go rich and decadent. Substitute the ground almonds with finely ground hazelnuts. Add 1 teaspoon of instant espresso powder (dissolved in 1/2 teaspoon of vanilla) to the wet ingredients. The chocolatey coffee flavor pairs beautifully with the hazelnut.
H3 Keto-Friendly Pecan Snowballs
Make it low-carb! Substitute the all-purpose flour with additional almond flour (you may need a tablespoon or two more). Substitute the powdered sugar in the dough and the coating with a powdered sugar substitute like erythritol or monk fruit sweetener. The texture will be slightly different, but still tender!
❓ FAQ Section: Your Burning Cookie Questions Answered
Everyone has questions about these delicate, buttery beauties.
H3 Are almond snowball cookies the same as Russian Tea Cakes or Mexican Wedding Cookies?
Yes! They are all essentially the same buttery, nutty shortbread cookie rolled in powdered sugar. The difference is usually the nut used (pecan for Mexican, walnut for Russian, almond for these) and sometimes a slight variation in flour type.
H3 Why do my snowball cookies flatten out?
Flat cookies usually mean the dough was too warm (butter melted too fast) or you used too much liquid (by accidentally adding too much butter or not enough flour). Always chill the dough and make sure your butter is softened, not melted.
H3 Can I make the dough ahead of time?
Absolutely! You can store the wrapped dough in the refrigerator for up to 5 days or freeze it for up to 3 months. Thaw frozen dough overnight in the fridge before scooping and baking.
H3 How do I store almond snowball cookies?
Store them in an airtight container at room temperature for up to 1 week. Because they have a protective sugar coating, they hold up very well. They also freeze beautifully after being baked and rolled.
H3 Do I have to roll them twice in powdered sugar?
Yes, if you want the maximum “snowball” effect! The first roll sticks to the warm, buttery surface and creates a base. The second roll adheres to the fully cooled cookie and provides that beautiful, delicate, melt-away finish.
H3 Should I use raw or toasted almonds?
Toasted almonds (or almond flour) give a deeper, richer, nuttier flavor. Toast them lightly in a dry skillet for 5 minutes until fragrant before grinding. If you use raw, the flavor will be milder.
H3 My cookies came out dry and crumbly—what went wrong?
You likely over-baked them. These cookies are meant to be baked briefly and remain pale. Also, if you used too much flour (by packing it into the measuring cup), the dry ingredients overpowered the butter. Spoon and level your flour!
🎉 Final Thoughts: Go Forth and Spread the Snow!
Congratulations! You’ve mastered the almond snowball cookies recipe. You’ve conquered the double roll, honored the pale aesthetic, and created a batch of cookies so buttery and tender, they practically dissolve on the tongue. You are officially ready for any cookie swap, holiday party, or Tuesday night craving.
Go ahead, enjoy the fact that you’ll never have to buy one of those sad, stale store-bought versions again. Why would you, when you make magic? Now, which holiday tin are you going to store these beauties in? 😉